Spring Data Elasticsearch使用方式(Elasticsearch)
目录
- 1. 项目部署
- 1.1 添加依赖
- 1.2 配置application.yml 文件
- 1.3 测试是否注入成功
- 2. 操作
- 2.1 索引库操作
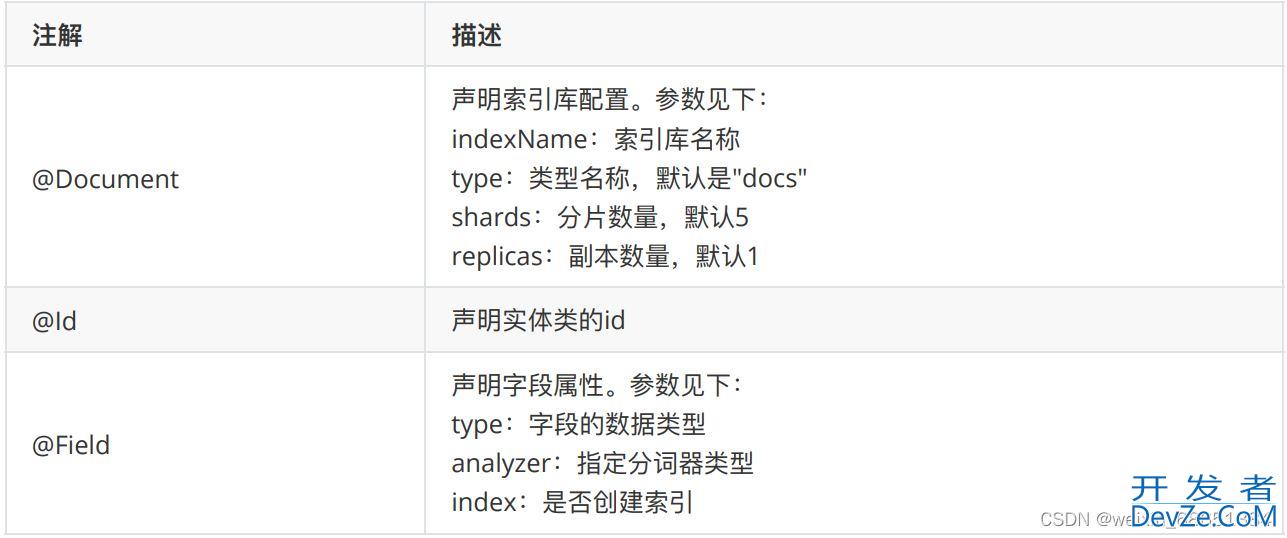
- 2.1.1 实体类注解
- 2.1.2 创建映射
- 2.2 索引数据CRUD操作
- 2.2.1 创建索引数据
- 2.2.2 查询索引数据
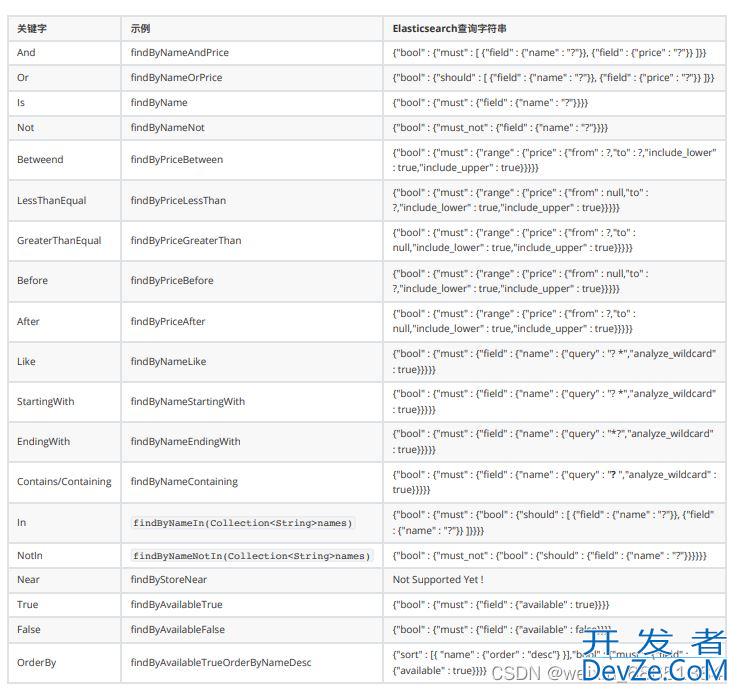
- 2.2.3 ⾃定义⽅法查询
- 2.3 原⽣查询案例
- 总结
1. 项目部署
1.1 添加依赖
在项目的 pom.XML 中引⼊Spring Data Elasticsearch的启动器。
<dependency>
 <groupId>org.springframework.boot</groupId>
 <artifactId>spring-boot-starter-data-elasticsearch</artifactId>
</dependency>
1.2 配置application.yml 文件
spring:
 data:
   elasticsearch:
     cluster-name: csdn-elastic
     cluster-nodes: 127.0.0.1:9301,127.0.0.1:9302,127.0.0.1:9303
需要注意的是,Spring Data Elasticsearch底层使⽤的不是Elasticsearch提供的RestHighLevelClient,⽽是 TransportClient,并不采⽤HTTP协议通信,⽽是访问Elasticsearch对外开放的TCP端⼝。
我们在之前集群配置 中,设置的端⼝分别是:9301、9302、9303。
1.3 测试是否注入成功
在test测试⽂件夹下的com.csdn.es包下创建⼀个SpringDataESTests测试类。通过@Autowired注解对 ElasticsearchTemplate进⾏注⼊,测试对象是否可以获取到。
package com.csdn.es;
import org.junit.Test;
import org.junit.runner.RunWith;
import org.springframework.beans.factory.annotation.Autowired;
import org.springframework.boot.test.context.SpringBootTest;
import org.springframework.data.elasticsearch.core.ElasticsearchTemplate;
import org.springframework.test.context.junit4.SpringRunner;
@RunWith(SpringRunner.class)
@SpringBootTest
public class SpringDataESTests {
 @Autowired
 private ElasticsearchTemplate template;
 @Test
 public void check() {
 System.err.println(template);
 }
}
注: 使用 Spring Data Elasticsearch 是springboot 版本不能太高,建议使用 2.1.6.RELEASE 版本。如果有 Rest Client 版本太高也会注入失败,建议使用 6.4.3 。
2. 操作
2.1 索引库操作
2.1.1 实体类注解
1.我们在Product实体类上添加下⾯的⼀些注解。
package com.csdn.pojo;
import lombok.AllArgsConstructor;
import lombok.Data;
import lombok.NoArgsConstructor;
import org.springframework.data.annotation.Id;
import org.springframework.data.elasticsearch.annotations.Document;
import org.springframework.data.elasticsearch.annotations.Field;
import org.springframework.data.elasticsearch.annotations.FieldType;
@Data
@NoArgsConstructor
@AllArgsConstructor
@Document(indexName = "csdn", type = "product", shards = 3, replicas = 1)
public class Product {
 @Id
 private Long id;
 @Field(type = FieldType.Text, analyzer = "ik_max_word")
 private String title; // 标题
 @Field(type = FieldType.Keyword)
 private String category; // 分类
 @Field(type = FieldType.Keyword)
 private String brand; // 品牌
 @Field(type = FieldType.Double)
 private Double price; // 价格
 @Field(type = FieldType.Keyword, index = false)
 private String images; // 图⽚地址
}

2.在SpringDataESTests类中定义创建索引的createIndex()⽅法。
@Test
public void createIndex() {
 // 创建索引库,并制定实体类的字节码
 template.createIndex(Product.class);
}
2.1.2 创建映射
刚才的注解已经把映射关系也配置上了,所以创建映射只需要这样:
@Test
public void createMapping() {
 template.putMapping(Product.class);
}
2.2 索引数据CRUD操作
SDE的索引数据CRUD操作并没有封装在ElasticsearchTemplate类中,⽽是有⼀个叫做ElasticsearchRepository的 接⼝中。
在com.csdn.respository包下⾃定义ProductRepository接⼝,并继承ElasticsearchRespository接⼝。
package com.csdn.respository;
import com.yx.pojo.Product;
import org.springframework.data.elasticsearch.repository.ElasticsearchRepository;
public interface ProductRepository extends ElasticsearchRepository<Product, Long> {

}
2.2.1 创建索引数据
1.先来看单个创建。在SpringDataESTests类中定义addDocument()⽅法。
@Autowired
private ProductRepository productRepository;
@Test
public void addDocument() {
 Product product = new Product(1L, "⼩⽶⼿机Mix", "⼿机", "⼩⽶", 2899.00,
"http://image.yx.com/12479122.jpg");
 // 添加索引数据
 productRepository.save(product);
}
2.再来看批量创建。在SpringDataESTests类中定义addDocuments()⽅法。
@Test
public void addDocuments() {
 // 准备⽂档数据
 List<Product> list = new ArrayList<>();
 list.add(new Product(2L, "坚果⼿机R1", "⼿机", "锤⼦", 3699.00,
"http://image.yx.com/12479122.jpg"));
 list.add(new Product(3L, "华为META20", "⼿机", "华为", 4499.00,
"http://image.yx.com/12479122.jpg"));
 list.add(new Product(4L, "⼩⽶Pro", "⼿机", "⼩⽶", 4299.00,
"http://image.yx.com/12479122.jpg"));
 list.add(new Product(5L, "荣耀V20", "⼿机", "华为", 2799.00,
"http://image.yx.com/12479122.jpg"));
 // 添加索引数据
 productRepository.saveAll(list);
}
2.2.2 查询索引数据
1.根据id查询数据
@Test
public void findById() {
 Optional<Product> optional = productRepository.findById(1L);
 Product defaultProduct = new Product();
 defaultProduct.setTitle("默认商品数据");
 // orElse(T other)⽅法:如果Optional对象中封装的泛型为null,则将orElse()⽅法的参数作为返回值
 Product product = optional.orElse(defaultProduct);
 System.err.println(product);
}
2.查询所有数据
@Test
public void findAll() {
 Iterable<Product> list = productRepository.findAll();
 list.forEach(System.err::println);
}
2.2.3 ⾃定义⽅法查询

在ProductRepository接⼝中定义根据商品的价格区间查询商品数据的findByPriceBetween()⽅法。
/**
* 根据商品的价格区间查询商品数据
* @param from 开始价格
* @param to 结束价格
* @return 符合条件的商品数据
*/
List<Product> findByPriceBetween(Double from, Double to);
⽆需写实现,SDE会⾃动帮我们实现该⽅法,我们只需要⽤即可。在SpringDataESTests类中定义 findByPriceBetween()⽅法。
@Test
public void findByPriceBetween() {
 List<Product> products = productRepository.findByPriceBetween(3000d, 5000d);
 products.forEach(System.err::println);
}
2.3 原⽣查询案例
在com.csdn.mapper包下⾃定义搜索结果映射ProductSearchResultMapper类。
package com.csdn.esclient;

import com.google.gson.Gson;
import org.elasticsearch.action.search.SearchResponse;
import org.elasticsearch.search.SearchHit;
import org.elastwww.devze.comicsearch.search.SearchHits;
import org.elasticsearch.common.text.Text;
import org.elasticsearch.search.fetch.subphase.highlight.HighlightField;
import org.springframework.data.domain.Pageable;
import org.springframework.data.elasticsearch.core.SearchResultMapper;
import org.springframework.data.elasticsearch.core.aggregation.AggregatedPage;
import org.springframework.data.elasticsearch.core.aggregation.impl.AggregatedPageImpl;

import Java.util.ArrayList;
import java.util.List;
import java.util.Map;

/**
 * 1.接口 SearchResultMapper 表示用来自定义查询结果映射,将结果按照开发者的配置,进行重组,然后返回客户端
 * 2.重python写 mapResults
 */
/** ⾃定义查询结果映射,⽤于处理⾼亮显示 */
public class ProductSearchResulMapper implements SearchResultMapper {
    @Override
    public <T> AggregatedPage<T> mapResults(SearchResponse searchResponse, Class<T> aClass, Pageable pageable) {
        // 记录总条数
        long totalHits = searchResponse.getHits().getTotalHits();
        // 记录列表(泛型) - 构建Aggregate使⽤
        List<T> list = new ArrayList<>();
        // 获取搜索结果(真正的的记编程录)
        SearchHits hits = searchResponse.getHits();
        Gson gson = new Gson();
        for (SearchHit hit : hits) {
            if (hits.getHits().length <= 0) {
                return null;
            }
            // 将原本的jsON对象转换成Map对象
            Map<String, Object> map = hit.getSourceAsMap();
            // 获取⾼亮的字段Map
            Map<String, HighlightField> highlightFields = hit.getHighlightFields();
            for (Map.Entry<String, HighlightField> highlightField : highlightFields.entrySet()) {
                // 获取⾼亮的Key
                String key = highlightField.getKey();
                // 获取⾼亮的Value
                HighlightField value = highlightField.getValue();
                // 实际fragments[0]就是⾼亮的结果,⽆需遍历拼接
                Text[] fragments = value.getFragments();
                // 因为⾼亮的字段必然存在于Map中,就是key值
                map.put(key, fragments[0].toString());
            }
            // 把Map转换成对象
            T item = gson.fromJson(gson.toJson(map), aClass);
            list.add(item);
        }
        // 返回的是带分⻚的结果
        return new AggregatedPageImpl<>(list, pageable, totalHits);
    }
}
Java测试类:
package com.csdn.es;

import com.qf.esclient.ProductSearchResulMapper;
import com.qf.pojo.Product;
import org.elasticsearch.index.query.QueryBuilders;
import org.elasticsearch.search.aggregations.AggregationBuilders;
import org.elasticsearch.search.fetch.subphase.highlight.HighlightBuilder;
import org.junit.Test;
import org.junit.runner.RunWith;
import org.springframework.beans.factory.annotation.Autowired;
import org.springframework.boot.test.context.SpringBootTest;
import org.springframework.data.domain.PageRequest;
import org.springframework.data.domain.Sort;
import org.springframework.data.elasticsearch.core.ElasticsearchTemplate;
import org.springframework.data.elasticsearch.core.aggregation.AggregatedPage;
import org.springframework.data.elasticsearch.core.query.FetchSourceFilter;
import org.springframework.data.elasticsearch.core.query.NativeSearchQueryBuilder;
import org.springframework.test.context.junit4.SpringRunner;

import java.util.List;

@SpringBootTest
@RunWith(SpringRunner.class)
public class SpringDataESTests {

    @Autowired
    private ElasticsearchTemplate template;

    @Test
    public void test01() {
        // 1.创建原生查询语句构建
        NativeSearchQueryBuilder builder = new NativeSearchQueryBuilder();
        // 2.通过NativeSearchQueryBuilder指定过滤器条件
        builder.withSourceFilter(new FetchSourceFilter(null,null));
        // 3.添加词条搜索条件
        builder.withQuery(QueryBuilders.matchQuery("title","手机"));
        // 4.分页操作:当前页其实位置的下标
        builder.withPageable(PageRequest.of(0, 2, Sort.by(Sort.Direction.ASC,
                "price")));
        // 5.高亮显示 TODO
        HighlightBuilder.Field field = new HighlightBuilder.Field("title");
        field.preTags("<span style='color:red'>");
        field.postTags("</span>");
        builder.withHighlightFields(field);

        // 6.聚合:分组。参数解析:terms()方法指定分组的名称(聚合名称)
        builder.addAggregation(AggregationBuilders.terms("brandAgg").field("brand"));
        // 7.构建查询的条件,并且执行查询
        AggregatedPage<Product> packages = template.queryForPage(builder.build(), Product.class,new ProductSearchResulMapper());


        long total = packages.getTotalElements();
        int totalPages = packages.getTotalPages();http://www.devze.com
        List<Product> list = packages.getContent();
        System.out.println("总条数:" + total);
        System.out.println("总⻚数:" + totalPages);
        System.out.println("数据:");
        list.forEach(System.out::println);


        // 聚合
        /**
        Aggregations aggregations = packwww.devze.comages.getAggregations();
        // 导包org.elasticsearch.search.aggregations.bucket.terms.Terms
        Terms terms = aggregations.get("brandAgg");
        terms.getBuckets().forEach(b -> {
            System.err.println("品牌:" + b.getKeyAsString());
            System.err.println("count:" + b.getDocCount());
        });
         */
    }

}
总结
以上为个人经验,希望能给大家一个参考,也希望大家多多支持编程客栈(www.devze.com)。


 加载中,请稍侯......
精彩评论