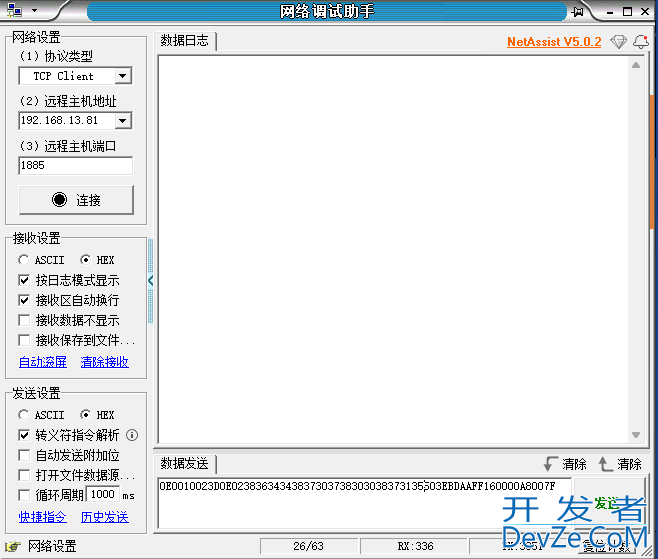
使用java项目搭建一个netty服务
映入依赖,只要保证有这个依赖,就不需要单独引入依赖,支持多个端口直连,支持多个实现层解析数据,
  <groupId>org.springframework.boot</groupId>
  <artifactId>spring-boot-starter-data-Redis</artifactId>
  <version>3.3.4</version>
yml配置
# TCP设备对接
iot:
  device:
    port1: 1883
    port2: 1885
package com.cqcloud.platform.handler;

import org.springframework.beans.factory.annotation.Value;
import org.springframework.stereotype.Component;

import com.cqcloud.platform.service.IotNbIotMqttService;
import com.cqcloud.platform.service.IotPushService;
import com.cqcloud.platform.service.implwww.devze.com.IotNbIotServiceImpl;
import com.cqcloud.platform.service.impl.IotPushServiceImpl;

import io.netty.bootstrap.ServerBootstrap;
import io.netty.channel.ChannelFuture;
import io.netty.channel.ChannelInitializer;
import io.netty.channel.ChannelPipeline;
import io.netty.channel.nio.NioEventLoopGroup;
import io.netty.channel.socket.SocketChannel;
import io.netty.channel.socket.nio.NIOServerSocketChannel;
import jakarta.annotation.PostConstruct;
/**
 * @author weimeilayer@gmail.com ✨
 * @date  2022年3月8日
 */
@Component
public class NettyTcpServer {
	/**
	 * 用于自设备1协议端口
	 */
    private static int PORT1;
    /**
     * 来自设备2协议端口
     */
    private static int PORT2;

    @Value("${iot.device.port1}")
    public int port1Value;

    @Value("${iot.device.port2}")
    public int port2Value;

    @PostConstruct
    public void init() {
        PORT1 = port1Value;
        PORT2 = port2Value;
    }

	public void start() throws Exception {
		final NioEventLoopGroup bossGroup = new NioEventLoopGroup();
	    final NioEventLoopGroup workerGroup = new NioEventLoopGroup();
	    try {
	        ServerBootstrap bootstrap = new ServerBootstrap();
	        // 创建 MqttService 和 MqttPushService 实例
	        IotNbIotMqttService iotNbIotMqttService = new IotNbIotServiceImpl();
	        IotPushService iotPushService = new IotPushServiceImpl();

	        bootstrap.group(bossGroup, workerGroup)
	            .channel(NioServerSocketChannel.class)
	            .childHandler(new ChannelInitializer<SocketChannel>() {
	                @Override
	                protected void initChannel(SocketChannel ch) {
	                    ChannelPipeline pipeline = ch.pipeline();
	                    // 直接使用 ByteBuf,无需编码器和解码器
	                    // 根据端口注入不同的服务
	                    if (ch.localAddress().getPort() == PORT1) {
	                        pipeline.addLast(new TcpIotNbServerHandler(iotNbIotMqttService)); // 业务逻辑处理器
	                    } else if (ch.localAddress().getPort() == PORT2) {
	                        pipeline.addLast(new TcpIotServerHandler(iotPushService)); // 新处理器
	             编程客栈       }
	                }
	            });

	        // 绑定第一个端口并启动
	        ChannelFuture future1 = bootstrap.bind(PORT1).sync();
	        // 绑定第二个端口并启动
	        ChannelFuture future2 = bootstrap.bind(PORT2).sync();

	        // 等待服务器关闭
	        future1.channel().closeFuture().sync();
	        future2.channel().closeFuture().sync();
	    } finally {
	        // 优雅地关闭线程池
	        workerGroup.shutdownGracefully();
	        bossGroup.shutdownGracefully();
	    }
	}
}
启动类需要
public static void main(String[] args) throws IOException {
		ConfigurableEnvironment env = new SpringApplication(DynamicYearningApplication.class).run(args).getEnvironment();
		String envPort = env.getProperty("server.port");
		String port = Objects.isNull(envPort) ? "8000" : envPort;
		String envContext = env.getProperty("server.servlet.context-path");
		String contextPath = Objects.isNull(envContext) ? "" : envContext;
		String path = port + contextPath + "/doc.html";
		String externalAPI = InetAddress.getLocalHost().getHostAddress();
		Console.log("Access URLs:\n\t--------------------------------------------编程客栈-----------------------------\n\tLocal-swagger: \t\thttp://127.0.0.1:{}\n\tExternal-swagger: \thttp://{}:{}\n\t-------------------------------------------------------------------------",path, externalAPI, path);
		// 加上以下代码
		NettyTcpServer server = new NettyTcpServer();
		try {
			server.start();
		} catch (Exception e) {
			e.printStackTrace();
		}
	}
创建TcpIotServerHandler
package com.cqcloud.platform.handler;

import com.baomidou.myBATisplus.core.conditions.query.LambdaQueryWrapper;
import com.baomidou.mybatisplus.core.toolkit.StringPool;
import com.cqcloud.platform.entity.IotCommandRecords;
import com.cqcloud.platform.service.IotPushService;
import com.cqcloud.platform.utils.DeviceActionParser;
import io.netty.buffer.ByteBuf;
import io.netty.buffer.Unpooled;
import io.netty.channel.ChannelHandlerContext;
import io.netty.channel.SimpleChannelInboundHandler;
import lombok.extern.slf4j.Slf4j;

import Java.util.HashMap;
import java.util.List;
import java.util.Map;
import java.util.Optional;

/**
 * 设备协议
 * @author weimeilayer@gmail.com ✨
 * @date  2022年3月8日
 */
@Slf4j
public class TcpIotServerHandler extends SimpleChannelInboundHandler<ByteBuf>  {

	// 接口注入
	private final IotPushService iotPushService;

	public TcpIotServerHandler(IotPushService iotPushService) {
		this.iotPushService = iotPushService;
	}
	@Override
	protected void channelRead0(ChannelHandlerContext ctx, ByteBuf in) throws Exception {
		byte[] byteArray;
		if (in.readableBytes() <= 0) {
			in.release();
			return;
		}
		byteArray = new byte[in.readableBytes()];
		in.readBytes(byteArray);
		if (byteArray.length <= 0) {
			in.release();
			return;
		}
		// 将消息传递给 iotPushService
		iotPushService.pushMessageArrived(byteArray);
	}
	// 发送响应的统一辅助方法
	private void sendResponse(ChannelHandlerContext ctx, String hexResponse) {
		byte[] responseBytes = hexStringToByteArray(hexResponse);
		ByteBuf responseBuffer = Unpooled.copiedBuffer(responseBytes);
		ctx.writeAndFlush(responseBuffer);
	}

	@Override
	public void exceptionCaught(ChannelHandlerContext ctx, Throwable cause) {
		// 打印异常堆栈跟踪,便于调试和错误排查
		cause.printStackTrace();
		// 关闭当前的通道,释放相关资源
		ctx.close();
	}
}
创建 TcpIotNbServerHandler
package com.cqcloud.platform.handler;

import com.cqcloud.platform.service.IotNbIotMqttService;

import io.netty.buffer.ByteBuf;
import io.netty.buffer.Unpooled;
import io.netty.channel.ChannelHandlerContext;
import io.netty.channel.SimpleChannelInboundHandler;

/**
 * NB-IOT CAT1数据格协议
 *
 * @author weimeilayer@gmail.com
 * @date 2022年3月8日
 */
public class TcpIotNbServerHandler extends SimpleChannelInboundHandler<ByteBuf> {
	private final IotNbIotMqttService iotNbIotMqttService;

	// 构造函数注入 MqttService
	public TcpIotNbServerHandler(IotNbIotMqttService iotNbIotMqttService) {
		this.iotNbIotMqttService = iotNbIotMqttService;
	}

	@Override
	public void channelRead0(ChannelHandlerContext ctx,ByteBuf in) {
		byte[] byteArray;
		if (in.readableBytes() <= 0) {
			in.release();
			return;
		}
		byteArray = new byte[in.readableBytes()];
		in.readBytes(byteArray);
		if (byteArray.length <= 0) {
			in.release();
			return;
		}
	    // 将 byte[] 数据传递给 iotNbIotMqttService
	    iotNbIotMqttService.messageArrived(byteArray);
		//发送固定事件默认回复
        sendResponse(ctx);
	}

	// 发送响应的统一辅助方法
    private void sendResponse(ChannelHandlerContext ctx) {
    	// 回复客户端--向设备回复AAAA8001(设备将保持20秒不休眠),平台尽量在10秒
    	byte[] responseBytes = new byte[] { (byte) 0xAA, (byte) 0xAA, (byte) 0x80, (byte) 0x01 };
        ByteBuf responseBuffer = Unpooled.copiedBuffer(responseBytes);
        ctx.writeAndFlush(responseBuffer);
    }

    //将响应消息转换为字节数组
    public static byte[] hexStringToByteArray(String s) {
        int len = s.length();
        byte[] data = new byte[len / 2];
        for (int i = 0; i < len; i += 2) {
            data[i / 2] = (byte) ((Character.digit(s.charAt(i), 16) << 4)
                    + Character.digit(s.charAt(i + 1), 16));
        }
        return data;
    }
	@Ovwww.devze.comerride
	public void exceptionCaught(ChannelHandlerContext ctx, Throwable caQOhZaVIcuse) {
		cause.printStackTrace();
		ctx.close();
	}
}
创建接口类IotPushService
package com.cqcloud.platform.service;

/**
 * @author weimeilayer@gmail.com
 * @date 2022年3月8日
 */
public interface IotPushService {
	public void pushMessageArrived(byte[] message);
}
创建IotNbIotMqttService 类
package com.cqcloud.platform.service;

/**
 * @author weimeilayer@gmail.com
 * @date 2022年3月8日
 */
public interface IotNbIotMqttService {

	public void messageArrived(byte[] message);
}
创建实现类IotNbIotServiceImpl
package com.cqcloud.platform.service.impl;

import org.springframework.stereotype.Service;

import com.cqcloud.platform.service.IotNbIotMqttService;
import com.cqcloud.platform.utils.DataParser;

import lombok.AllArgsConstructor;

/**
 * @author weimeilayer@gmail.com
 * @date 2022年3月8日
 */
@Service
@AllArgsConstructor
public class IotNbIotServiceImpl implements IotNbIotMqttService {

	@Override
	public void messageArrived(byte[] message) {
		// 将 byte 数组转换为十六进制字符串
		String convertData = printByteArray(message);
		// 打印字节数组内容
		System.out.println("来自于xxx数据格式协议的1883端口的数据字节数组内容:"+ convertData);
        //调用解析方法
        dispatchMessage(convertData);
	}

	// 将 byte[] 转换为十六进制字符串的辅助方法
    public static String bytesToHex(byte[] bytes) {
        StringBuilder hex = new StringBuilder();
        for (byte b : bytes) {
            // 将每个字节转换为两位的十六进制表示
            hex.append(String.format("%02X", b));
        }
        return hex.toString();
    }

	public static String printByteArray(byte[] byteArray) {
		StringBuilder hexString = new StringBuilder();
		for (byte b : byteArray) {
			// 将字节转换为无符号的十六进制字符串,去掉空格
			hexString.append(String.format("%02X", b & 0xFF));
		}
		System.out.println("Byte Array (Hex): " + hexString.toString());
		return hexString.toString();
	}

	public void dispatchMessage(String byteArray) {
        String prefix = byteArray.substring(0, 2);
        // 根据 messageID 进行判断
          System.out.println("来自于数据格式协议来自于1883端口的数据处理消息:" +byteArray);
	}
}
创建 IotPushServiceImpl
package com.cqcloud.platform.service.impl;

import org.springframework.stereotype.Service;

import com.cqcloud.platform.service.IotPushService;
import com.cqcloud.platform.utils.DeviceActionParser;

import lombok.AllArgsConstructor;

/**
 * 发送指令实现类
 * @author weimeilayer@gmail.com
 * @date 2022年3月8日
 */
@Service
@AllArgsConstructor
public class IotPushServiceImpl implements IotPushService {

	@Override
	public void pushMessageArrived(byte[] message) {
		// 解析字节数组
		System.out.println("来自物联网平台的设备协议于1885端口的数据设备返回的的内容处理");
		//打印数据
		printByteArray(message);
		//调用解析方法
		dispatchMessage(message);
	}

	//设备回复的接受内容
	public static void dispatchMessage(byte[] byteArray) {

	}

	public static void printByteArray(byte[] byteArray) {
		StringBuilder hexString = new StringBuilder();
		for (byte b : byteArray) {
			// 将字节转换为无符号的十六进制字符串,去掉空格
			hexString.append(String.format("%02X", b & 0xFF));
		}
		System.out.println("Byte Array (Hex): " + hexString.toString());
	}

	 // 将十六进制字符串转换为字节数组的实用方法
    public static byte[] stringToBytes(String s) {
        int len = s.length();
        byte[] data = new byte[len / 2];
        for (int i = 0; i < len; i += 2) {
            data[i / 2] = (byte) ((Character.digit(s.charAt(i), 16) << 4)
                                  + Character.digit(s.charAt(i+1), 16));
        }
        return data;
    }
	// 提取设备类型的十六进制字符串
    private static String extractDeviceTypeHex(byte[] byteArray) {
        // 转换为十六进制字符串
        String hexString = bytesToHex(byteArray);
        // 提取设备类型
        return hexString.substring(10, 12); // 设备类型的位数
    }

    // 辅助方法:将字节数组转换为十六进制字符串
    private static String bytesToHex(byte[] bytes) {
        StringBuilder hexString = new StringBuilder();
        for (byte b : bytes) {
            String hex = Integer.toHexString(0xFF & b);
            if (hex.length() == 1) {
                hexString.append('0'); // 确保每个字节都为两位
            }
            hexString.append(hex);
        }
        return hexString.toString().toUpperCase(); // 返回大写格式
    }

    // 将十六进制字符串转换为 byte
    private static byte hexStringToByte(String hex) {
        return (byte) Integer.parseInt(hex, 16);
    }
}
然后使用网络根据助手请求。

以上就是使用java项目搭建一个netty服务的详细内容,更多关于java搭建netty服务的资料请关注编程客栈(www.devze.com)其它相关文章!


 加载中,请稍侯......
精彩评论