kotlin实现快递与号码归属地查询案例详解
目录
- 一.快递查询开发
- 二.号码地查询开发
一.快递查询开发
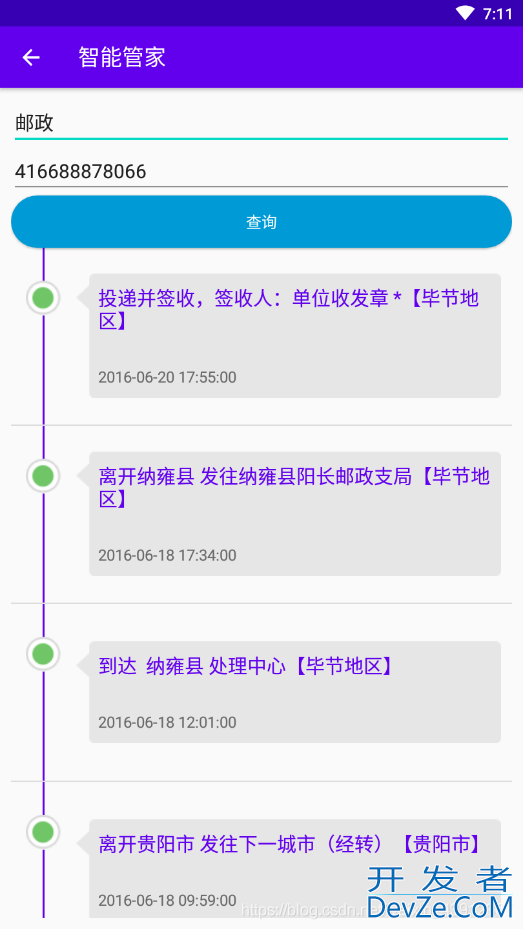
此效果展示:

1.新建CourierActivity,编写界面交互代码:
<?XML version="1.0" encoding="utf-8"?>
<LinearLayout xmlns:android="http://schemas.android.com/apk/res/android"
    android:layout_width="match_parent"
    android:layout_height="match_parent"
    xmlns:tools="http://schemas.android.com/tools"
    android:orientation="vertical"
    android:padding="10dp"
    tools:context=".ui.CourierActivity">
    <EditText
        android:id="@+id/et_name"
        android:layout_width="match_parent"
        android:layout_height="wrap_content"
        android:hint="@string/text_courier_company"
        android:text="zto"/>
    <EditText
        android:id="@+id/et_number"
        android:layout_width="match_parent"
        android:layout_height="wrap_content"
        android:hint="@string/text_courier_number"
        android:text="416688878066"/>
    <Button
        android:id="@+id/btn_get_courier"
        android:layout_width="match_parent"
        android:layout_height="wrap_content"
        android:background="@drawable/button_bg"
        android:text="查询"
        android:textColor="@android:color/white"/>
    <ListView
        android:id="@+id/mListView"
        android:layout_width="match_parent"
        android:layout_height="0dp"
        android:scrollbars="none"
        android:layout_weight="1"/>
</LinearLayout>
2.编写Kotlin界面交互代码:
package com.zrc.smartbutler.ui
import android.os.Bundle
import android.text.TextUtils
import android.widget.Toast
import com.kymjs.rxvolley.RxVolley
import com.kymjs.rxvolley.client.HttpCallback
import com.zrc.smartbutler.R
import com.zrc.smartbutler.adapter.CourierAdapter
import com.zrc.smartbutler.entity.CourierData
import com.zrc.smartbutler.utils.L
import kotlinx.android.synthetic.main.activity_courier.*
import org.json.JSONException
import org.json.JSONObject
import Java.util.*
import kotlin.collections.ArrayList
// 快递查询
class CourierActivity : BaseActivty() {
     var mList = ArrayList<CourierData>()
    override fun onCreate(savedInstanceState: Bundle?) {
        super.onCreate(savedInstanceState)
        setContentView(R.layout.activity_courier)
        back()
        initView();
    }
    private fun initView() {
        //查询
        btn_get_courier.setOnClickListener {
            /**
             * 1.获取输入框的内容
             * 2.判断是否为空
             * 3.拿到数据去请求数据(JSON)
             * 4.解析JSON
             * 5.ListView适配器
             * 6.实体类(item)
             * 7.设置数据/显示效果
             */
            //1.获取输入框的内容
            val name = et_name.text.trim()
            val number = et_number.text.trim()
            //拼接URL
            val url = "http://10.0.2.2/abc.json"
            //2.判断是否为空
            if(!TextUtils.isEmpty(name) and !TextUtils.isEmpty(number)){
                //3.拿到数据去请求数据(Json)
                RxVolley.get(url, object : HttpCallback() {
                    override fun onSuccess(t: String) {
                        //Toast.makeText(, t, Toast.LENGTH_SHORT).show();
                        L().i("Courier:$t")
                        //4.解析Json
                        parsingJson(t)
                    }
                })
            }else{
                Toast.makeText(this,"输入框不能为空",Toast.LENGTH_SHORT).show()
            }
        }
    }
    //解析数据
    private fun parsingJson(t: String) {
        try {
            val jsonObject = JSONObject(t)
            val jsonResult = jsonObject.getJSONObject("result")
            val jsonArray = jsonResult.getJSONArray("list")
            for (i in 0 until jsonArray.length()) {
                val json = jsonArray[i] as JSONObject
                val data = CourierData()
                data.setRemark(json.getString("remark"))
                data.setZone(json.getString("zone"))
                data.setDatetime(json.getString("datetime"))
                mList.add(data)
            }
            //倒序
            Collections.reverse(mList)
            L().i("Courier:$mList")
            val adapter = CourierAdapter(this, R.layout.layout_courier_item,mList)
            mListView.adapter = adapter
        } catch (e: JSONException) {
            e.printStackTrace()
        }
    }
}
由于快递查询免费次数耗尽,所以制作本地接口,作为演示。
具体操作步骤在上面代码注释中,已经很明确,在这就不过多赘述,下面附上适配器和布局代码。
拿到数据去请求数据(JSON)
RxVolley.get(url, object : HttpCallback() {
                    override fun onSuccess(t: String) {
                        //Toast.makeText(, t, Toast.LENGTH_SHORT).show();
                        L().i("Courier:$t")
                        //4.解析Json
                        parsingJson(t)
                    }
                })
ListView适配器:
package com.zrc.smartbutler.adapter
/**
 *项目名:  SmartButler
 *包名:    com.zrc.smartbutler.adapter
 *文件名:  CourierAdapter
 *描述:    快递查询适配器
 */
import android.app.Activity
import android.view.LayoutInflater
import android.view.View
import android.view.ViewGroup
import android.widget.ArrayAdapter
import android.widget.TextView
import com.zrc.smartbutler.R
import com.zrc.smartbutler.entity.CourierData
class CourierAdapter(activity:Activity, val resourceId:Int,mList: List<CourierData>) : ArrayAdapter<CourierData>(activity,resourceId,mList){
    override fun getView(position: Int, convertView: View?, parent: ViewGroup): View {
        val view:View
        val viewHolder:ViewHolder
        if(convertView==null){
            view = LayoutInflater.from(context).inflate(resourceId,parent,false)
            val tv_remark:TextView = view.findViewById(R.id.tv_remark)
            val tv_zone:TextView = view.findViewById(R.id.tv_zone)
            val tv_datetime:TextView = view.findViewById(R.id.tv_datetime)
            viewHolder = ViewHolder(tv_remark,tv_zone,tv_datetime)
            view.tag = viewHolder
        }else{
            view = convertView
            viewHolder = view.tag as ViewHolder
        }
        val fruit = getItem(position)
        if(fruit!=null){
            viewHolder.tv_remark.text = fruit.getRemark()
            viewHolder.tv_zone.text = fruit.getZone()
            viewHolder.tv_datetime.text = fruit.getDatetime()
        }
        return view
    }
    inner class ViewHolder(val tv_remark:TextView,val tv_zone:TextView,val tv_datetime:TextView)
}
layout_courier_item布编程客栈局:
<?xml version="1.0" encoding="utf-8"?>
<LinearLayout
    xmlns:android="http://schemas.android.com/apk/res/android"
    android:layout_width="match_parent"
    android:layout_height="match_parent"
    android:gravity="center_vertical"
    android:orientation="horizontal">
    <LinearLayout
        android:layout_width="60dp"
        android:layout_height="wrap_content"
        android:gravity="center_horizontal"
        android:orientation="vertical">
        <View
            android:layout_width="2dp"
            android:layout_height="30dp"
            android:background="@color/colorPrimary"/>
        <ImageView
            android:layout_width="wrap_content"
            android:layout_height="wrap_content"
            android:src="@drawable/timeline_green"/>
        <View
            android:layout_width="2dp"
            android:layout_height="100dp"
            android:background="@color/colorPrimary"/>
    </LinearLayout>
    <LinearLayout
        android:layout_width="0dp"
        android:layout_height="wrap_content"
        android:layout_marginRight="10dp"
        android:layout_weight="1"
        android:background="@drawable/timeline_content"
        android:orientation="vertical"
        android:padding="10dp">
        <TextView
            android:id="@+id/tv_remark"
            android:layout_width="wrap_content"
            android:layout_height="wrap_content"
            android:paddingLeft="10dp"
            android:text="你的快件已经到达北京"
 www.devze.com           android:textColor="@color/colorPrimary"
            android:textSize="18sp"/>
        <TextView
            android:id="@+id/tv_zone"
            android:layout_width="wrap_content"
            android:layout_height="wrap_content"
            androi开发者_Go学习d:layout_marginBottom="5dp"
            android:layout_marginTop="5dp"
            android:paddingLeft="10dp"
            android:text="北京"
            android:textColor="@color/colorAccent"
            android:textSize="15sp"/>
        <TextView
            android:id="@+id/tv_datetime"
            android:layout_width="wrap_content"
            android:layout_height="wrap_content"
            android:paddingLeft="10dp"
            android:text="2016-11-12"/>
    </LinearLayout>
</LinearLayout>
至此,快递查询开发完成!!!
二.号码地查询开发
效果展示:

1.新建PhoneActivity,编写xml代码
<?xml version="1.0" encoding="utf-8"?>
<LinearLayout xmlns:android="http://schemas.android.com/apk/res/android"
    android:layout_width="match_parent"
    android:layout_height="match_parent"
    xmlns:tools="http://schemas.android.com/tools"
    android:orientation="vertical"
    android:padding="10dp"
    tools:context=".ui.PhoneActivity">
    <EditText
        android:id="@+id/et_number"
        android:layout_width="match_parent"
        android:layout_height="wrap_content"
        android:hint="@string/text_input_phone"/>
    <LinearLayout
        android:layout_width="match_parent"
        android:layout_height="300dp"
        android:gravity="center"
        android:orientation="vertical">
        <ImageView
            android:id="@+id/iv_company"
            android:layout_width="200dp"
            android:layout_height="100dp"
            android:padding="30dp"/>
        <TextView
            android:gravity="center"
            android:id="@+id/tv_result"
            android:layout_width="wrap_content"
            android:layout_height="wrap_cphpontent"
            android:textColor="@color/colorPrimaryDark"
            android:textSize="20sp"/>
    </LinearLayout>
    <LinearLayout
        android:layout_width="match_parent"
        android:layout_height="0dp"
        android:layout_weight="1"
        android:orientation="vertical">
        <!--第一行-->
        <LinearLayout
            android:layout_width="match_parent"
            android:layout_height="wrap_content"
            android:layout_weight="1"
            android:orientation="horizontal">
            <Button
                android:id="@+id/btn_1"
                android:textSize="20sp"
                android:text="1"
                android:layout_width="match_parent"
                android:layout_height="match_parent"
                android:layout_weight="1"/>
            <Button
                android:id="@+id/btn_2"
                android:textSize="20sp"
                android:text="2"
                android:layout_width="match_parent"
                android:layout_height="match_parent"
                android:layout_weight="1"/>
            <Button
                android:id="@+id/btn_3"
                android:textSize="20sp"
                android:text="3"
                android:layout_width="match_parent"
                android:layout_height="match_parent"
                android:layout_weight="1"/>
            <Button
                android:id="@+id/btn_del"
                android:textSize="20sp"
                android:text="DEL"
                android:layout_width="match_parent"
                android:layout_height="match_parent"
                android:layout_weight="1"/>
        </LinearLayout>
        <!--第二行-->
        <LinearLayout
            android:layout_width="match_parent"
            android:layout_height="wrap_content"
            android:layout_weight="1"
            android:orientation="horizontal">
            <Button
                android:id="@+id/btn_4"
                android:textSize="20sp"
                andrjsoid:text="4"
                android:layout_width="match_parent"
                android:layout_height="match_parent"
                android:layout_weight="1"/>
            <Button
                android:id="@+id/btn_5"
                andro编程客栈id:textSize="20sp"
                android:text="5"
                android:layout_width="match_parent"
                android:layout_height="match_parent"
                android:layout_weight="1"/>
            <Button
                android:id="@+id/btn_6"
                android:textSize="20sp"
                android:text="6"
                android:layout_width="match_parent"
                android:layout_height="match_parent"
                android:layout_weight="1"/>
            <Button
                android:id="@+id/btn_0"
                android:textSize="20sp"
                android:text="0"
                android:layout_width="match_parent"
                android:layout_height="match_parent"
                android:layout_weight="1"/>
        </LinearLayout>
        <!--第三行-->
        <LinearLayout
            android:layout_width="match_parent"
            android:layout_height="wrap_content"
            android:layout_weight="1"
            android:orientation="horizontal">
            <Button
                android:id="@+id/btn_7"
                android:textSize="20sp"
                android:text="7"
                android:layout_width="match_parent"
                android:layout_height="match_parent"
                android:layout_weight="1"/>
            <Button
                android:id="@+id/btn_8"
                android:textSize="20sp"
                android:text="8"
                android:layout_width="match_parent"
                android:layout_height="match_parent"
                android:layout_weight="1"/>
            <Button
                android:id="@+id/btn_9"
                android:textSize="20sp"
                android:text="9"
                android:layout_width="match_parent"
                android:layout_height="match_parent"
                android:layout_weight="1"/>
            <Button
                android:id="@+id/btn_query"
                android:textSize="20sp"
                android:text="@string/text_query"
                android:layout_width="match_parent"
                android:layout_height="match_parent"
                android:layout_weight="1"/>
        </LinearLayout>
    </LinearLayout>
</LinearLayout>
2.编写kotlin交互代码:
package com.zrc.smartbutler.ui
import android.os.Bundle
import android.text.TextUtils
import android.view.View
import android.widget.Button
import android.widget.Toast
import androidx.appcompat.app.AppCompatActivity
import com.kymjs.rxvolley.RxVolley
import com.kymjs.rxvolley.client.HttpCallback
import com.zrc.smartbutler.R
import com.zrc.smartbutler.utils.L
import com.zrc.smartbutler.utils.StaticClass
import kotlinx.android.synthetic.main.activity_phone.*
import org.json.JSONException
import org.json.JSONObject
class PhoneActivity : BaseActivty() ,View.OnClickListener{
    //标记位
    private var flag = false
    override fun onCreate(savedInstanceState: Bundle?) {
        super.onCreate(savedInstanceState)
        setContentView(R.layout.activity_phone)
        back()
        initView()
    }
    private fun initView() {
        btn_0.setOnClickListener(this)
        btn_1.setOnClickListener(this)
        btn_2.setOnClickListener(this)
        btn_3.setOnClickListener(this)
        btn_4.setOnClickListener(this)
        btn_5.setOnClickListener(this)
        btn_6.setOnClickListener(this)
        btn_7.setOnClickListener(this)
        btn_8.setOnClickListener(this)
        btn_9.setOnClickListener(this)
        btn_query.setOnClickListener(this)
        btn_del.setOnClickListener(this)
        //长按事件
        btn_del.setOnLongClickListener {
            et_number.setText("")
            false
        }
    }
    //点击事件
    /**
     * 逻辑
     * 1.获取输入框的内容
     * 2.判断是否为空
     * 3.网络请求
     * 4.解析Json
     * 5.结果显示
     *
     * ------
     * 键盘逻辑
     */
    override fun onClick(v: View?) {
        //获取到输入框的内容
        var str = et_number.text.toString()
        when (v!!.id) {
            R.id.btn_0, R.id.btn_1, R.id.btn_2, R.id.btn_3, R.id.btn_4, R.id.btn_5, R.id.btn_6, R.id.btn_7, R.id.btn_8, R.id.btn_9 -> {
                if (flag) {
                    flag = false
                    str = ""
                    et_number.setText("")
                }
                //每次结尾添加1
                et_number.setText(str + (v as Button).text)
                //移动光标
                et_number.setSelection(str.length + 1)
            }
            R.id.btn_del -> if (!TextUtils.isEmpty(str) && str.length > 0) {
                //每次结尾减去1
                et_number.setText(str.substring(0, str.length - 1))
                //移动光标
                et_number.setSelection(str.length - 1)
            }
            R.id.btn_query -> if (!TextUtils.isEmpty(str)) {
                getPhone(str)
            }
        }
    }
    //获取归属地
    private fun getPhone(str: String) {
        val url =
            "http://apis.juhe.cn/mobile/get?phone=" + str + "&key=" + StaticClass().PHONE_KEY
        RxVolley.get(url, object : HttpCallback() {
            override fun onSuccess(t: String) {
                //Toast.makeText(this@PhoneActivity, "结果:" + t, Toast.LENGTH_SHORT).show();
                L().i("phone:$t")
                parsingJson(t)
            }
        })
    }
    /**
     * "province":"浙江",
     * "city":"杭州",
     * "areacode":"0571",
     * "zip":"310000",
     * "company":"中国移动",
     * "card":"移动动感地带卡"
     */
    //解析Json
    private fun parsingJson(t: String) {
        try {
            val jsonObject = JSONObject(t)
            val jsonResult = jsonObject.getJSONObject("result")
            val province = jsonResult.getString("province")
            val city = jsonResult.getString("city")
            val areacode = jsonResult.getString("areacode")
            val zip = jsonResult.getString("zip")
            val company = jsonResult.getString("company")
            val card = jsonResult.getString("card")
            tv_result.text = """
                归属地:$province$city
                区号:$areacode
                邮编:$zip
                运营商:$company
                类型:$card
                """.trimIndent()
            when (company) {
                "移动" -> iv_company.setBackgroundResource(R.drawable.china_mobile)
                "联通" -> iv_company.setBackgroundResource(R.drawable.china_unicom)
                "电信" -> iv_company.setBackgroundResource(R.drawable.china_telecom)
            }
            flag = true
        } catch (e: JSONException) {
            e.printStackTrace()
        }
    }
}
具体代码内容不再赘述,注释中已经写的很详细了!!!
至此,号码地查询完成!!!
快递及号码地查询完成,下篇文章将针对语音机器人聊天进行开发,欢迎关注后续更新!!!
到此这篇关于kotlin实现快递与号码归属地查询案例详解的文章就介绍到这了,更多相关kotlin快递查询内容请搜索我们以前的文章或继续浏览下面的相关文章希望大家以后多多支持我们!


 加载中,请稍侯......
精彩评论