Linux 配置时间服务器的详细过程
目录
- 一、同步阿里云服务器时间
- 服务端设置
- 1.检查chrony服务是否安装,设置chrony开机自启,查看chrony服务状态
- 2.关闭防火墙,SElinux设置为宽容模式,查看防火墙状态
- 3.编辑服务端/etc/chrony.conf文件
- 4.重启服务,查看服务,查看日期
- 客户端设置
- 1.关闭防火墙并查看防火墙状态
- 2.编辑客户端配置文件
- 3.客户端重启服务,查看服务,查看日期
- 二、同步本地服务器时间
- 服务端配置
- 1.修改服务端配置文件
- 2.修改 /etc/resolv.conf 文件,不使用dns解析,模拟无法上网的情况
- 3.修改错误时间
- 4.重启服务,查看服务,查看日期
一、同步阿里云服务器时间
服务端设置
1.检查chrony服务是否安装,设置chrony开机自启,查看chrony服务状态
[root@node1-server ~]# rpm -q chrony  # rpm -q 用于查看包是否安装
chrony-4.3-1.el9.x86_64
[root@node1-server ~]# systemctl enable --now chronyd  # 设置服务开机自启
[root@node1-server ~]# systemctl status chronyd  # 查看chronyd服务状态
● chronyd.service - NTP client/server
     Loaded: loaded (/usr/lib/systemd/system/chronyd.service; enabled; preset: enabled)
     Active: active (running) since Tue 2025-03-25 14:11:34 CST; 2h 22min ago
       Docs: man:chronyd(8)
             man:chrony.conf(5)
   Main PID: 905 (chronyd)
      Tasks: 1 (limit: 10681)
     Memory: 4.0M
        CPU: 80ms
     CGroup: /system.slice/chronyd.service
             └─905 /usr/sbin/chronyd -F 2

2.关闭防火墙,SELinux设置为宽容模式,查看防火墙状态
[root@node1-server ~]# systemctl stop firewalld && systemctl disable firewalld  # 关闭防火墙服务,关闭成功后禁用服务
Removed "/etc/systemd/system/multi-user.target.wants/firewalld.service".
Removed "/etc/systemd/system/dbus-org.Fedoraproject.FirewallD1.service".
[root@node1-server ~]# setenforce 0  # SELinux 调整为宽容模式
[root@node1-server ~]# getenforce  # 查看 SELinux 状态
Permissive  # 宽容模式
[root@node1-server ~]# systemctl status firewalld.service  # 查看防火墙状态
○ firewalld.service - firewalld - dynamic firewall daemon
     Loaded: loaded (/usr/lib/systemd/system/firewalld.service; disabled; preset: enabled)
     Active: inactive (dead)
       Docs: man:firewalld(1)

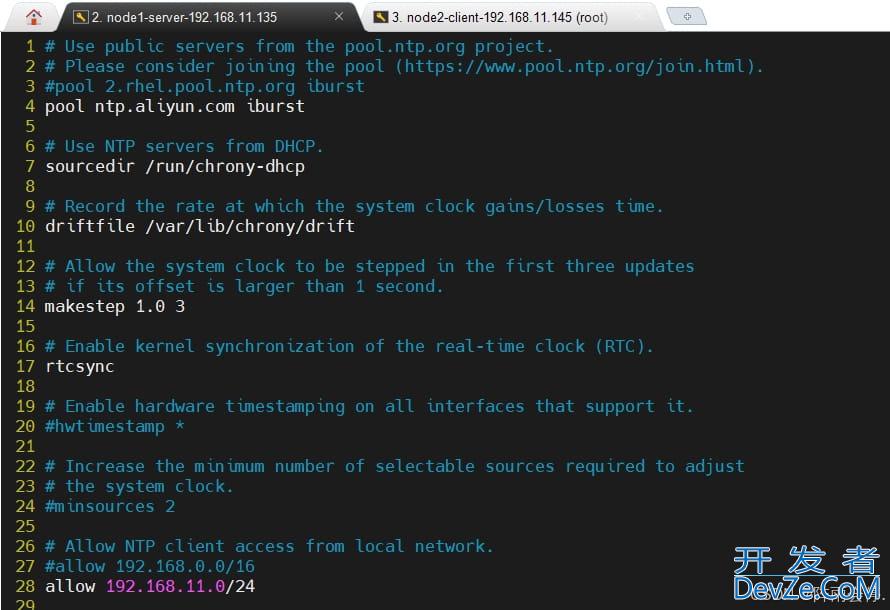
3.编辑服务端/etc/chrony.conf文件
[root@node1-server ~]# vim /etc/chrony.conf
  3 #pool 2.rhel.pool.ntp.org iburst  # 注释此行
  4 pool ntp.aliyun.com iburst  # pool 是一个关键字,作用是指定一组 NTP 服务器,iburst表示的是首次同步的时候快速同步
  27 #allow 192.168.0.0/16  # 注释此行
  28 allow 192.168.11.0/24  # 允许同步该网段
4.重启服务,查看服务,查看日期
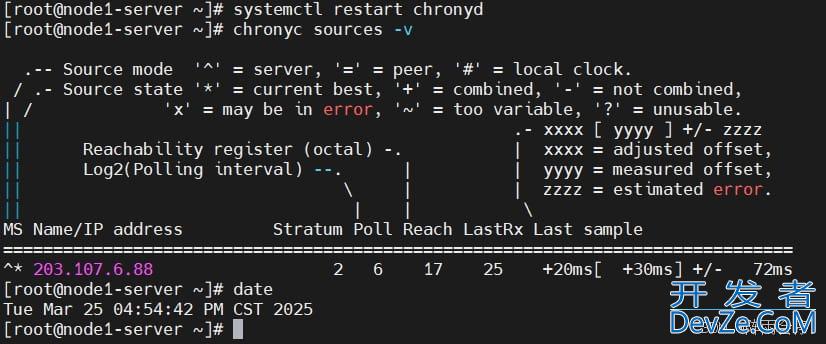
[root@node1-server ~]# systemctl restart chronyd  # 重启服务
[root@node1-server ~]# chronyc sources -v  # 查看服务
  .-- Source mode  '^' = server, '=' = peer, '#' = local clock.
 / .- Source state '*' = current best, '+' = combined, '-' = not combined,
| /             'x' = may be in error, '~' = too variable, '?' = unusable.
||                                                 .- xxxx [ yyyy ] +/- zzzz
||      Reachability register (octal) -.           |  xxxx = adjusted offset,
||      Lpythonog2(Polling interval) --.      |          |  yyyy = measured offset,
||                                \     |          |  zzzz = estimated error.
||                                 |    |           \
MS Name/IP address         Stratum Poll Reach LastRx Last sample
=========================================================================
^* 203.107.6.88                  2   6    17    25    +20ms[  +30ms] +/-   72ms
[root@node1-server ~]# date  # 查看日期
Tue Mar 25 04:54:42 PM CST 2025   # 与阿里云服务器同步成功
客户端设置
1.关闭防火墙并查看防火墙状态
[root@node2-client ~]# systemctl stop firewalld.service && systemctl disable firewalld.service  #关闭防火墙
Removed "/etc/systemd/system/multi-user.target.wants/firewalld.service".
Removed "/etc/systemd/system/dbus-org.fedoraproject.FirewallD1.service".
[root@node2-client ~]# systemctl status firewalld.service  #查看防火墙状态
○ firewalld.servifqSGyeQSuce - firewalld - dynamic firewall daemon
     Loaded: loaded (/usr/lib/systemd/system/firewalld.service; disabled; preset: enabled)
     Active: inactive (dead)
       Docs: man:firewalld(1)

2.编辑客户端配置文件
[root@node2-client ~]# vim /etc/chrony.conf
  3 #pool 2.rhel.pool.ntp.org iburst
  4 pool 192.168.11.135 iburst  # 以192.168.11.135为时间android服务器

3.客户端重启服务,查看服务,查看日期
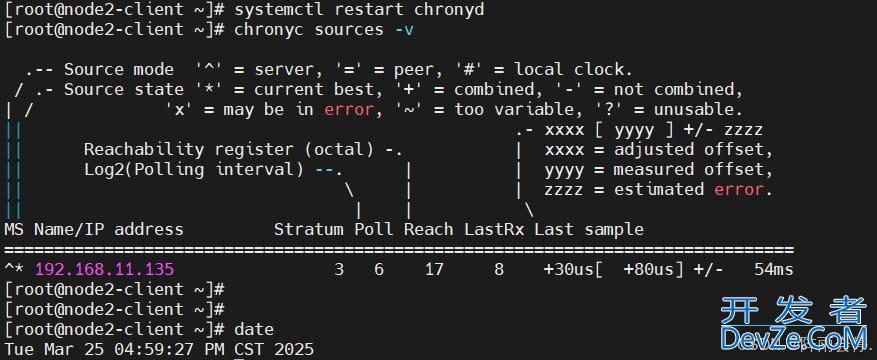
[root@node2-client ~]# systemctl restart chronyd  # 重启服务
[root@node2-client ~]# chronyc sources -v  # 查看服务
  .-- Source mode  '^' = server, '=' = peer, '#' = local clock.
 / .- Source state '*' = current best, '+' = combined, '-' = not combined,
| /             'x' = may be in error, '~' = too variable, '?' = unusable.
||                                                 .- xxxx [ yyyy ] +/- zzzz
||      Reachability register (octal) -.           |  xxxx = adjusted offset,
||      Log2(Polling interval) --.      |          |  yyyy = measured offset,
||                                \     |          |  zzzz = estimated error.
||                                 |    |           \
MS Name/IP address         Stratum Poll Reach LastRx Last sample
=========================================================================
^* 192.168.11.135                3   6    17     8    +30us[  +80us] +/-   54ms
[root@node2-client ~]# date  # 查看日期
Tue Mar 25 04:59:27 PM CST 2025   #与服务端同步成功
二、同步本地服务器时间
服务端配置
1.修改服务端配置文件
[root@node1-server ~]# vim /etc/chrony.conf
 30 # Serve time even if not synchronized to a time source.
 31 local stratum 10  # 把本地系统设置为一个 NTP 时间源,并且将其 Stratum 层级设定为 10

2.修改 /etc/resolv.conf 文件,不使用dns解析,模拟无法上网的情况
[root@node1-server ~]# vim /etc/resolv.conf
# Generated by NetworkManager
#nameserver 223.5.5.5  # 注释此行

3.修改错误时间
[root@node1-server ~]# date -s '2021-12-13 14:54:58'  # 修改时间是为了让结果更明显
Mon Dec 13 02:54:58 PM CST 2021

4.重启服务,查看服务,查看日期
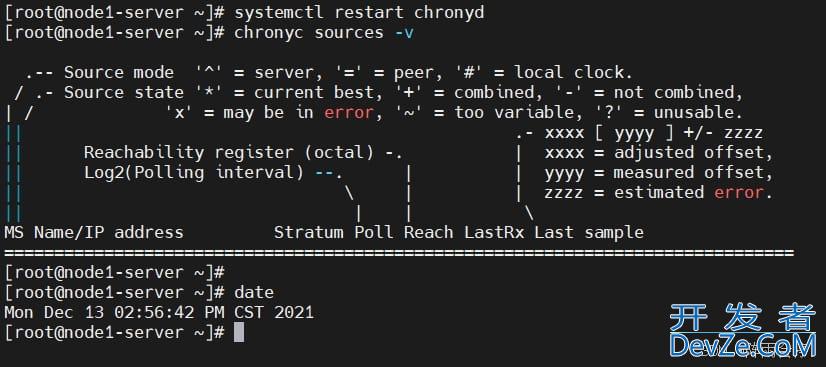
[root@node1-server ~]# systemctl restart chronyd
[root@node1-server ~]# chronyc sources -v
  .-- Source mode  php'^' = server, '=' = peer, '#' = local clock.
 / .- Source state '*' = current best, '+' = combined, '-' = not combined,
| /             'x' = may be in error, '~' = too variable, '?' = unusable.
||                                                 .- xxxx [ yyyy ] +/- zzzz
||      Reachability register (octal) -.           |  xxxx = adjusted offset,
||      Log2(Polling interval) --.      |          |  yyyy = measured offset,
||                                \     |          |  zzzz = estimated error.
||                                 |    |           \
MS Name/IP address         Stratum Poll Reach LastRx Last sample
=========javascript================================================================
[root@node1-server ~]#   # 此处能看到没有时间服务器与本机同步
[root@node1-server ~]# date
Mon Dec 13 02:56:42 PM CST 2021
客户端配置 仅需客户端重启服务,查看服务,查看日期
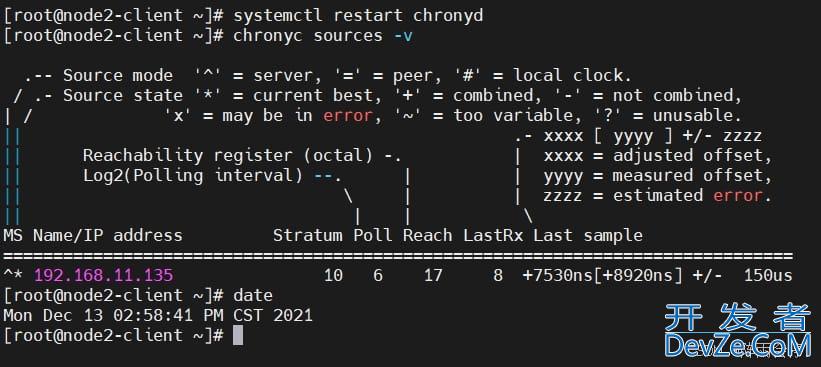
[root@node2-client ~]# systemctl restart chronyd
[root@node2-client ~]# chronyc sources -v
  .-- Source mode  '^' = server, '=' = peer, '#' = local clock.
 / .- Source state '*' = current best, '+' = combined, '-' = not combined,
| /             'x' = may be in error, '~' = too variable, '?' = unusable.
||                                                 .- xxxx [ yyyy ] +/- zzzz
||      Reachability register (octal) -.           |  xxxx = adjusted offset,
||      Log2(Polling interval) --.      |          |  yyyy = measured offset,
||                                \     |          |  zzzz = estimated error.
||                                 |    |           \
MS Name/IP address         Stratum Poll Reach LastRx Last sample
=========================================================================
^* 192.168.11.135               10   6    17     8  +7530ns[+8920ns] +/-  150us
[root@node2-client ~]# date
Mon Dec 13 02:58:41 PM CST 2021   # 时间与服务端同步成功
到此这篇关于Linux 配置时间服务器的文章就介绍到这了,更多相关Linux 时间服务器内容请搜索编程客栈(www.devze.com)以前的文章或继续浏览下面的相关文章希望大家以后多多支持编程客栈(www.devze.com)!



 加载中,请稍侯......
精彩评论