Java实现多行文字水印的方法详解
目录
- 一、业务场景
- 1.1 UI设计的水印原型
- 二、实现方案探索
- 2.1 准备处方图片
- 2.2 单行文字水印
- 2.3 两行水印方案
- 2.4 多行水印方案
- 三、总结
一、业务场景
公司处方药品销售业务,需要在线开具处方或者手动上传处方图片,处方图片在购药使用之后需要添加已使用的水印字样,防止处方图片的重复使用。因此,需要设计一个为图片添加文字水印的Java工具类,针对这个问题,我展开了解决方案的研究。
1.1 UI设计的水印原型
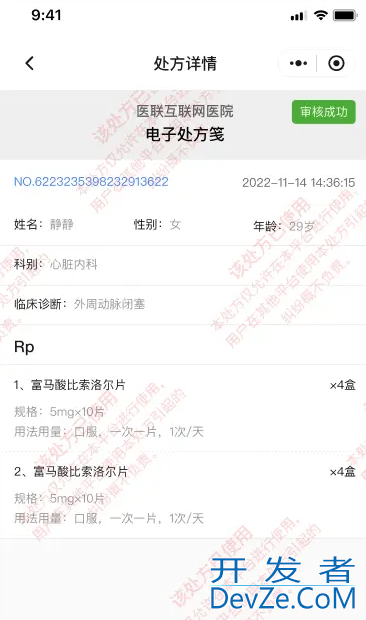
二、实现方案探索
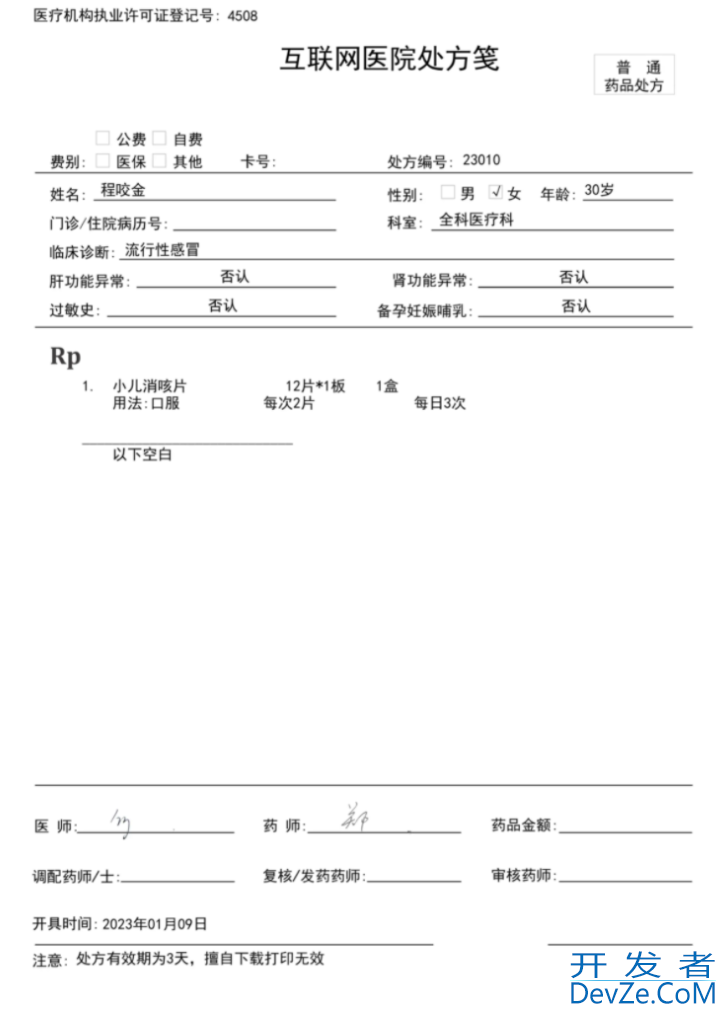
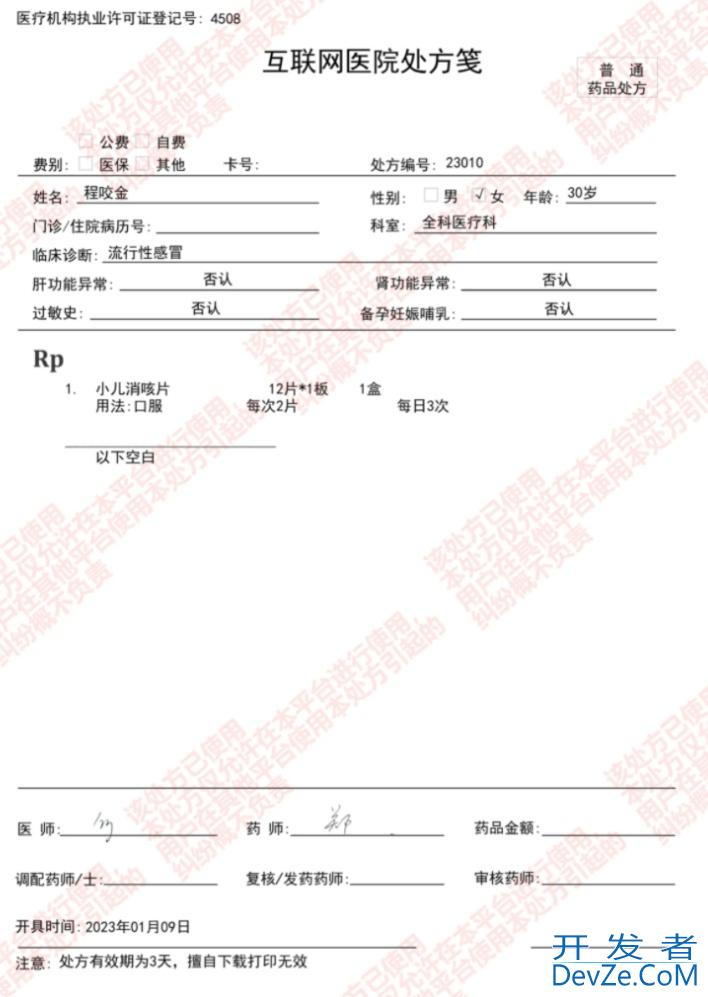
2.1 准备处方图片
我们先在互联网医院,给患者“程咬金”开个处方单
2.2 单行文字水印
首先是翻找项目中通用工具类,发现有一个WaterMarkUtils的类,应该就是给图片添加水印的工具类
/**
* @author 遛马少年
* @Title WaterMarkUtils
 * @Description
 */
public class WaterMarkUtils {

   /**
    * 图片添加水印
    *
    * @param imgFile
    *            需要添加水印的图片
    * @param markContentColor
    *            水印文字的颜色
    * @param waterMarkContent
    *            水印的文字
    * @return  水印图片
    */
   public static File markStr(File imgFile, Color markContentColor, String waterMarkContent) {
      try {
         // 加水印
         BufferedImage bufImg = ImageIO.read(imgFile);
         int width = bufImg.getWidth(); //图片宽
         int height = bufImg.getHeight(); //图片高
         Graphics2D g = bufImg.createGraphics();
         g.drawImage(bufImg, 0, 0, w开发者_Python教程idth, height, null);
         Font font = new Font("微软雅黑", Font.ITALIC, 45);
         g.setColor(markContentColor); // 根据图片的背景设置水印颜色

         g.setFont(font);
         int x = width -2*getWatermarkLength(waterMarkContent, g); //这是一个计算水印位置的函数,可以根据需求添加
         int y = height - 1*getWatermarkLength(waterMarkContent, g);
         g.drawString(waterMarkContent, x, y);
         g.dispose();

         ImageIO.write(bufImg, "png", imgFile);
         return imgFile;
      } catch (Exception e) {
          log.error("WaterMarkUtils-markStr err:{} ",e.getMessage());
      }
      return null;
   }

   /**
    * 获取水印文字总长度
    *
    * @param waterMarkContent
    *            水印的文字
    * @param g
    * @return 水印文字总长度
    */
   public static int getWatermarkLength(String waterMarkContent, Graphics2D g) {
      return g.getFontMetrics(g.getFont()).charsWidth(waterMarkContent.toCharArray(), 0, waterMarkContent.length());
   }
}
写个main方法试一下效果
public class TestWaterMark {   public static void main(String[] args) {      String rxPath = "F:\Temp\rxImage\程咬金.png";
      File rxFile = new File(rxPath);
      WaterMarkUtils.markStr(rxFile, Color.RED, "该处方已使用,处方仅允许在本平台进行使用,用户在其他平台使用本处方引起的纠纷概不负责");
   }
看看效果:
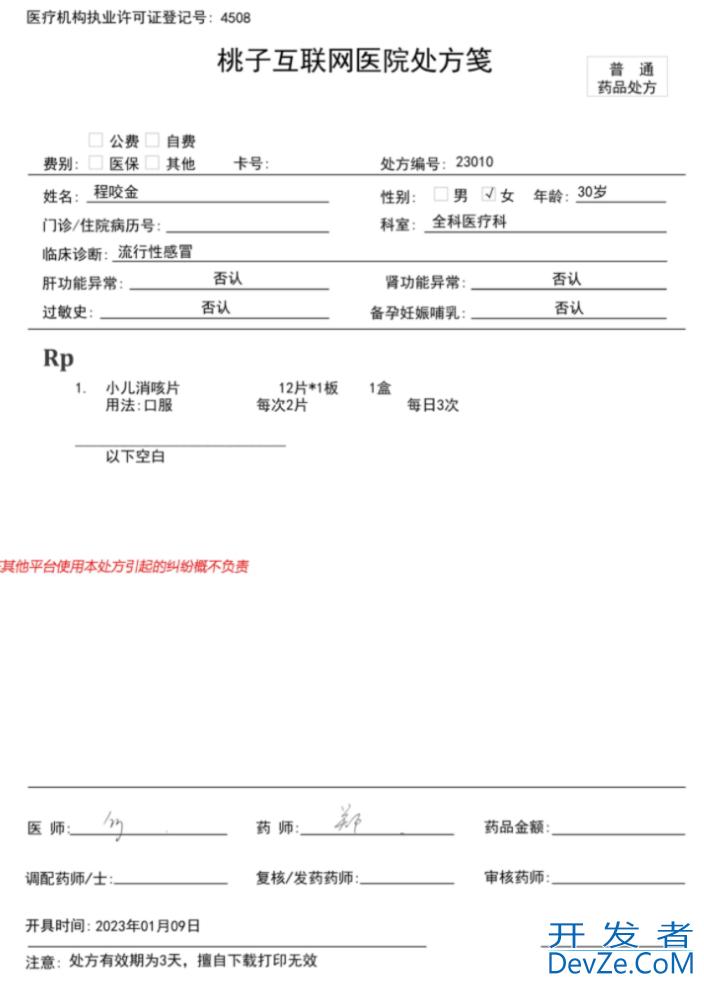
只在中间位置插入python了一行水印,并且因为水印文字太长而显示不全,显然是不符合要求的。
2.3 两行水印方案
接着,基于上面的水印方案,做了点改造
首先将根据图片大小计算字体大小,添加文字水印的本质是基于Graphics2D在图片上进行绘制操作,要实现多行水印,就要循环遍历图片的行级像素,然后添加文字即可,最终代码如下
/**
* @author 遛马少年
* @Title ImageWatermarkUtil
* @Description
 */
@Slf4j
public class ImageWatermarkUtil {
   // 水印透明度
   private static float alpha = 0.1f;
   // 水印文字颜色
   private static Color color = Color.RED;
   // 水印之间的间隔
   private static final int XMOVE = 80;
   // 水印之间的间隔
   private static final int YMOVE = 80;

   /**
    * 获取文本长度。汉字为1:1,英文和数字为2:1
    */
   private static int getTextLength(String text) {
      int length = text.length();
      for (int i = 0; i < text.length(); i++) {
         String s = String.valueOf(text.charAt(i));
         if (s.getBytes().length > 1) {
            length++;
         }
      }
      length = length % 2 == 0 ? length / 2 : length / 2 + 1;
      return length;
   }

   /**
    * 给图片添加水印文字、可设置水印文字的旋转角度
    *
    * @param srcImgPath   原图片路径
    * @param dstImgPath   加完水印之后图片路径
    * @param degree       旋转角度
    * @param logoText     水印主标题
    * @param logoTextPlus 水印副标题
    */
   public static void ImageByText(String srcImgPath, String dstImgPath, Integer degree, String logoText, String logoTextPlus) {
      File srcFile = new File(srcImgPath);
      File dstFile = new File(dstImgPath);
      ImageByText(srcFile, dstFile, degree, logoText, logoTextPlus);
   }

   public static void ImageByText(File srcFile, File dstFile, Integer degree, String logoText, String logoTextPlus) {

      InputStream is = null;
      OutputStream os = null;
      try {
         long start = System.currentTimeMillis();
         // 源图片
         Image srcImg = ImageIO.read(srcFile);
         int width = srcImg.getWidth(null);// 原图宽度
         int height = srcImg.getHeight(null);// 原图高度
         BufferedImage buffImg = new BufferedImage(srcImg.getWidth(null), srcImg.getHeight(null),
               BufferedImage.TYPE_INT_RGB);
         // 得到画笔对象
         Graphics2D g = buffImg.create编程客栈Graphics();
         // 设置对线段的锯齿状边缘处理
         g.setRenderingHint(RenderingHints.KEY_INTERPOLATION, RenderingHints.VALUE_INTERPOLATION_BILINEAR);
         g.drawImage(srcImg.getScaledInstance(srcImg.getWidth(null), srcImg.getHeight(null), Image.SCALE_SMOOTH),
               0, 0, null);
         // 设置水印旋转
         if (null != degree) {
            g.rotate(Math.toRadians(degree), (double) buffImg.getWidth() / 2, (double) buffImg.getHeight() / 2);
         }
         int txtLen = logoTextPlus.length();
         int FONT_SIZE = width / txtLen;
         Font font = new Font("微软雅黑", Font.BOLD, FONT_SIZE);javascript
         // 设置水印文字颜色
         g.setColor(color);
         // 设置水印文字Font
         g.setFont(font);
         // 设置水印文字透明度
         g.setComposite(AlphaComposite.getInstance(AlphaComposite.SRC_ATOP, alpha));
         int x = -width / 2;
         int y = -height / 2;
         int markWidth = FONT_SIZE * txtLen;// 字体长度
         int markHeight = FONT_SIZE;// 字体高度

         // 循环添加水印
         while (x < width * 1.5) {
            y = -height / 2;
            while (y < height * 1.5) {
               g.drawString(logoText, x, y);
               y += markHeight + YMOVE;
               g.drawString(logoTextPlus, x, y);
               y += markHeight + YMOVE;
            }
            x += markWidth + XMOVE;
         }
         // 释放资源
         g.dispose();
         // 生成图片
         os = new FileOutputStream(dstFile);
         ImageIO.write(buffImg, FileUtil.extName(srcFile), os);
         long time = System.currentTimeMillis() - start;
         log.info("添加水印文字成功!耗时(ms):{}", time);
      } catch (Exception e) {
         e.printStackTrace();
      } finally {
         try {
            if (null != os)
               os.close();
         } catch (Exception e) {
            e.printStackTrace();
         }
      }
   }
}
写个main方法,试一下效果
public class TestWaterMark {   public static void main(String[] args) {      String rxPath = "F:\Temp\rxImage\程咬金.png";      File rxFile = new File(rxPath);
      String rxDstPath = "F:\Temp\rxImage\程咬金-加水印.png";
      File rxDstFile = new File(rxDstPath);
      ImageWatermarkUtil.ImageByText(rxFile, rxDstFile, -40, "该处方已使用", "处方仅允许在本平台进行使用,用户在其他平台使用本处方引起的纠纷概不负责");
   }
}
效果如下:
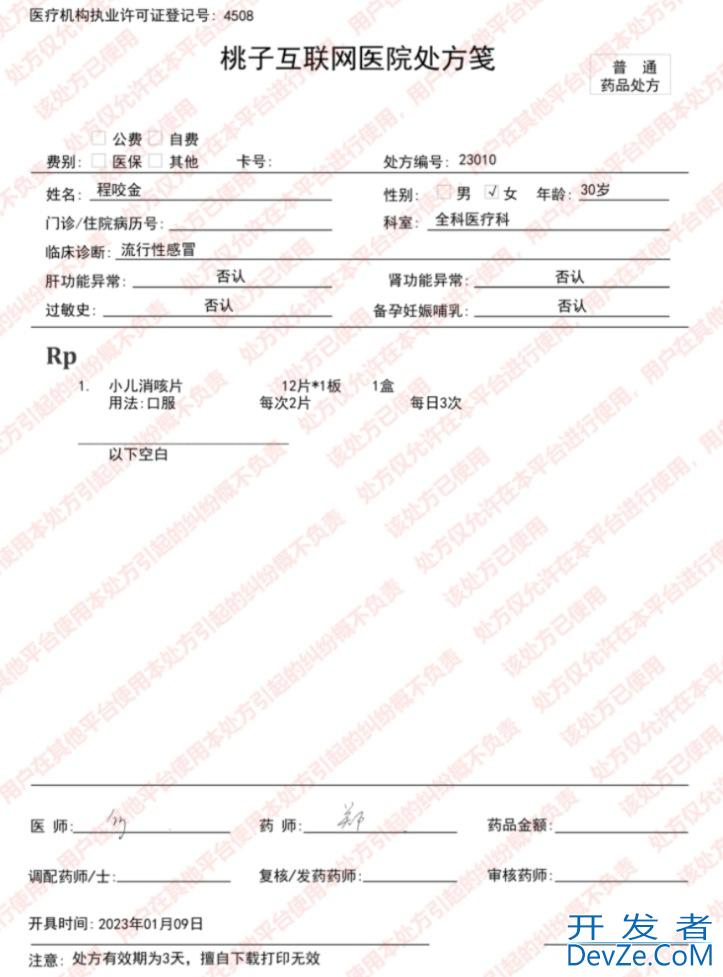
已经很接近原型设计了,为了实现多行效果,我在循环里面调用了两次drawStrinandroidg
g.drawString(logoText, x, y);
g.drawString(logoTextPlus, x, y);
但是还有问题,就是第二行文字太长,并不能完整地显示,追求完美的我没有放弃,接着改造
2.4 多行水印方案
既然第二行太长,那就再把第二行拆分,每行几个字即可,然后再循环写文字
最终代码如下
/**
* @author 遛马少年
* @Title ImageWatermarkUtil2
* @Description */
public class ImageWatermarkUtil2 {
   // 水印透明度
   private static float alpha = 0.1f;
   private static int fontSize = 80;
   // 水印文字字体
   private static Font font = new Font("微软雅黑", Font.BOLD, fontSize);
   // 水印文字颜色
   private static Color color = Color.RED;

   /**
    * 水印之间的横向间隔
    */
   private static final int XMOVE = 80;

   /**
    * 水印之间的纵向间隔
    */
   private static final int YMOVE = 80;


   /**
    * 给图片添加水印文字、可设置水印文字的旋转角度
    *
    * @param logoText 水印文字
    * @param srcFile  源文件
    * @param dstFile  输出文件
    * @param degree   设置角度
    */
   public static void markImageByText(File srcFile, File dstFile, Integer degree, String logoText) {
      long start = System.currentTimeMillis();
      InputStream is = null;
      try {
         String[] waterMarkContents = logoText.split("\|\|");
         // 1、源图片
         Image srcImg = ImageIO.read(srcFile);
         // 原图宽度
         int srcImgWidth = srcImg.getWidth(null);
         // 原图高度
         int srcImgHeight = srcImg.getHeight(null);
         BufferedImage buffImg = new BufferedImage(srcImg.getWidth(null),
               srcImg.getHeight(null), BufferedImage.TYPE_INT_RGB);
         // 2、得到画笔对象
         Graphics2D g = buffImg.createGraphics();
         // 3、设置对线段的锯齿状边缘处理
         g.setRenderingHint(RenderingHints.KEY_INTERPOLATION,
               RenderingHints.VALUE_INTERPOLATION_BILINEAR);
         g.drawImage(
               srcImg.getScaledInstance(srcImg.getWidth(null),
                     srcImg.getHeight(null), Image.SCALE_SMOOTH), 0, 0,
               null);
         // 4、设置水印旋转
         if (null != degree) {
            g.rotate(Math.toRadians(degree),
                  (double) buffImg.getWidth() / 2,
                  (double) buffImg.getHeight() / 2);
         }
         // 5、设置水印文字颜色
         g.setColor(color);
         // 6、设置水印文字Font
         g.setFont(font);
         // 7、设置水印文字透明度
         g.setComposite(AlphaComposite.getInstance(AlphaComposite.SRC_ATOP,
               alpha));
         // 8、第一参数->设置的内容,后面两个参数->文字在图片上的坐标位置(x,y)
         // 获取其中最长的文字水印的大小
         int maxLen = 0;
         int maxHigh = 0;
         String waterMarkContent = "";
         for (int i = 0; i < waterMarkContents.length; i++) {
            waterMarkContent = waterMarkContents[i];
            int fontLen = getWatermarkLength(waterMarkContent, g);
            if (fontLen >= maxLen) {
               maxLen = fontLen;
            }
            maxHigh = maxHigh + (i + 1) * fontSize + 10;
         }
         // 文字长度相对于图片宽度应该有多少行
         int line = srcImgWidth * 2 / maxLen;
         int co = srcImgHeight * 2 / maxHigh;

         int yz = 0;
         // 填充Y轴方向
         for (int a = 0; a < co; a++) {
            int t = 0;
            for (int j = 0; j < waterMarkContents.length; j++) {
               waterMarkContent = waterMarkContents[j];
               int y = (j + 1) * fontSize + 10 + t;

               // 文字叠加,自动换行叠加,注意符号
               int tempX = -srcImgWidth / 2;
               int tempY = -srcImgHeight / 2 + y + yz;
               // 单字符长度
               int tempCharLen = 0;
               // 单行字符总长度临时计算
               int tempLineLen = 0;
               StringBuffer sb = new StringBuffer();
               for (int i = 0; i < waterMarkContent.length(); i++) {
                  char tempChar = waterMarkContent.charAt(i);
                  tempCharLen = getCharLen(tempChar, g);
                  tempLineLen += tempCharLen;

                  // 和图片的长度进行对应的比较操作
                  if (tempLineLen >= srcImgWidth) {
                     // 长度已经满一行,进行文字叠加
                     g.drawString(sb.toString(), tempX, tempY);
                     t = t + fontSize;
                     // 清空内容,重新追加
                     sb.delete(0, sb.length());
                     tempY += fontSize;
                     tempLineLen = 0;
                  }
                  // 追加字符
                  sb.append(tempChar);
               }
               // 填充X轴
               for (int z = 0; z < line; z++) {
                  // 最后叠加余下的文字
                  g.drawString(sb.toString(), tempX, tempY);
                  tempX = tempX + maxLen + XMOVE;
               }
            }
            yz = yz + maxHigh + YMOVE;
         }
         // 9、释放资源
         g.dispose();
         // 10、生成图片
         ImageIO.write(buffImg, "png", new FileOutputStream(dstFile));
         System.out.println("图片完成添加水印文字,耗时:{}" + (System.currentTimeMillis() - start));
      } catch (Exception e) {
         e.printStackTrace();
      } finally {
         try {
            if (null != is)
               is.close();
         } catch (Exception e) {
            e.printStackTrapythonce();
         }
      }
   }


   public static int getCharLen(char c, Graphics2D g) {
      return g.getFontMetrics(g.getFont()).charWidth(c);
   }

   /**
    * 获取水印文字总长度
    *
    * @paramwaterMarkContent水印的文字
    * @paramg
    * @return水印文字总长度
    */
   public static int getWatermarkLength(String waterMarkContent, Graphics2D g) {
      return g.getFontMetrics(g.getFont()).charsWidth(waterMarkContent.toCharArray(), 0, waterMarkContent.length());
   }
}
再试下最终效果
public class TestWaterMark {   public static void main(String[] args) {      String rxPath = "F:\Temp\rxImage\程咬金.png";      File rxFile = new File(rxPath);      String rxDstPath = "F:\Temp\rxImage\程咬金-加水印.png";
      File rxDstFile = new File(rxDstPath);
      ImageWatermarkUtil2.markImageByText(rxFile, rxDstFile, -40, "该处方已使用||本处方仅允许在本平台进行使用,||用户在其他平台使用本处方引起的||纠纷概不负责");
   }
}
效果如下:
中间空白位置有点多,其实可以通过修改循环y的步长来控制
Anyway,这个效果最终满足了UI验收要求
三、总结
多行水印实现起来,总体还是比较简单的。唯一的难点的多行的实现,目前网上搜索到的解决方案,大多都是单行的。多行的实现其实就是基于单行,多了一层循环遍历。
有个不太确定的点是,添加水印的字体大小是否需要根据图片大小动态调整,比如图片较大时,水印文字字体也跟着变大。所以我的第二个方案是动态调整的,最终方案又是规定大小的。
至于怎么设计,看各位的实际业务需求。
到此这篇关于Java实现多行文字水印的方法详解的文章就介绍到这了,更多相关Java多行文字水印内容请搜索我们以前的文章或继续浏览下面的相关文章希望大家以后多多支持我们!


 加载中,请稍侯......
精彩评论