tkinter如何实现label超链接调用浏览器打开网址
目录
- tkinter label超链接调用浏览器打开网址
- python tkinter Label使用
- Label使用
- Label的属性
- Label方法
- Label属性说明程序
- 总结
tkinter label超链接调用浏览器打开网址
tkinter的label标签没有command属性,但是可以利用bind方法给label标签绑定鼠标和键盘事件
代码:
# 首先需要导入webbrowser模块
import webbrowser

# 建立窗口window
window = tk.Tk()

# 给窗口的可视化起名字
window.title('label超链接')

# 设置窗口的居中显示
screenwidth = window.winfo_screenwidth()
screenheight = window.winfo_screenheight()
width = 700
height = 150
size = "%dx%d+%d+%d" % (wphpidth, height, (screenwidth - width) / 2, (screenheight - height) / 2)
# 设定窗口的大小(长 * 宽)
window.geometry(size)

# 设置label标签
link = tk.Label(window, text='点击购买高级版本:  www.baidu.com', font=('Arial', 10))
link.place(x=20, y=130)

# 此处必须注意,绑定的事件函数中必须要包含event参数
def open_url(event):
    webbrowser.open("http://www.baidu.com", new=0)

# 绑定label单击时间
link.bind("<Button-1>", open_url)
python tkinter Label使用
Label使用
Label是tkinter一个比较简单但是常用的Widget。通常用来显示提示信息或者结果。
Label的属性
Label的属性有标准属性和Widget专有属性两种。
标准属性有:
    activebackground, activeforeground, anchor,
    background, bitmap, borderwidth, cursor,
    disabledforeground, font, foreground,
    highlightbackground, highlightcolor,
    highlightthickness, image, justify,
    padx, pady, relief, takefocus, text,
    textvariable, underline, wraplength
其中highlightbackground, highlightcolor,highlightthickness和takefoucs由于php标签是不支持输入的而无法使用。
Label方法
Label没有专用的方法
Label属性说明程序
程序说明
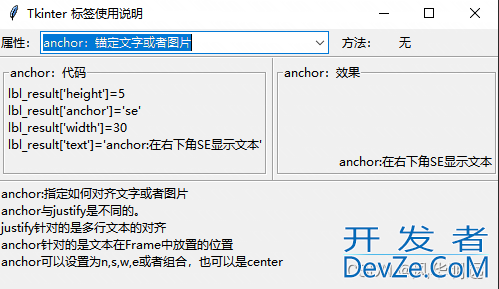
此程序说明了Label的所有属性。可以通过下拉框选择,查看属性的效果以及如何设置属性。示例如下:

代码由两部分组成,第一部分是Tkinter窗口代码,第二部分是Label属性数据。
窗口代码
# coding:utf8

import tkinter as tk
from tkinter.ttk import *
from Label_Parameter import *

cbx_para = None  # 属性下拉框
cbx_method = None  # 方法下拉框
lbl_status = None  # 输出说明性文字
lbl_code = None
lbl_result = None
frm_code = None
frm_result = None
init_para={}
demo_image = None
v_str = None

def GetInitParameter():
    global lbl_result
    global init_para
    init_para={}
    for item in Label_Parameter.parameter:
        index = item.split("/")[0]
        init_para[index] = lbl_result[index]

def ClearParameter():
    global lbl_result
    global init_para
    for item in Label_Parameter.parameter:
        index = item.split("/")[0]
        lbl_result[index]=init_para[index]


def Para_Demo(*args):
    global cbx_para
    global lbl_code
    global lbl_status
    global lbl_result
    global frm_result
    global frm_code
    global demo_image
    global v_str

    index = cbx_para.current()

    #
    if index in Label_Parameter.Label_Para:
        ClearParameter()
        frm_code.grid(row=3, column=1, padx=5, pady=5)
        frm_result.grid(row=3, column=2, padx=5, pady=5)

        frm_code["text"]=Label_Parameter.parameter[index]+":代码"
        frm_result["text"]=Label_Parameter.parameter[index]+":效果"
        temp = Label_Parameter.Label_Para[index]
        dis_code = ""
        for item in range(1,len(temp[0])):
            dis_code = dis_code+temp[0][item]+"\n"

        lbl_code['text'] = dis_code
        for item in range(1,len(temp[0])):
            exec(temp[0][item])
        # exec(item) for item in Label_Para[index][2]
        lbl_status['text'] = temp[1]
    else:
        frm_code.grid_forget()
        frm_result.grid_forget()

def center_window(root, width, height):
    screenwidth = root.winfo_screenwidth()
    screenheight = root.winfo_screenheight()
    size = '%dx%d+%d+%d' % (width, height, (screenwidth - width)/2, (screenheight - height)/2)
    root.geometry(size)

def main():
    root = tk.Tk()
    # 属性下拉框
    # 按钮
    global frm_code
    global frm_result
    global v_str
    v_str = tk.StringVar()

    frm_top = tk.Frame(root)
    frm_top.grid(row=1, column=1, sticky="W", columnspan=3, pady=2)
    sp = Separator(root, orient='horizontal')
    sp.grid(row=2, column=1, columnspan=2, sticky="nwse")
    frm_code = tk.LabelFrame(root,text="")
    frm_code.grid(row=3, column=1, padx=10)
    sp = Separator(root, orient='vertical')
    sp.grid(row=3, column=2, sticky="nwse")
    frm_result = tk.LabelFrame(root,text="")
    frm_result.grid(row=3, column=2, pady=5)
    sp = Separator(root, orient='horizontal')
    sp.grid(row=4, colum开发者_Go教程n=1, columnspan=2, sticky="nwse")
    frm_bottom = tk.Frame(root)
    frm_bottom.grid(row=5, column=1, columnspan=3, sticky="w")

    nCbx_Height = 10
    tk.Label(frm_top, text="属性:").grid(row=1, column=1, sticky="e")
    global cbx_para

    txt = [Label_Parameter.parameter[item] + ":" + Label_Parameter.parameter_info[item]
           for item in range(len(Label_Parameter.parameter))]
    cbx_para = Combobox(frm_top, height=nCbx_Height, values=txt, width=38)
    cbx_para.bind("<<ComboboxSelected>>", Para_Demo)
    cbx_para.set(txt[0])
    cbx_para.grid(row=1, column=2)

    tk.Label(frm_top, text="方法:").grid(row=1, column=3, sticky="e", padx=10)
    tk.Label(frm_top, text="无").grid(row=1, column=4, sticky="w", padx=5)
    global lbl_status
    lbl_status = tk.Label(frm_bottom, text="", anchor="w", justify="left")
    lbl_status.grid(row=1, column=1, sticky="w")

    global lbl_code
    lbl_code = tk.Label(frm_code, text="", justify="left")
    lbl_code.grid(row=1, column=1)

    global lbl_result
    lbl_result = tk.Label(frm_result, text="", justify="left")
    lbl_result.grid(row=1, column=1)

    GetInitParameter()
    global demo_image
    demo_image = tk.PhotoImage(file='a.PNG')
    frm_result.grid_forget()
    frm_code.grid_forget()

    root.title("Tkinter 标签使用说明")
    center_window(root,500,280)
    root.mainloop()


if __name__ == "__main__":
    main()

"""tkinter中关于Label的注释
Construct a label widget with the parent MASTER.

STANDARD OPTIONS

    activebackground, activeforeground, anchor,
    background, bitmap, borderwidth, cursor,
    disabledforeground, font, foreground,
    highlightbackground, highlightcolor,
    highlightthickness, image, justify,
    padx, pady, relief, takefocus, text,
    textvariable, underline, wraplength

WIDGET-SPECIFIC OPTIONS

    height, state, width

"""
Label_Parameter.py
第二个程序最好命名为Label_Parameter.py。
如果命名为其他程序需要修改第一部分第5行的代码。
#coding:utf8

class Label_Parameter():
    #Label 参数名称
    parameter=["activebackground", "activeforeground", "anchor", "background/bg",
               "bitmap", "borderwidth/bd", "compound", "cursor",
               "disabledforeground", "font", "foreground/fg", "height",
               "image","justify", "padx", "pady",
               "relief","state", "takefocus", "text",
               "textvariable", "underline", "width", "wraplength"]
    #Label 参数说明
    parameter_info=["背景颜色", "文本颜色", "锚定文字或者图片", "背景颜色",
               "显示bitmap", "边框宽度", "同时显示文字和图片的方法", "光标样式",
               "禁止时的背景颜色", "字体", "文字或者bitmap颜色", "高度",
               "图片","多行文字时对齐方式", "x方向上内边距", "y方向上内边距",
               "边框效果","状态", "使用Tab获得焦点", "显示文字",
                "StringVar变量与标签相关联", "指定字符下划线", "宽度", "折叠多行"]

    #Label 说明,包括序号、代码说明、代码、运行效果
    Label_Para = {
        0: [["activebackground:","lbl_result['activebackground']='red'","lbl_result['state']='active'",
                "lbl_result['text']='activebackground:背景颜色'"],
            "activebackground:定义标签在active状态下背景颜色。\n需要注意的是,必须显式定义state='active',否则该属性不生效"],
        1: [["activeforeground:","lbl_result['activeforeground'] = 'blue'", "lbl_result['state'] = 'active'",
                "lbl_result['text']='activeforeground:文本颜色'"],
            "activeforeground:定义标签在active状态下文字的颜色。\n需要注意的是,必须显式定义state='active',否则该属性不生效"],
        2:[["anchor:","lbl_result['height']=5","lbl_result['anchor']='se'","lbl_result['width']=30",
                "lbl_result['text']='anchor:在右下角SE显示文本'"],
           "anchor:指定如何对齐文字或者图片\nanchor与justify是不同的。\njustijsfy针对的是多行文本的对齐\nanchor针对的是文本在Frame中放置的位置\nanchor可以设置为n,s,w,e或者组合,也可以是center"],
        3:[["background/bg:","lbl_result['text']='绿色背景'","lbl_result['bg']='green'",
                "lbl_result['text']='bg:背景颜色是绿色'"],
           "background/bg:指定标签的背景颜色"],
        4:[["bitmap:","lbl_result['bitmap']='error'"],
           "bitmap:显示位图\n1)使用系统自带的bitmap,直接输入名字即可。比如bitmap='error'\n2)使用自定义的bitmap,在路径前面加上'@'即可"
           ],
        5:[["borderwidth/bd:","lbl_result['bd']=20","lbl_result['bg']='lightblue'","lbl_result['text']='bd:边框=20'"],
           "bd:设置文本到Label边界的宽度\nbd参数相当于设置了padx和pady参数"
           ],
        6:[["compound:","#demo_image = tk.PhotoImage(file='a.PNG')","lbl_result['image']=demo_image","lbl_result['text']='文字在图片下方'","lbl_result['compound']=tk.TOP"],
           "compound:设置图片相对文字的位置\n可以设置为bottom,top,center,right,left\nbottom代表的是图片相对文字的位置\n实际使用中要去掉第一行代码的注释"
           ],
        7:[["cursor:","lbl_result['cursor']='watch'","lbl_result['text']='鼠标经过标签时的光标'"],
           "cursor:鼠标经过标签时的光标"
           ],
        8:[["disabledforeground:","lbl_result['state']=tk.DISABLED","lbl_result['disabledforeground']='red'","lbl_result['text']='标签禁止状态,文字是红色的'"],
            "disabledforeground:标签被禁止的时候的文本颜色\n一定要用state=tk.DISABLED,才能使该选项起作用"],
        9:[["font:","lbl_result['font']=('宋体',20,)","lbl_result['text']='font=(\"宋体\",20,)'"],
           "font:设置文本字体。\n一个标签只能用一种字体。如果要用多种字体,需要用多个标签\n字体定义可以使用三元组(字体名称,大小,修饰)\n也可以使用Font类"
           ],
        10:[["foreground/fg:","lbl_result['text']='红色文本'","lbl_result['fg']='red'http://www.devze.com"],
            "fg:设置标签文本的颜色\n要求标签的状态是tk.NORMAL"],
        11:[["height:","lbl_result['text']='height=10'","lbl_result['height']=10"],
            "height:设置标签的高度,一般与width配合使用"],
        12: [["image:", "#demo_image = tk.PhotoImage(file='a.PNG')","lbl_result['image']=demo_image"],
             "image:显示图片"],
        13: [["justify", "lbl_result['justify']=tk.LEFT", "lbl_result['text']='文字左对齐\\n第二行'"],
             "justify:多行文本的对齐方式\n支持left,right,center"],
        14: [["padx:", "lbl_result['text']='padx=5'", "lbl_result['width']=30","lbl_result['padx']=5"],
             "padx:设置文本到标签边框水平方向距离,常与pady配合使用"],
        15:[["pady:","lbl_result['text']='pady=5'","lbl_result['pady']=5"],
            "pady:设置文本到标签边框垂直方向的距离,常与padx配合使用"],
        16:[["relief:","lbl_result['text']='边框修饰效果'","lbl_result['bd']=10","lbl_result['relief']='raised'"],
            "relief:标签边框的修饰效果\n可设为flat, groove, raised, ridge, solid, or sunken"],
        17:[["state","lbl_result['state']=tk.NORMAL","lbl_result['text']='标签正常状态'"],
            "state:设置标签状态\n可设为active, disabled, 编程normal"],
        18:[["takefocus:","lbl_result['takefocus']=True","lbl_result['text']='标签获得输入焦点'"],
            "takefocus:获得输入焦点。\n由于Label是不支持编辑的,所以获得输入焦点没有作用"],
        19: [["text:", "lbl_result['text']='标签显示的文本'"],
             "text:为标签要显示的文本"],
        20:[["textvariable:","v_str.set('通过textvariable改变标签文本')","lbl_result['textvariable']=v_str"],
             "textvariable:定义与标签文本相关联的变量\n该变量的变化会反应在标签中"],
        21: [["underline:","lbl_result['underline']=4","lbl_result['text']='Hello World!'"],
             "underline:在指定字母下面显示下划线"],
        22: [["width:","lbl_result['width']=30","lbl_result['text']='width=30'"],
             "width:定义标签宽度\n常与height属性配合使用"],
        23: [["wraplength:","lbl_result['wraplength']='50'","lbl_result['text']='这个很长的文本会被折行显示wraplength=30'"],
             "wraplength:定义折行显示\n超过wraplength定义的长度的文字会折行显示\nwraplength的单位是像素,不是文字数目"]

    }
第一部分程序使用了很多的全局变量,是为了编程以及示例代码说明的需要。
在实际的应用中不需要定义这么多的全局变量,也可以使用类的成员变量的方式减少定义全局变量的风险
总结
以上为个人经验,希望能给大家一个参考,也希望大家多多支持我们。


 加载中,请稍侯......
精彩评论