基于WPF实现带明细的环形图表
目录
- 效果
- 大体思路
- 圆弧部分
- Popup明细部分
- 椭圆
- 折线
- Popup的定位
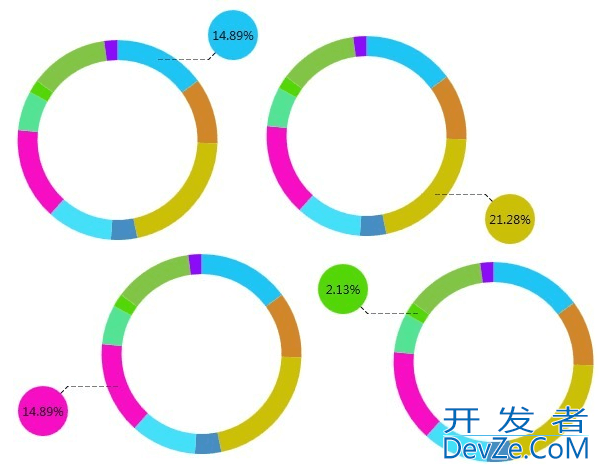
效果
明细用Popup实现的,录gif时,Popup显示不出来,不知道为什么,所以静态图凑合看吧
大体思路
图表使用Arc+Popup实现
图表分为两部分,一是环形部分,一是标注的明细部分.
环形部分使用Arc图形表示.需要注意这个Arc是Blend里的图形.用Blend建项目的话可以直接用,使用VS建项目需要添加引用 Microsoft.Expression.Drawing 在引用管理器=>程序集=>扩展 下(前提是已经安装了Blend)
明细部分使用Popup控件,IsOpen属性绑定到Arc的IsMouseover,也就是鼠标进http://www.devze.com入圆弧的时候,Popup就打开显示.
Popup内部一个椭圆控件当作背景,一个文字显示,一个折线虚线化当作指针
然后就是把Popup定位到对应圆弧合适的位置去显示(这里取的是圆弧的中间)
比较抱歉的是样式比较丑陋,忽略吧,重点看定位.
圆弧部分
Arc有两个重要的属性:StartAngle起始角度和EndAngle终结角度.这两个属性决定了圆弧占所在圆环的比例.
每一个数据项就对应一个圆弧,把所有圆弧都放到一个容器里,首尾相连
数据项的总和为100,那么所有圆弧也就组成一个完整的圆环.
Popup明细开发者_JAVA学习部分
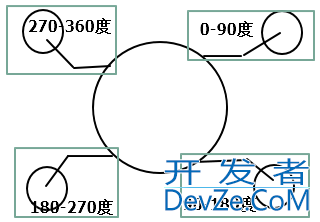
明细部分分为四种,见图
椭圆
从图可知,作为背景的椭圆分为两种情况,小于180度,椭圆靠容器的右边对齐,大于180度,靠容器的左边对齐
也就是代码的这部分:
Ellipse ell = new Ellipse() { Fill = brush };
//中间点角度小于180 明细靠右显示 否则靠左显示
Grid detailGrid = new Grid() { Width = _popupHeight, HorizontalAlignment = HorizontalAlignment.Right };
if (middleAngle > 180)
{
    detailGrid.HorizontalAlignment = HorizontalAlignment.Left;
}
折线
折线是分为四种,每一个角度区间都对应一种
private Polyline GetPopupPolyline(double middleAngle)
{
    Polyline pLine = new Polyline() { Stroke = new SolidColorBrush(Color.FromRgb(0, 0, 0)), StrokeDashArray = new DoubleCollection(new double[] { 5, 2 }) };
    double x1 = 0, y1 = 0;
    double x2 = 0, y2 = 0;
    double x3 = 0, y3 = 0;
    if (middleAngle > 0 && middleAngle <= 90)
    {
        x1 = 0; y1 = _popupHeight;
        x2 = _popupWidth / 2; y2 = _popupHeight;
        x3 = _popupWidth * 3 / 4; y3 = _popupHeight / 2;
    }
    if (middleAngle > 90 && middleAngle <= 180)
    {
        x1 = 0; y1 = 0;
        x2 = _popupWidth / 2; y2 = 0;
编程客栈        x3 = _popupWidth * 3 / 4; y3 = _popupHeight / 2;
    }
    if (middleAngle > 180 && middleAngle <= 270)
    {
        x1 = _popupWidth; y1 = 0;
        x2 = _popupWidth / 2; y2 = 0;
        x3 = _popupWidth / 4; y3 = _popupHeight / 2;
    }
    if (middleAngle > 270 && middleAngle <= 360)
    {
        x1 = _popupWidth; y1 = _popupHeight;
        x2 = _popupWidth / 2; y2 = _popupHeight;
        x3 = _popupWidth / 4; y3 = _popupHeight / 2;
    }
    pLine.Points.Add(new Point(x1, y1));
    pLine.Points.Add(new Point(x2, y2));
    pLine.Points.Add(new Point(x3, y3));
    return pLine;
}
Popup的定位
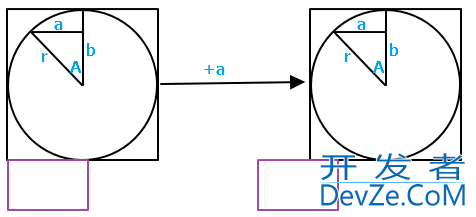
首先以0-90度为例,说明一些基本的东西,见图
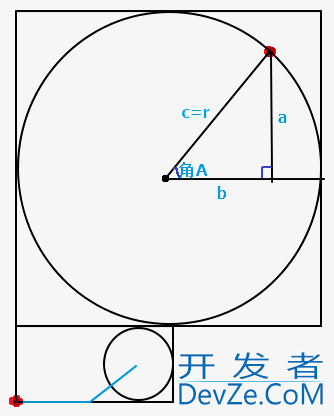
首先Popup默认的位置,都是在它容器的左下方的,Popup的左上角和容器的左下角重合.
现在要做的是Popup标记为红点的位置,和圆环上标记为红点的位置重合.
先来回顾一下小时候学过的公式:
1.直角三角形 a=r*sinA
2.勾股定理 c^2=a^2+b^2 b=Sqrt(c^2-a^2)
上图的直角三角形,角A的对边为a,临边为b,斜边为c.显然c边于圆的半径r相等.注意:因为圆弧是有厚度的,所以取r的时候要减去二分之一的圆弧厚度.
角A是可以通过90度减去圆弧的对应的角度求出来的,也就是sinA的值已知了,那么就可以求出a和b的长度,然ZTpqzqb后就可以去移动Popup了
一.0-90度
X轴:1.向右移动二分之一个容器的width 2.向右移动一个b的距离

Y轴:1.向上移动二分之一个容器的height 2.向上移动一个Popup的height 3.向上移动一个a的距离

二.90-180度
X轴:1.向右移动二分之一个容器的width 2.向右移动一个a的距离

Y轴:1.上移二分之一个圆弧的Thickness,以保证标记的起点在圆弧的中央 2.上移一个(r-b)的距离

三.180-270度
X轴:1.向左移动一个b的距离
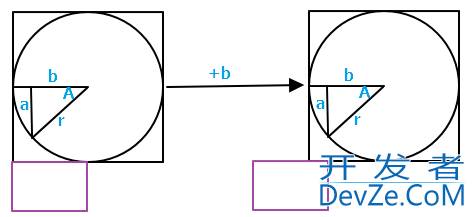
Y轴:1.上移二分之一个圆弧的Thickness,以保证标记的起点在圆弧的中央 2.上移一个(r-a)的距离

四.270-360度
X轴:1.向左移动一个a的距离
Y轴:1.向上移动二分之一个容器的height 2.向上移动一个Popup的height 3.向上移动一个b的距离

代码部分
private Popup GetPopup(double middleAngle)
{
    /*
     * 生成popup
     * 设置popup的offset 让标记线的起点 对应到圆弧的中间点
     */
    Popup popup = new Popup() { Width = _popupWidth, Height = _popupHeight, AllowsTransparency = true, IsHitTestVisible = false };
    //直角三角形 a=r*sinA 勾股定理 c^2=a^2+b^2 b=Sqrt(c^2-a^2)
    double r = _chartSize / 2 - _arcThickness / 2;
    double offsetX = 0, offsetY = 0;
    if (middleAngle > 0 && middleAngle <= 90)
    {
android        double sinA = Math.Sin(Math.PI * (90 - middleAngle) / 180);
        double a = r * sinA;
        double c = r;
        double b = Math.Sqrt(c * c - a * a);
        offsetX = _chartSize / 2 + b;
        offsetY =编程客栈 -(_chartSize / 2 + _popupHeight + a);
    }
    if (middleAngle > 90 && middleAngle <= 180)
    {
        double sinA = Math.Sin(Math.PI * (180 - middleAngle) / 180);
        double a = r * sinA;
        double c = r;
        double b = Math.Sqrt(c * c - a * a);
        offsetX = _chartSize / 2 + a;
        offsetY = -(_arcThickness / 2 + (r - b));
    }
    if (middleAngle > 180 && middleAngle <= 270)
    {
        double sinA = Math.Sin(Math.PI * (270 - middleAngle) / 180);
        double a = r * sinA;
        double c = r;
        double b = Math.Sqrt(c * c - a * a);
        offsetX = -_popupWidth + (r - b) + _arcThickness / 2;
        offsetY = -(_arcThickness / 2 + (r - a));
    }
    if (middleAngle > 270 && middleAngle <= 360)
    {
        double sinA = Math.Sin(Math.PI * (360 - middleAngle) / 180);
        double a = r * sinA;
        double c = r;
        double b = Math.Sqrt(c * c - a * a);
        offsetX = -_popupWidth + (r - a) + _arcThickness / 2;
        offsetY = -(_chartSize / 2 + _popupHeight + b);
    }
    popup.HorizontalOffset = offsetX;
    popup.VerticalOffset = offsetY;

    return popup;
}
差不多主要的就是这些了.到这.画图有点累.
源码下载:ArcChart.zip
到此这篇关于基于wpF实现带明细的环形图表 的文章就介绍到这了,更多相关WPF环形图表内容请搜索我们以前的文章或继续浏览下面的相关文章希望大家以后多多支持我们!


 加载中,请稍侯......
精彩评论