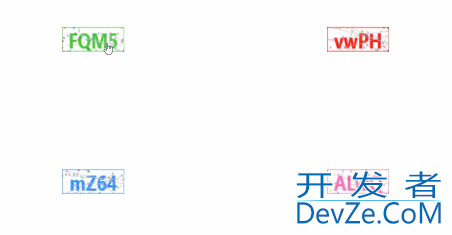
基于WPF实现验证码控件
代码如下
一、创建CheckCode.xaml代码如下
<ResourceDictionaryXMLns="http://schemas.microsoft.com/winfx/2006/xaml/presentation"
xmlns:x="http://schemas.microsoft.com/winfx/2006/xaml"
xmlns:controls="clr-namespace:wpFDevelopers.Controls">

<ResourceDictionary.MergedDictionaries>
<ResourceDictionarySource="Basic/ControlBasic.xaml"/>
</ResourceDictionary.MergedDictionaries>

<StyleTargetType="{x:Typecontrols:CheckCode}"BasedOn="{StaticResourceControlBasicStyle}">
<SetterProperty="Background"Value="{x:Null}"/>
<SetterProperty="Width"Value="100"/>
<SetterProperty="Height"Value="40"/>
<SetterProperty="Cursor"Value="Hand"/>
<SetterProperty="Template">
<Setter.Value>
<ControlTemplateTargetType="{x:Typecontrols:CheckCode}">
<Imagex:Name="PART_Image"Stretch="Fill"Source="{TemplateBindingImageSource}"/>
</ControlTemplate>
</Setter.Value>
</Setter>
</Style>
</ResourceDictionary>
二、CheckCode.cs代码如下
usingSystem;
usingSystem.Windows;
usingSystem.Windows.Controls;
usingSystem.Windows.Input;
usingSystem.Windows.Media;
usingSystem.Windows.Media.Imaging;

namespaceWPFDevelopers.Controls
{
[TemplatePart(Name=ImageTemplateName,Type=typeof(Image))]
publicclassCheckCode:Control
{

privateconststringImageTemplateName="PART_Image";
privateImage_image;
privateSize_size=newSize(70,23);
privateconststringstrCode="abcdefhkmnprstuvwxyzABCDEFGHJKLMNPQRSTUVWXYZ23456789";

publicstaticreadonlyDependencyPropertyImageSourceProperty=
DependencyProperty.Register("ImageSource",typeof(ImageSource),typeof(CheckCode),newPropertyMetadata(null));
///<summary>
///随机生成的验证码
///</summary>
publicImageSourceImageSource
{
get{return(ImageSource)GetValue(ImageSourceProperty);}
set{SetValue(ImageSourceProperty,value);}
}

///<summary>
///字体颜色
///</summary>
publicBrushSizeColor
{
get{return(Brush)GetValue(SizeColorProperty);}
set{SetValue(SizeColorProperty,value);}
}

publicstaticreadonlyDependencyPropertySizeColorProperty=
DependencyProperty.Register("SizeColor",typeof(Brush),typeof(CheckCode),newPropertyMetadata(DrawingContextHelper.Brush));

publicCheckCode()
{
this.Loaded+=CheckCode_Loaded;
}

privatevoidCheckCode_Loaded(objectsender,RoutedEventArgse)
{
ImageSource=CreateCheckCodeImage(CreateCode(4),(int)this.ActualWidth,(int)this.ActualHeight);
}

publicoverridevoidOnApplyTemplate()
{
base.OnApplyTemplate();
_image=GetTemplateCyAtDOBzLthild(ImageTemplateName)asImage;
if(_image!=null)
_image.PreviewMouseDown+=_image_PreviewMouseDown;


}

privatevoid_image_PreviewMouseDown(objectsender,MouseButtonEventArgse)
{
if(!IsLoaded)
return;

ImageSource=CreateCheckCodeImage(CreateCode(4),(int)this.ActualWidth,(int)this.ActualHeight);
}

privatestringCreateCode(intstrLength)
{
var_charArray=strCode.ToCharArray();
varrandomCode="";
inttemp=-1;
Randomrand=newRandom(Guid.NewGuid().GetHashCode());
for(inti=0;i<strLength;i++)
{
if(temp!=-1)
rand=newRandom(i*temp*((int)DateTime.Now.Ticks));
intt=rand.Next(strCode.Length-1);
if(!string.IsNullOrWhiteSpace(randomCode))
{
while(randomCode.ToLower().Contains(_charArray[t].ToString().ToLower()))
t=rand.Next(strCode.Length-1);
}
if(temp==t)
returnCreateCode(strLength);
temp=t;

randomCode+=_charArray[t];
}
returnrandomCode;
}
privateImageSourceCreateCheckCodeImage(stringcheckCode,intwidth,intheight)
{
if(string.IsNullOrWhiteSpace(checkCode))
returnnull;
if(width<=0||height<=0)
returnnull;
vardrawingVisual=newDrawingVisual();
varrandom=newRand编程客栈om(Guid.NewGuid().GetHashCode());
using(DrawingContextdc=drawingVisual.Rend开发者_C教程erOpen())
{
dc.DrawRectangle(Brushes.White,newPen(SizeColor,1),newRect(_size));
varformattedText=DrawingContextHelper.GetFormattedText(checkCode,color:SizeColor,flowDirection:FlowDirection.LeftToRight,textSize:20,fontWeight:FontWeights.Bold编程);
dc.DrawText(formattedText,newPoint((_size.Width-formattedText.Width)/2,(_size.Height-formattedText.Height)/2));

for(inti=0;i<10;i++)
{
intx1=random.Next(width-1);
inty1=random.Next(height-1);
intx2=random.Next(width-1);
inty2=random.Next(height-1);

dc.DrawGeometry(Brushes.Silver,newPen(Brushes.Silver,0.5D),newLineGeometry(newPoint(x1,y1),newPoint(x2,y2)));
}

for(inti=0;i<100;i++)
{
intx=random.Next(width-1);
inty=random.Next(height-1);
SolidColorBrushc=newSolidColorBrush(Color.FromRgb((byte)random.Next(0,255),(byte)random.Next(0,255),(byte)random.Next(0,255)));
dc.DrawGeometry(c,newPen(c,1D),newLineGeometry(newPoint(x-0.5,y-0.5),newPoint(x+0.5,y+0.5)));
}

dc.Close();
}

varrenderBitmap=newRenderTargetBitmap(70,23,96,96,PixelFormats.Pbgra32);
renderBitmap.Render(drawingVisual);
returnBitmapFrame.Create(renderBitmap);
}
}
}
三、新建CheckCodeExample.cs代码如下
<UserControlx:Class="WPFDevelopers.Samples.ExampleViews.CheckCodeExample"
xmlns="http://schemas.microsoft.com/winfyAtDOBzLtx/2006/xaml/presentation"
xmlns:x="http://schemas.microsoft.com/winfx/2006/xaml"
xmlns:mc="http://schemas.openxmlformats.org/markup-compatibility/2006"
xmlns:d="http://schemas.microsoft.com/expression/blend/2008"
xmlns:local="clr-namespace:WPFDevelopers.Samples.ExampleVihttp://www.devze.comews"
xmlns:wpfdev="https://github.com/WPFDevelopersOrg/WPFDevelopers"
mc:Ignorable="d"
d:DesignHeight="450"d:DesignWidth="800">
<UniformGridRows="2"Columns="2">
<wpfdev:CheckCodeSizeColor="LimeGreen"/>
<wpfdev:CheckCodeSizeColor="Red"/>
<wpfdev:CheckCodeSizeColor="DodgerBlue"/>
<wpfdev:CheckCodeSizeColor="HotPink"/>
</UniformGrid>
</UserControl>
效果预览

源码地址如下
Github:https://github.com/WPFDevelopersOrg
Gitee:https://gitee.com/WPFDevelopersOrg
以上就是基于WPF实现验证码控件的详细内容,更多关于WPF验证码控件的资料请关注我们其它相关文章!


 加载中,请稍侯......
精彩评论