Springboot通过请求头获取当前用户信息方法详细示范
目录
- 一、实现原理
- 二、导入依赖
- 三、配置文件
- 四、代码实现
- 五、总结
一、实现原理
1、token的存储
当用户登录时,将<token, userInfo>存入Redis缓存中,以便鉴权与获取用户信息。
2、发送请求
每次发送请求时将token放入请求头中,令key为“Authorization”或其他值。
3、获取请求头部
ServletRequestAttributes sra = (ServletRequestAttributes) RequestContextHolder.getRequestAttributes();
HttpServletRequest request = sra.getRequest();
4、用户请求头部携带的token在redis中获得userInfo
二、导入依赖
1、redis相关依赖
<dependency>
    <groupId>org.springframework.boot</groupId>
    <artifactId>spring-boot-starter-data-redis</artifactId>
</dependency>
<dependency>
    <groupId>org.apache.commons</groupId>
    <artifactId>commons-pool2&l编程客栈t;/artifactId>
</dependency>
2、fastjson
<dependency>
    <groupId>com.alibaba</groupId>
    <artifactId>fastjson</artifactId>
</dependency>
3、myBATis-plus
<dependency>
    <groupId>com.baomidou</groupId>
    <artifactId>mybatis-plus</artifactId>
</dependency>
<dependency>
    <groupId>com.baomidou</groupId>
    <artifactId>mybatis-plus-boot-starter</artifactId>
</dependency>
三、配置文件
server:
port: 10002spring: datasource: url: jdbc:mysql://localhost:3306/myDB?characterEncoding=utf-8&serverTimezone=Asia/Shanghai username: <用户名> password: <密码> driver-class-name: com.mysql.cj.jdbc.Driver redis: #数据库索引 database: 0 host: 127.0.0.1 password: <密码> jedis: pool: max-idle: 300 max-active: 600 max-wait: 1000 timeout: 3600 port: 6379 pool: maxTotal: 1000 testOnBorrow: true
四、代码实现
1、RedisUtil
import org.springframework.data.redis.core.StringRedisTemplate;
import org.springframework.stereotype.Component;
import Javax.annotation.Resource;
import java.util.concurrent.TimeUnit;
/**
 * redis工具类
 */
@Component
public class RedisUtil {
    @Resource
    private StringRedisTemplate stringRedisTemplate;
    /**
     * 指定缓存失效时间
     *
     * @param key  键
     * @param time 时间javascript(秒)
     * @return true or false
     */
    public  Boolean expire(final String key, final long time) {
        stringRedisTemplate.afterPropertiesSet();
        try {
            if (time > 0) {
                stringRedisTemplate.expire(key, time, TimeUnit.SECONDS);
            }
            return true;
        } catch (final Exception e) {
            e.printStackTrace();
            return false;
        }
    }
    /**
   开发者_自学开发  * 普通缓存获取
     *
     * @param key 键
     * @return 值
     */
    public  Object get(final String key) {
        stringRedisTemplate.afterPropertiesSet();
        return key == null ? null : stringRedisTemplate.opsForValue().get(key);
    }
    /**
     * 普通缓存放入
     *
     * @param key   键
     * @param value 值
     * @return true成功 false失败
http://www.devze.com     */
    public  Boolean set(final String key, final String value) {
        stringRedisTemplate.afterPropertiesSet();
        try {
            stringRedisTemplate.opsForValue().set(key, value);
            return true;
        } catch (final Exception e) {
            e.printStackTrace();
            return false;
        }
    }
    /**
     * 普通缓存放入并设置时间
     *
     * @param key   键
     * @param value 值
     * @param time  时间(秒) time要大于0 如果time小于等于0 将设置无限期
     * @return true成功 false 失败
     */
    public  Boolean set(final String key, final String value, final long time) {
        stringRedisTemplate.afterPropertiesSet();
        try {
            if (time > 0) {
                stringRedisTemplate.opsForValue().set(key, value, time, TimeUnit.SECONDS);
            } else {
                set(key, value);
            }
            return true;
        } catch (final Exception e) {
            e.printStackTrace();
            return false;
        }
    }
    /**
     * 删除键
     * @param key 键
     * @return true or false
     */
    public  Boolean del(final String key) {
        stringRedisTemplate.afterPropertiesSet();
        try {
            stringRedisTemplate.opsForHash().delete(key);
            return true;
        } catch (final Exception e) {
            e.printStackTrace();
            return false;
        }
    }
}
编程客栈2、TokenUtil
import java.util.UUID;
public class TokenUtil {
    public static String generateToken() {
        //生成唯一不重复的字符串
        return UUID.randomUUID().toString();
    }
}
3、UserHelper
import com.alibaba.fastjson.JSONObject;
import com.example.commons.utils.MyStringUtils;
import com.example.commons.utils.ObjectUtil;
import com.example.commons.utils.RedisUtil;
import com.example.commons.vo.UserVO;
import org.springframework.beans.factory.annotation.Autowired;
import org.springframework.stereotype.Component;
import org.springframework.web.context.request.RequestContextHolder;
import org.springframework.web.context.request.ServletRequestAttributes;
import javax.servlet.http.HttpServletRequest;
@Component
public class UserHelper {
    @Autowired
    private RedisUtil redisUtil;
    /**
     * 获取当前用户的信息
     * @return userVO
     */
    public UserVO getCurrentUser() {
        ServletRequestAttributes sra = (ServletRequestAttributes) RequestContextHolder.getRequestAttributes();
        if (sra == null) {
            return null;
        }
        HttpServletRequest request = sra.getRequest();
        return getCurrentUser(request);
    }
    /**
     * 通过请求获取当前用户信息
     * @param request 请求
     * @return userVO
     */
    public UserVO getCurrentUser(HttpServletRequest request) {
        String token = request.getHeader("Authorization");
        if (MyStringUtils.isBlank(token)) {
            return null;
        }
        return getCurrentUserByToken(token);
    }
    /**
     * 通过token获取当前用户信息
     * @param token token
     * @return userVO
     */
    public UserVO getCurrentUserByToken(String token) {
        String context = (String) redisUtil.get(token);
        if (MyStringUtils.isBlank(context)) {
            return null;
        }
        try {
            return JSONObject.parseobject(context, UserVO.class);
        } catch (Exception e) {
            e.printStackTrace();
        }
        return null;
    }
    /**
     * 获取当前用户的id
     * @return 用户id
     */
    public Long getCurrentUserId() {
        UserVO userVO = getCurrentUser();
        if (ObjectUtil.isNull(userVO)) {
            return null;
        }
        return userVO.getId();
    }
    /**
     * 获取当前请求
     * @return request
     */
    public HttpServletRequest getHttpServletRequest() {
        ServletRequestAttributes sra = (ServletRequestAttributes) RequestContextHo编程客栈lder.getRequestAttributes();
        if (sra == null) {
            return null;
        }
        return sra.getRequest();
    }
}
以上代码中提到的UserVO、MyStringUtil、ObjectUtil均为本人自定义,比较简单且与主题关联不大,就不占用篇幅了。
4、登录
@PostMapping("/login")
public RestResponseEntity Login(@RequestParam("id") Long id) {
    // 此处简化操作,只要用户id存在即视为登录成功
    User user = userService.getUserById(id);
    if (ObjectUtil.isNull(user)) {
        return RestResponseEntity.fail("登录失败");
    }
    UserVO userVO = new UserVO();
    userVO.setId(user.getId());
    userVO.setName(user.getUName());
    // 将userVO序列化转成json字符串
    String userContext = JSON.toJSONString(userVO);
    // 随机生成一个token
    String token = TokenUtil.generateToken();
    // 将token与userContext存入redis
    redisUtil.set(token, userContext);
    return RestResponseEntity.success(token);  // 此处响应体为自定义
}
5、调用getCurrentUser实例
import com.example.commons.vo.UserVO;
import com.example.reader.Helper.UserHelper;
import org.springframework.beans.factory.annotation.Autowired;
import org.springframework.web.bind.annotation.GetMapping;
import org.springframework.web.bind.annotation.RequestMapping;
import org.springframework.web.bind.annotation.RestController;
@RestController
@RequestMapping("/user")
public class UserController {
    @Autowired
    private UserHelper userHelper;
    @GetMapping("/getUser")
    public UserVO getUser() {
        return userHelper.getCurrentUser();
    }
}
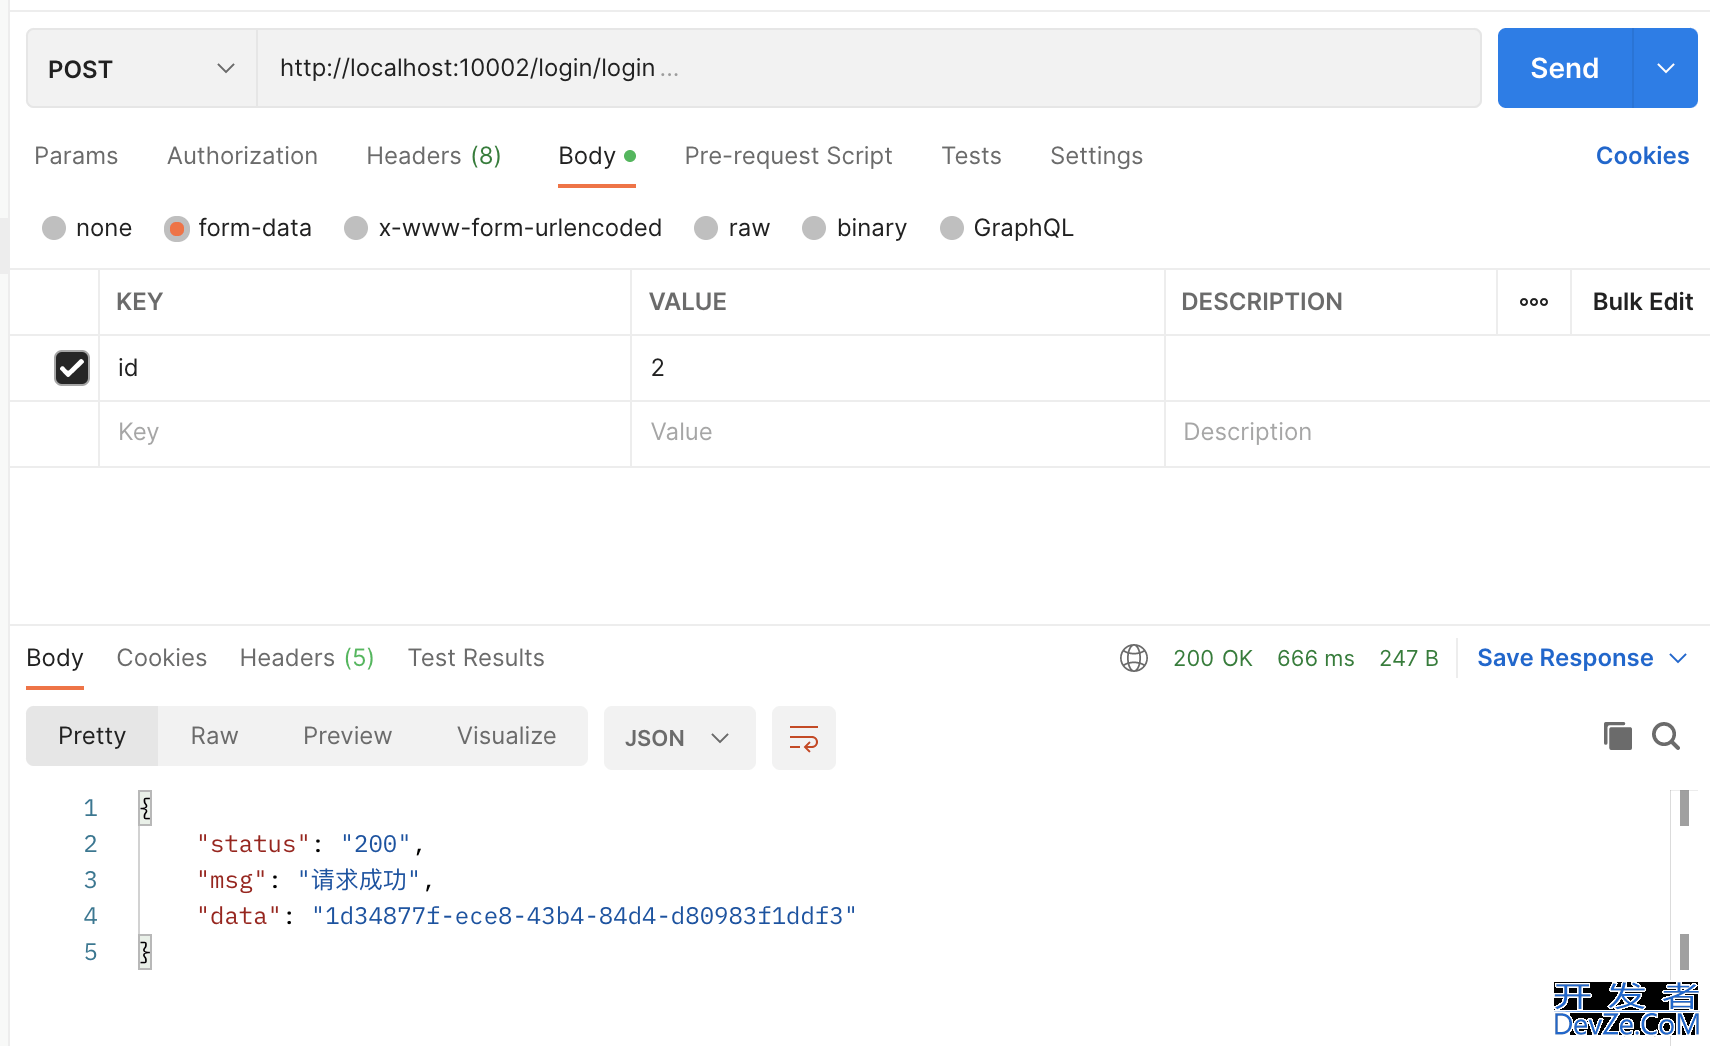
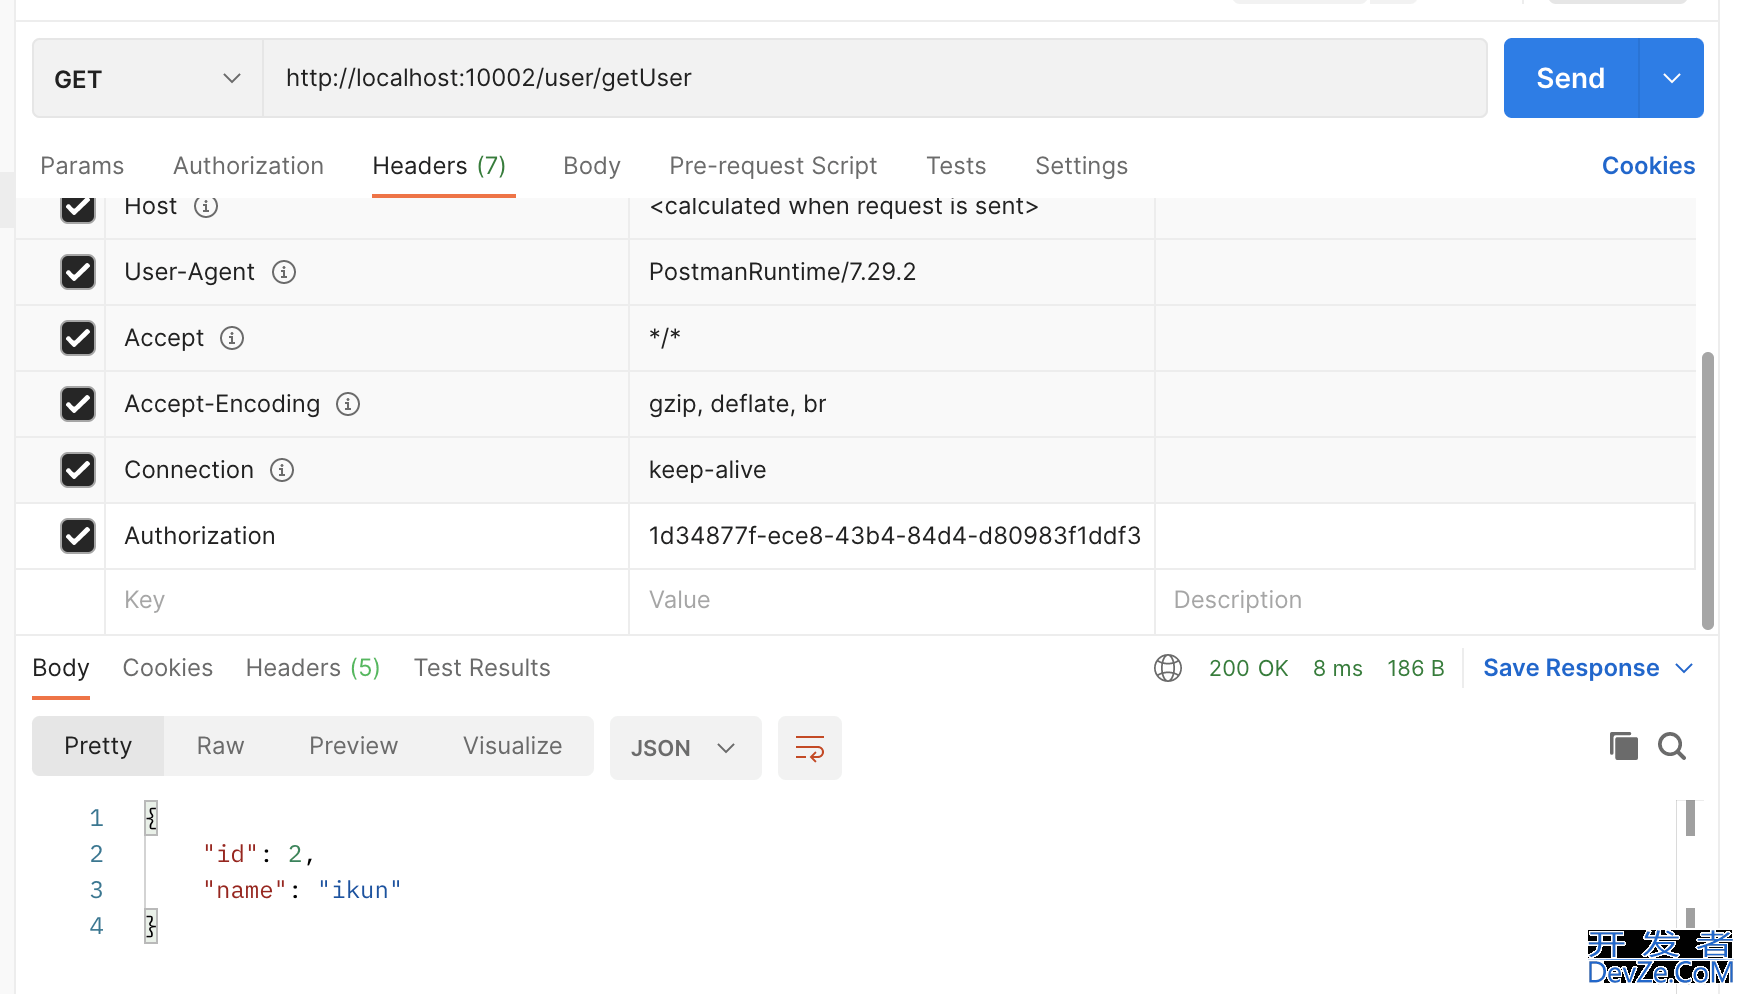
6、测试
(1)登录测试

请求成功,token与userInfo也已写入redis

(2)获得当前用户信息

五、总结
用这种方法获取当前用户信息,只需要一句简单的
UserVO userVO =userHelper.getCurrentUser();
而不需要在controller或者其他业务代码中获取http头部,更加整洁。并且将一些用户常用的信息存入redis中,可以减少检索数据库的次数,一定程度上可以提高效率。
到此这篇关于Springboot通过请求头获取当前用户信息方法详细示范的文章就介绍到这了,更多相关Springboot请求头获取用户信息内容请搜索我们以前的文章或继续浏览下面的相关文章希望大家以后多多支持我们!


 加载中,请稍侯......
精彩评论