Android入门之Service的使用详解
目录
- 简介
- 什么是Service
- Service的生命周期
- startService和bindService的区别
- startService ()时Service的生命周期
- bindService()时Service的生命周期
- 例子
- 全代码
- 后端代码
简介
我们的android在启动一些长事务时都会使用异步,很多初学者觉得这个异步就是一个异步线程+Handler而己。如果你这么想就错了。这一切其实靠的正是Android里的Service。
Service分成普通Service和IntentService两种。而启动又发为两对:
- 第一对,startService/stopService;
- 第二对,bindService/unbindService;
后面开始我们就逐步展开对Android Service的讲述,我尽量也以“保姆式教程”的方法来引领着大家循序渐进的入门,以求牢固掌握这些基础的东西。
下面我们就来讲Android中最最简单的Service使用。
什么是Service
Service和Thread的区别。其实他们两者并没有太大的关系,不过有很多朋友经常把这两个混淆了! Thread是线程,程序执行的最小单元,分配CPU的基本单位! 而Service则是Android提供一个允许长时间留驻后台的一python个组件,最常见的 用法就是做轮询操作!或者想在后台做一些事情,比如后台下载更新! 记得别把这两个概念混淆。

所以通过上面的理论我们知道,service有两种启动方式:
- startService/stopService
- bindService/unBindservice
我们就说startService,这个start一下去,整个service的生命周期就变得非常非常有用了。
为什么这么说呢?
因为你要写一个service时,经常会遇到:何时给它赋初始值?何时处理?何时回调?何时结束?
这就是“生命周期”的重要性。
各位不要感到“枯燥”,就像spring boot的生命周期,当你的业务场景足够复杂时,这种生命周期中大部分点你是需要Override到的。如果有些朋友你觉得生命周期从来没什么用那说明你所在的项目已经足够简单到没什么工作经验、技术含量可言了,那么我奉劝你如果长时间在这么没有含量的项目内你要考虑自身是不是会栽在35、40这个梗上了,这是很危险的一个信号。
Service的生命周期
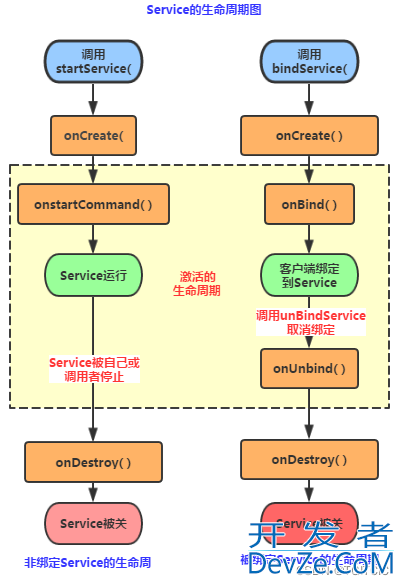
本着保姆式教程的精神,我们说经常会使用到的Service的生命周期。各位记得,startService和bindService的启动决定着它的生命周期也不相同。
startService和bindService的区别
服务不能自己运行。一旦Activity中调用了startService()方法启动Service后,Activity就不能直接控制Service了。这时就需要bindService()把Activity和Service联系起来,之后就能在Activity中指挥Service去工作了。
startService()和bindServicejs()都能启动Service,它们的调用顺序也会对Service产生影响,具体影响我们看下去。startService ()时Service的生命周期
通过startService(),Service会经历 onCreate() –> onStart() 启动Service。然后stopService()的时候直接onDestroy()。如果调用者直接退出而没有调用stopService(),那么Service会一直在后台运行。 注意在Service的一个生命周期之内只会调用一次onCreate()方法,stopService()之前若多次startService()则只会调用onStart()方法。
bindService()时Service的生命周期
如果打算采用bindService()方法启动服务,在服务未被创建时,系统会先调用服务的onCreate()方法,接着调用onBind()方法。这个时候调用者和服务绑定在一起,调用者unbindService()退出了,系统就会先调用服务的onUnbind()方法,接着调用onDestroy()方法。多次调用bindService()方法并不会导致多次创建服务及绑定(也就是说onCreate()和onBind()方法并不会被多次调用)。
如果bindService()之前Service已经在运行了,那么这是调用unbindService()只会onUnbind()而不会onDestory()。
以一个例子我们先来看start/stop一个service以下它的生命周期是如何经历的。
例子

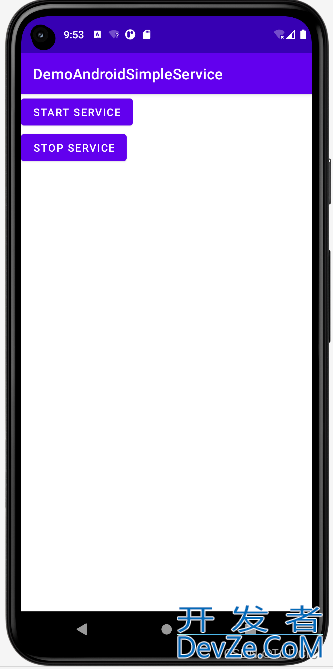
我们的界面上就两个按钮,一个startService,一个stopService。
来看具体的代码
全代码
后端代码
service类-SimpleService类
package org.mk.android.demoandroidsimpleservice;

import android.app.Service;
import android.content.Intent;
import android.os.IBinder;
import android.util.Log;

public class SimpleService extends Service 编程{
    private final String TAG = "SimpleService";

    public SimpleService() {
    }

    @Override
    public IBinder onBind(Intent intent) {
        // TODO: Return the communication channel to the service.
        Log.i(TAG, ">>>>>>onBind方法被调用");
        return null;
    }

    //Service被创建时调用
    @Override
    public void onCreate() {
        Log.i(TAG, ">>>>>>onCreate方法被调用");
        super.onCreate();
    }

    //Service被启动时调用
    @Override
    public int onStartCommand(Intent intent, int flags, int startId) {
        Log.i(TAG, ">>>>>>onStartCommand方法被调用");
        return super.onStartCommand(intent, flags, startId);
    }

    //Service被关闭之前回调
    @Override
    public void onDestroy() {
        Log.i(TAG, ">>>>>>onDestory方法被调用");
        super.onDestroy();
    }
}
运行主类
package org.mk.android.demoandroidsimpleservice;

import androidx.appcompat.app.AppCompatActivity;

import android.content.Context;
import android.content.Intent;
import android.os.Bundle;
import android.view.View;
import android.widget.Button;

public class MainActivity extends AppCompatActivity {
    private Button buttonStartSimpleService;
    private Button buttonStopSimpandroidleService;
    private Intent intent = new Intent();
    private Context ctx;
    @Override
    protected void onCreate(Bundle savedInstanceState) {
        super.onCreate(savedInstanceState);
        setContentView(R.layout.activity_main);
         ctx = MainActivity.this;
        buttonStartSimpleService = (Button) findViewById(R.id.buttonStartSimpleService);
        buttonStopSimpleService = (Button) findViewById(R.id.buttonStopSimpleService);
        buttonStartSimpleService.setOnClickListener(new OnClickListener());
        buttonStopSimpleService.setOnClickListener(new OnClickListener());
    }

    class OnClickListener implements View.OnClickListener {
        @Override
        public void onClick(View开发者_JAVA view) {
            Intent eIntent;
            switch (view.getId()) {
                case R.id.buttonStartSimpleService:
                    intent=new Intent(ctx,SimpleService.class);
                    startService(intent);
                    break;
                case R.id.buttonStopSimpleService:
                    intent=new Intent(ctx,SimpleService.class);
                    stopService(intent);
                    break;
            }
        }
    }
}
为了运行Service你还需要在AndroidManifest.XML文件中注册这个Service
注意下文中的<service>块。
<?xml version="1.0" encoding="utf-8"?>
<manifest xmlns:android="http://schemas.android.com/apk/res/android"
    xmlns:tools="http://schemas.android.com/tools">

    <application
        android:allowBackup="true"
        android:dataExtractionRules="@xml/data_extraction_rules"
        android:fullBackupContent="@xml/backup_rules"
        android:icon="@mipmap/ic_launcher"
        android:label="@string/app_name"
        android:roundIcon="@mipmap/ic_launcher_round"
        android:supportsRtl="true"
        android:theme="@style/Theme.DemoAndroidSimpleService"
        tools:targetApi="31">
        <service
            android:name=".SimpleService"
            android:enabled="true"
            android:exported="true">
            <intent-filter>
                <action
                    android:name="org.mk.android.demoandroidsimpleservice.SimpleService"/>
            </intent-filter>

        </service>

        <activity
            android:name=".MainActivity"
            android:exported="true">
            <intent-filter>
                <action android:name="android.intent.action.MAIN" />

                <category android:name="android.intent.category.LAUNCHER" />
            </intent-filter>

            <meta-data
                android:name="android.app.lib_name"
                android:value="" />
        </activity>
    </application>

</manifest>
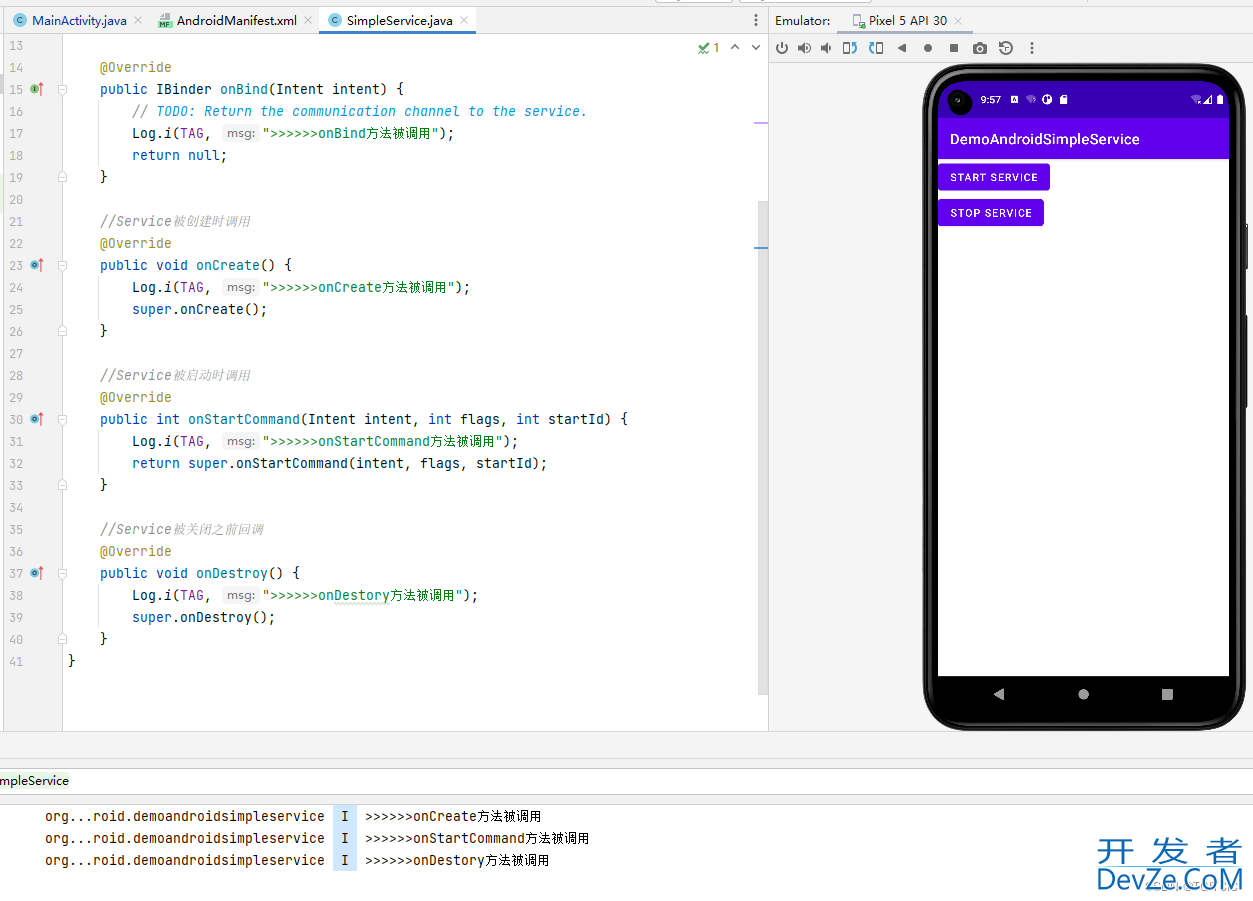
运行后的效果

这个运行后的效果恰恰说明了一个这样的效果:通过startSwww.devze.comervice启动的Service的生命周期不会触碰到那些bindService才拥有的生命周期中。
到此这篇关于Android入门之Service的使用详解的文章就介绍到这了,更多相关Android Service内容请搜索我们以前的文章或继续浏览下面的相关文章希望大家以后多多支持我们!


 加载中,请稍侯......
精彩评论