SpringBoot的pom.xml文件中设置多环境配置信息方法详解
目录
- 前言
- 1. 示例代码结构
- 2. pom.XML配置文件
- 3. application.yml文件
- 4. TestController文件
- 5. Main文件
- 6. 验证结果
- 总结
前言
Java项目开发中会用到多种中间件,比如mysql、Redis、RocketMQ等,每个项目又存在开发环境、测试环境、验收环境、生产环境等。有种方案是把这些配置信息放到pom.xml文件中,方便Jenkins进行打包,也方便开发。
1. 示例代码结构
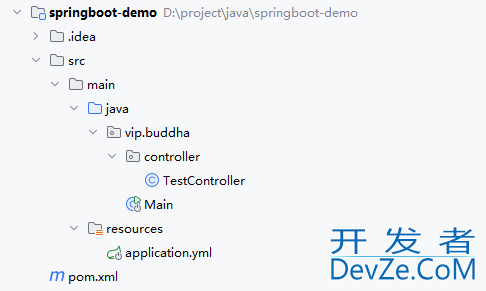
2. pom.xml配置文件
<?xml version="1.0" encoding="UTF-8"?>
<project xmlns="http://maven.apache.org/POM/4.0.0"
         xmlns:xsi="http://www.w3.org/2001/XMLSchema-instance"
         xsi:schemaLocation="http://maven.apache.org/POM/4.0.0 http://maven.apache.org/xsd/maven-4.0.0.xsd">
    <modelVersion>4.0.0</modelVersion>

    <parent>
        <groupId>org.springframework.boot</groupId>
        <artifactId>spring-boot-starter-parent</artifactId>
        <version>2.7.0</version>
    </parent>

    <groupId>vip.buhttp://www.devze.comddha</groupId>
    <artifactId>springboot-demo</artifactId>
    <version>1.0-SNAPSHOT</version>

    <properties>
        <maven.compiler.source>8</maven.compiler.source>
        <maven.compiler.target>8</maven.compiler.target>
    </properties>

    <dependencies>
        <dependency>
            <groupId>org.springframework.boot</groupId>
            <artifactId>spring-boot-starter-web</artifactId>
        </dependency>
    </dependencies>

    <profiles>
        <!-- 开发环境 -->
        <profile>
            <id>dev</id>
            <activation>
                <activeByDefault>true</activeByDefault>
            </activation>
            <properties>
                <db.url>jdbc:mysql://localhost:3306/dev_db</db.url>
                <db.username>dev_user</db.username>
                <db.password>dev_password</db.password>
            </properties>
        </profile>

        <!-- 生产环境 -->
        <profile>
            <id>prod</id>
            <activation>
                <activeByDefault>false</activeByDefault>
            </activation>
            <properties>
                <db.url>jdbc:mysql://localhost:3306/prod_db</db.url>
                <db.username>prod_user</db.username>
                <db.password>prod_password</db.password>
            </properties>
        </profile>
    </profiles>
    <build>
        <resources>
            <resource>
                <directory>src/main/resources</directory>
                <filtering>true</filtering>
                <!-- 添加以下配置,明确包含YAML文件 -->
                <includes>
                    <include>**/*.yml</include>
                </includes>
            </resource>
        </resour编程客栈ces>

        <plugins>
            <plugin>
                <artifactId>maven-resources-plugin</artifactId>
                <configuration>
                    <delimiters>
                        <delimiter>${}</delimiter> <!-- 使用 ${} 作为占位符 -->
                    </delimiters>
                    <useDefaultDelimiters>false</useDefaultDelimiters> <!-- 禁用默认的 @..@ -->
                </configuration>
            </plugin>
        </plugins>
    </build>

</project>
3. application.yml文件
spring:
  datasource:
    url: ${db.url}
    username: ${db.username}
    password: ${db.password}
4. TestController文件
package vip.buddha.controller;

import org.springframework.beans.factory.annotation.Value;
import org.springframework.web.bind.annotation.RequestjavascriptMapping;
import org.springframework.web.bind.annotation.RestController;

@RestController
public class TestController {
    @Value("${spring.datasource.url}")
    private String url;

    @Value("${spring.datasource.username}")
    private String u编程客栈sername;

    @Value("${spring.datasource.password}")
    private String password;

    @RequestMapping("/test")
    public void test() {
        System.out.println("url:" + url);
        System.out.println("username:" + username);
        System.out.println("password:" + password);
    }
}
5. Main文件
package vip.buddha;

import org.springframework.boot.SpringApplication;
import org.springframework.boot.autoconfigure.SpringBootApplication;

@SpringBootApplication
public class Main {
    public static void main(String[] args) {
        SpringApplication.run(Main.class, args);
    }
}
6. 验证结果
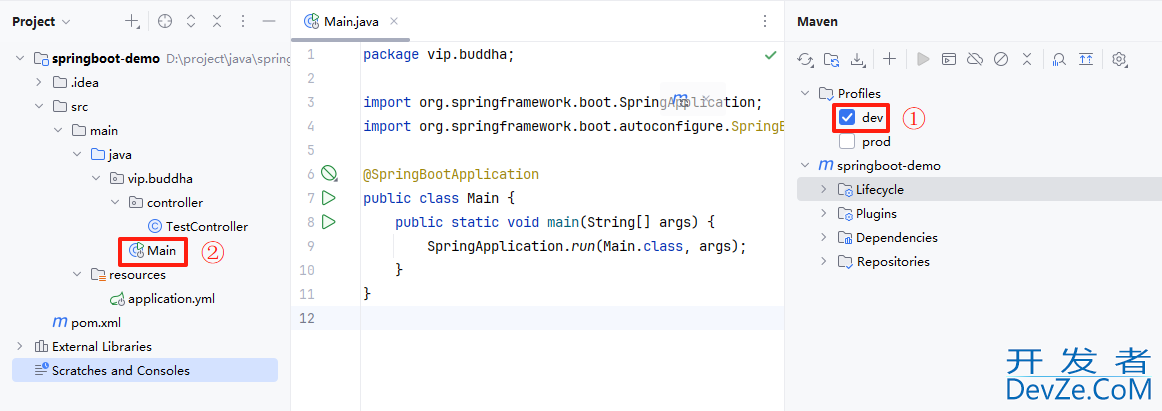
通过上面步骤,启动项目
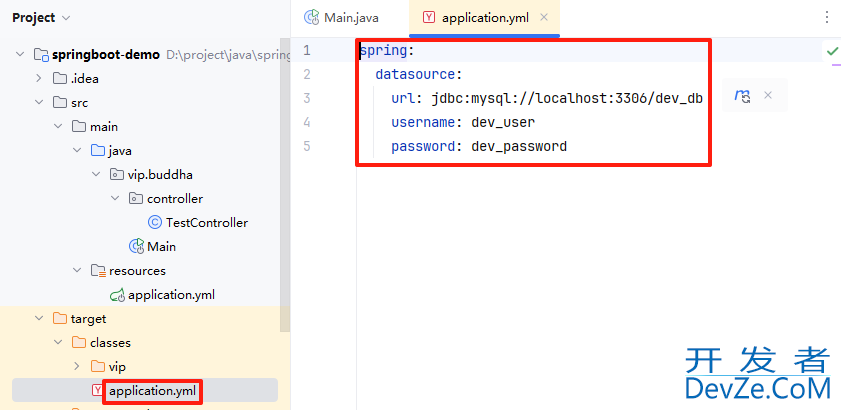
启动后,target/classes下的application.yml文件内容就被替换过来了。
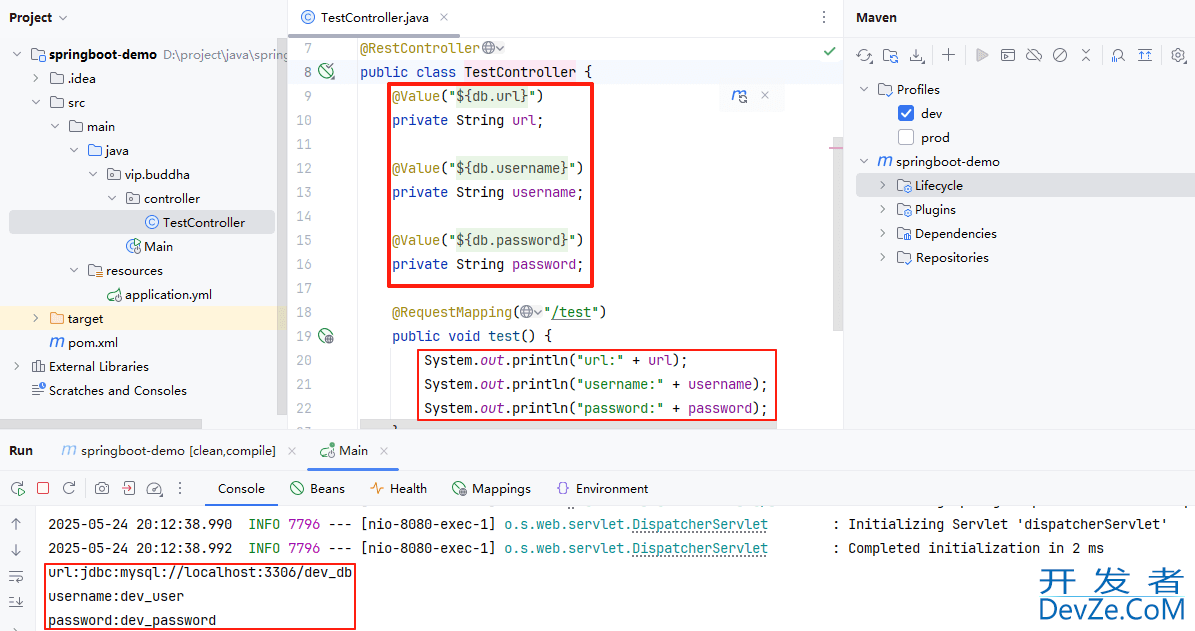
访问http://localhost:8080/test后,配置信息就在接口控制台按照预期给显示出来。如果想测试另外的一套配置信息,maven这边勾选另外的配置即可。
总结
到此这篇关于SpringBoot的pom.xml文件中设置多环境配置信息方法的文章就介绍到这了,更多相关SpringBoot pom.pythonxml多环境配置内容请搜索编程客栈(www.devze.com)以前的文章或继续浏览下面的相关文章希望大家以后多多支持编程客栈(www.devze.com)!


 加载中,请稍侯......
精彩评论