Java通过JNI调用C++动态库的完整流程详解
目录
- 示例环境
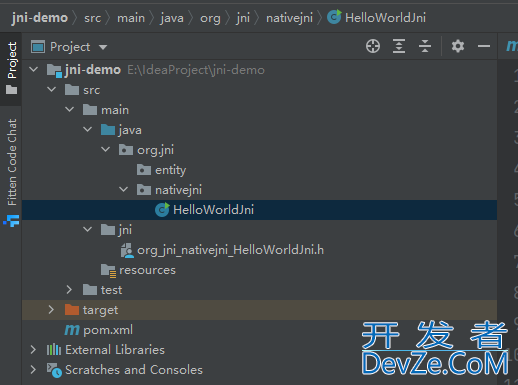
- Java 项目结构概览
- 编写 Java 类
- 实现 JNI 层与调用 DLL 方法
- 使用 Visual Studio 编译生成 DLL
- C++ 头文件:H编程elloWorld.h
- C++ 实现:HelloWorld.cpp
- JNI 头文件:org_jni_nativejni_HelloWorldJni.h
- JNI 实现:HelloWorldJNI.cpp
- Java 调用 DLL 测试
- 总结
介绍使用 JNI 调用 C++ 编写的动态链接库的全过程。
示例环境
| 项目 | 说明 |
|---|---|
| JDK | 8 |
| C++ 编译器 | Visual Studio 2019 |
| Java 开发工具 | IntelliJ IDEA 2021.3 |
| 操作系统 | Windows 10 |
Java 项目结构概览

编写 Java 类
在 org.jni.nativejni 包下创建类 HelloWorldJni.java:
package org.jni.nativejni;

public class HelloWorldJni {

    static {
        // 加载 C++ 编译生成的 DLL
        System.load("E:/vsproject/HelloWorld/x64/Release/HelloWorld.dll");
    }

    // native 方法声明
    public native String sayHello(String str1, String str2);
    public native int add(int a, int b);

    public static void main(String[] args) {
        HelloWorldJni hw = new HelloWorldJni();
        System.out.println("拼接字符串:" + hw.sayHello("Hello", "World"));
        System.out.println("相加:" + hw.add(52, 23));
    }
}
生成 JNI 头文件
方法一:使用 javac -h(推荐方式,支持 JDK8+)
在项目根目录下执行命令:
javac -h src/main/jni src/main/java/org/jni/nativejni/HelloWorldJni.java
说明:
- -h 参数用于指定生成头文件的目录。
- 这个命令会编译 .java 文件然后生成 .class 文件,同时生成 JNI 头文件。
注意:这个命令会在源码目录中生成 .class 文件,建议在 target/classes 中操作,避免污染源码。
方法二:使用 javah(仅适用于 JDK8)
先使用 Maven 编译项目:
mvn clean install
然后执行:
javah -classpath target/classes -d src/main/jni org.jni.nativejni.HelloWorldJni
说明:
- -classpath 指定 .class 文件的根路径。
- -d 指定 JNI 头文件的输出目录。
实现 JNI 层与调用 DLL 方法
使用 Visual Studio 编译生成 DLL
1.创建一个新的 C++ DLL 项目,项目名称为 HelloWorld。
2.添加源文件:
- HelloWorld.cpp:实现 DLL 的原始功能逻辑。
- HelloWorldJNI.cpp:实现 JNI 桥接代码。
3.配置项目属性:
C/C++ → 常规 → 附加包含目录中添加:
- JDK 的 include 目录
- JDK 的 include/win32 目录
C++ 头文件:HelloWorld.h
#ifndef HELLO_WORLD_H
#define HELLO_WORLD_H

// 导出 HelloWorld 函数
extern "C" __declspec(dllexport) const char* HelloWorld(const char* str1, const char* str2);

// 导出 Add 函数
extern "C" __declspec(dllexport) int Add(int a, int b);

#endif // HELLO_WORLD_H#pragma once
C++ 实现:HelloWorld.cpp
// HelloWorld.cpp
#include "pch.h" // 如果 VS 生成了预编译头文件
#include "HelloWorld.h" // 引入头文件
#include <IOStream>
#include <string>

extern "C" __declspec(dllexport) const char* HelloWorld(const char* str1, const char* str2) {
    static std::string result; // 使用静态变量存储返回值,确保返回的指针有效
    result = std::string(str1) + "," + std::string(str2);
    return result.c_str(); // 返回拼接后的 C 字符串
}

// 一个简单的加法函数
extern "C" __declspec(dllexport) int Add(int a, int b) {
    return a + b;
}
JNI 头文件:org_jni_nativejni_HelloWorldJni.h
由 javac -h 或 javah 自动生成,内容如下:
/* DO NOT EDIT THIS FILE - it is MAChine generated */
#include <jni.h>
/* Header for class org_jni_nativejni_HelloWorldJni */

#ifndef _Included_org_jni_nativejni_HelloWorldJni
#define _Included_org_jni_nativejni_HelloWorldJni
#ifdef __cplusplus
extern "C" {
#endif
/*
 * Class:     org_jni_nativejni_HelloWorldJni
 * Method:    sayHello
 * Signature: (Ljava/lang/String;Ljava/lang/String;)Ljava/lang/String;
 */
JNIEXPORT jstring JNICALL Java_org_jni_nativejni_HelloWorldJni_sayHello
  (JNIEnv *, jobject, jstring, jstring);

/*
 * Class:     org_jni_nativejni_HelloWorldJni
 * Method:    add
 * Signature: (II)I
 */
JNIEXPORT jint JNICALL Java_org_jni_nativejni_HelloWorldJni_add
  (JNIEnv *, jobject, jint, jint);

#ifdef __cplusjsplus
}
#endif
#endif
JNI 实现:HelloWorldJNI.cpp
#include "pch.h" // 如果 VS 生成了预编译头文件
#include "org_jni_nativejni_HelloWorldJni.h"  // 引入自动生成的 JNI 头文件
#include "HelloWorld.h"    // 引入自定义的头文件,调用已有的 DLL 接口

JNIEXPORT jstring JNICALL Java_org_jni_nativejni_HelloWorpythonldJni_sayHello
(JNIEnv* env, jobject, jstring jStr1, jstring jStr2) {
    // 将 Java 字符串转换为 C 字符串
    const char* str1 = env->GetStringUTFChars(jStr1, nullptr);
    const char* str2 = env->GetStringUTFChars(jStr2, nullptr);

    // 调用 C++ 动态库函数
    const char* resultgevxZG = HelloWorld(str1, str2);

    // 释放 Java 字符串的本地内存
    env->ReleaseStringUTFChars(jStr1, str1);
    env->ReleaseStringUTFChars(jStr2, str2);

    // 将 C 字符串转换为 Java 字符串并返回
    return env->NewStringUTF(result);
}


JNIEXPORT jint JNICALL Java_org_jni_nativejni_HelloWorldJni_add
(JNIEnv*, jobject, jint a, jint b) {
    return Add(a, b); // 调用原始的 Add 函数
}
提示:这里为了演示方便,JNI 桥接代码和业务逻辑放在同一个项目中。实际开发时桥接层要单独封装,便于维护与复用。
Java 调用 DLL 测试
将编译生成的 HelloWorld.dll 放到系统环境变量中,这里这个库没什么其他依赖,都是系统 c 盘中有的,所以直接指到它生成的目录就可以使用了。
运行 Java 主类的输出结果:
拼接字符串:Hello,World
相加:75
总结
梳理一下 Java 调用 C++ DLL 的完整流程。主要包括:
- 编写 Java 类并声明 native 方法
- 使用 javac -h 或 javah 生成 JNI 头文件
- 实现 JNI 桥接层,调用 DLL 中的 C++ 方法
- 使用 Visual Studio 生成 DLL 文件
- Java 运行时加载并调用本地方法,或者封装成接口给别人使用。
到此这篇关于Java通过JNI调用C++动态库的完整流程详解的文章就介绍到这了,更多相关Java JNI调用C++动态库内容请搜索编程客栈(wphpww.cppcns.com)以前的文章或继续浏览下面的相关文章希望大家以后多多支持编程客栈(www.devze.com)!


 加载中,请稍侯......
精彩评论