Python使用PIL将图片或GIF转为字符画的方法详解
目录
- 图片或GIF转字符画
- 图片转换为黑白字符画
- 将GIF转换为动态彩色字符画
图片或GIF转字符画
红及一时的编程小玩具,将图片转为字符画
接下来通过
python实现,比较好玩
图片转换为黑白字符画
- 安装
pillow库
pip3 install pillow
灰度值:黑白图像中点的颜色深度,范围一般从
0~255,白色为255,黑色为0,所以黑白图片也被成为灰度图像
RBG映射灰度公式
我们要将一张图片的灰度处理,将其中的色彩处理为黑白灰亮度图像
越亮的地方用占位百分比越小的字符来替换处理,比如
|而越暗的地方用占位百分比越大的字符来替换处理,比如
#
创建一个不重复字符序列数据,灰度值越小(越暗)为序列数据开头,越大(越亮)到序列结尾,长度为
90,用来映射256个灰度值,便捷的方法可以直接使用ascii码进行构建定义函数,用来处理
RGB并得出灰度值,根据灰度值,得出一个字符
char_=list("$@B%8&WM#*oahkbdpqwmZO0QLCJUYXzcvunxrjft/\|()1{}[]?_+~<>i!lI;:,\"^`'. ")
def get_char(r,g,b, alpha=256):
	'''
		r(红),g(绿),b(蓝)
		total: 灰度值总大小
		return -> str
	'''
	if alpha == 0:
		return ' '
	gray = 0.2126 * r  + 0.7152 * g + 0.0722 * b #得出灰度值
	char_length = len(char_) #字符序列长度
	index = (alpha+1) / char_length #总灰度值对应列表索引范围
	return char_[int(gray/index)] #返回当前灰度值所对应字符
pillow模块可以打卡图像,并重设图像大小,分析图像像素,定义如下函数,取出图像对应坐标像素
from PIL import Image
def convert_image_to_ascii(origin_path, output_path, width=150, height=80):
    """
    将图像转换为ASCII文字并保存到文本文件
    :param origin_path: 输入图像路径
    :param output_path: 输出文本文件路径
    :param width: 输出宽度
    :param height: 输出高度
    :return: None
    """
    # 打开图像,并将其转换为RGBA格式以确保包含alpha通道信息
    img = Image.open(origin_path).convert('RGBA')

    #Image.NEAREST 代表设置缩放图片的质量
    img = img.resize((width,height),Image.NEAREST)

    #遍历像素,获得灰度值对应字符
    content = ''
    for h in range(height):
        for w in range(width):
            char = get_char(*img.getpixel((w,h)))
            content += char
        content += '\n' #每一行像素换行追加\n
    with open(output_path,'w') as fp:
        fp.write(content)
    return content
- 运行这段代码,调用
analy_image函数,传入待处理图像路径path及保存之后的文件路径file
比如这样一张图片

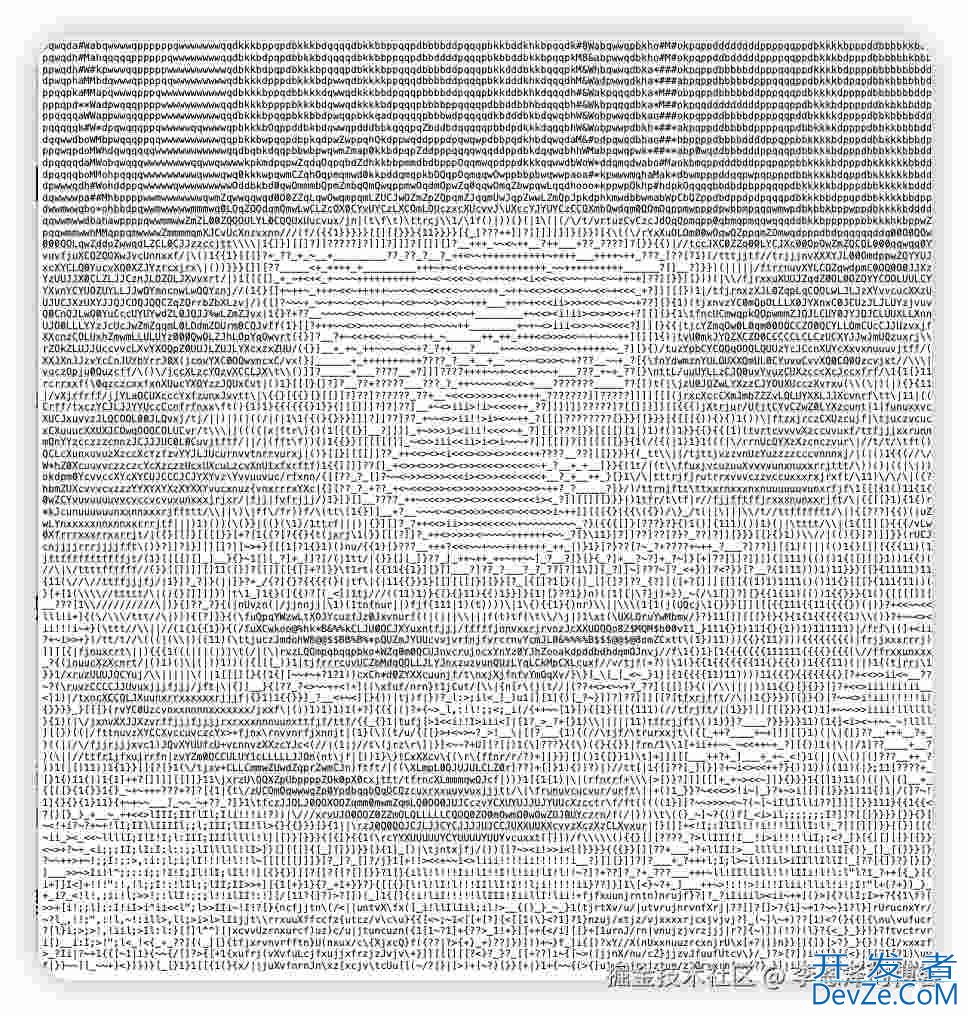
- 经过代码处理之后将会变为

- 如果想把文本存储为图片也可以
from PIL import Image
from PIL import Image, ImageDraw, ImageFont

char_ = list(
    "$@B%8&WM#*oahkbdpqwmZO0QLCJUYXzcvunxrjft/\|()1{}[]?_+~<>i!lI;:,\"^`'. ")


def get_char(r, g, b, alpha=256):
    '''
            r(红),g(绿),b(蓝)
            total: 灰度值总大小
            return -> str
    '''
    if alpha == 0:
        return ' '
    gray = 0.2126 * r + 0.7152 * g + 0.0722 * b  # 得出灰度值
    char_length = len(char_)  # 字符序列长度
    index = (alpha+1) / char_length  # 总灰度值对应列表索引范围
    return char_[int(gray/index)]  # 返回当前灰度值所对应字符


def convert_image_to_ascii(origin_path, output_path, width=150, height=80):
    """
    将图像转换为ASCII文字并保存到文本文件
    :param origin_path: 输入图像路径
    :param output_path: 输出文本文件路径
    :param width: 输出宽度
    :param height: 输出高度
    :return: None
    """
    # 打开图像,并将其转换为RGBA格式以确保包含alpha通道信息
    img = Image.open(origin_path).convert('RGBA')

    #Image.NEAREST 代表设置缩放图片的质量
    img = img.resize((width,height),Image.NEAREST)

    #遍历像素,获得灰度值对应字符
    content = ''
    for h in range(height):
        for w in range(width):
            char = get_char(*img.getpixel((w,h)))
            content += char
        content +=www.devze.com '\n' #每一行像素换行追加\n
    with open(output_path,'w') as fp:
        fp.write(content)
    return content


def ascii_art_to_image(ascii_art, output_path, font_path=None, font_size=20):
    """
    将ASCII字符艺术转换为图片并保存
    :param ascii_art: ASCII字符艺术字符串
    :param output_path: 输出图片路径
    :param font_path: 字体文件路径,默认为None,表示使用默认字体
    :param font_size: 字体大小
    :return: None
    """
    # 分http://www.devze.com割ASCII艺术字符串为行列表
    lines = ascii_art.split('\n')

    # 获取最长行的长度和总行数,用于确定图片尺寸
    max_line_length = max(len(line) for line in lines)
    num_lines = len(lines)

    # 设置图片的基本参数
    char_width, char_height = font_size, font_size  # 假设每个字符宽度和高度相等
    margin = 10  # 图片边缘留白

    # 创建白色背景的新图像
    image = Image.new('RGB',
                      (max_line_length * char_width + 2 * margin,
                       num_lines * char_height + 2 * margin),
                      color='white')
    draw = ImageDraw.Draw(image)

    try:
        # 加载字体
        if font_path:
            font = ImageFont.truetype(font_path, font_size)
        else:
            font = ImageFont.load_default()
    except IOError:
        print("加载字体失败,使用默认字体")
        font = ImageFont.load_default()

    # 在图像上绘制ASCII艺术文字
    for i, line in enumerate(lines):
        draw.text((margin, margin + i * char_height),
                  line, fill='black', font=font)

    # 保存图像
    image.save(output_path)
    print(f"已保存图片至 {output_path}")


path = '1.jpg'
file = '1.txt'
content_str = convert_image_to_ascii(path, '1.txt')
ascii_art_to_image(content_str, '1_ASCII.jpg')
- 完整代码
from PIL import Image

char_ = list(
    "$@B%8&WM#*oahkbdpqwmZO0QLCJUYXzcvunxrjft/\|()1{}[]?_+~<>i!lI;:,\"^`'. ")


def get_char(r, g, b, alpha=256):
    '''
    r(红),g(绿),b(蓝)
    total: 灰度值总大小
    return -> str
    '''
    if alpha == 0:
        return ' '
    gray = 0.2126 * r + 0.7152 * g + 0.0722 * b  # 得出灰度值
    char_length = len(char_)  # 字符序列长度
    index = (alpha+1) / char_length  # 总灰度值对应列表索引范围
    return char_[int(gray/index)]  # 返回当前灰度值所对应字符


def analy_image(path, file):
    """
    path: 处理图像路径
    file: 处理后的保存文件
    return -> None
    """
    img = Image.open(path)
    width = 80
    height = 80
    img = img.resize((width, height), Image.NEAREST)
    # Image.NEAREST 代表设置缩放图片的质量

    # 遍历像素,获得灰度值对应字符
    content = ''
    for h in range(height):
        for w in range(width):
            ch编程客栈ar = get_char(*img.getpixel((w, h)))
            # img.getpixel(w,h) 获取对应坐标像素
            content += char
        content += '\n'  # 每一行像素换行追加\n
    print(content)
    with open(file, 'w') as fp:
        fp.write(content)
将GIF转换为动态彩色字符画
思路很简单,将
GIF图片处理为一帧一帧的单独图片,再将单独图片灰度处理搞成字符图片,像上面这样,最终再上色并且把一阵一阵的字符图片组合成一个字符GIF
from PIL import Image,jsImageDraw,ImageFont
import os
from time import sleep
import imageio

char_ = list("$@B%8&WM#*oahkbdpqwmZO0QLCJUYXzcvunxrjft/\|()1{}[]?-_+~<>i!lI;:,\"^`'. ")
#"MNHQ$OC67+>!:-. "
def get_char(r,g,b,alpha=256):
    '''
    r(红),g(绿),b(蓝)
    total: 灰度值总大小
    return -> str
    '''
    if alpha == 0:
            return ''
    gray = 0.2126 * r  + 0.7152 * g + 0.0722 * b #得出灰度值
    char_length = len(char_) #字符序列长度
    index = (alpha+1) / char_length #总灰度值对应列表索引范围
    return char_[int(gray/index)] #返回当前灰度值所对应字符

def gif2png(path='test.gif'):
    '''
    path: GIF 图像路径
    该函数拆分GIF为单独的每一张PNG图片
    '''
    img = Image.open(path)
    work_path = os.getcwd() #当前工作路径
    cache_dir = os.path.join(work_path,'cache')
    if not os.path.exists(cache_dir):
        #如果不存在保存单独每一帧图片的目录,则创建该目录
        os.mkdir(cache_dir)
    while True:
        try:
            current = img.tell() #获取当前帧位置
            file_name = os.path.join(cache_dir,str(current)+'.png')
            img.save(file_name)
            img.seek(current+1) #向下一帧读取
      php  except EOFError:
            #GIF读取完毕
            break
    return current

def analy_image(pic_id):
    """
    path: 处理图像路径
    file: 处理后的保存文件
    return -> None
    """
    cache_dir = os.path.join(os.getcwd(),'cache')
    path = os.path.join(cache_dir,'%d.png' % (pic_id))
    img = Image.open(path).convert('RGB')
    #GIF处理后的单帧图片需要转换为RGB格式,否则会报错
    pic_width,pic_height = img.width,img.height
    width = int(pic_width / 6)
    height = int(pic_height / 12)
    img = img.resize((width,height),Image.NEAREST)
    #Image.NEAREST 代表设置缩放图片的质量

    #遍历像素,获得灰度值对应字符
    content = ''
    colors = []
    for h in range(height):
        for w in range(width):
            px = img.getpixel((w,h))
            char = get_char(px[0],px[1],px[2], px[3] if len(px) > 3 else 256)
            colors.append( (px[0],px[1],px[2]) )
            #img.getpixel(w,h) 获取对应坐标像素
            content += char
        content += '\n' #每一行像素换行追加\n
        colors.append( (255,255,255) )
    print(content)
    return content,colors,pic_width,pic_height

def text2png(content,colors,pic_width,pic_height,pic_id):
    '''
    将输出的图片字符文本转换为png
    '''
    work_path = os.getcwd() #当前工作路径
    content_dir = os.path.join(work_path,'content')
    if not os.path.exists(content_dir):
        #如果不存在保存单独每一帧图片的目录,则创建该目录
        os.mkdir(content_dir)

    txt_img = Image.new("RGB", (pic_width,pic_height), (255,255,255))
    canvas = ImageDraw.Draw(txt_img) #创建一个可以在给定图像上绘图的对象
    font = ImageFont.load_default().font

    x = 0
    y = 0

    font_w,font_h =  font.getsize(content[1]) #字体的宽高

    for i in range(len(content)):
        if content[i] == '\n':
            x = -font_w #每次初始化横纵坐标
            y += font_h
        canvas.text( (x,y), content[i], colors[i])
        x += font_w # 追加一个字体的像素
    txt_img.save(os.path.join(content_dir,'%d.png' % (pic_id)))

def png2gif(_id,dir_name='content',duration=5 / 130):
    '''
    将之前处理好的字符png图片组合成GIF图像
    通过imageio模块处理合并
    '''
    path = os.path.join(os.getcwd(),dir_name)
    images = []
    for pic_id in range(_id):
        #遍历取出每一张处理后的字符图片id值
        images.append(imageio.imread(os.path.join(path,'%d.png' % pic_id) ) )
        #从文件中读入数据
    imageio.mimsave(os.path.join(os.getcwd(),'fin.gif'), images, duration=duration)
    #保存路径、png图片数据列表、合并帧频率

def main():
    path = input(':')
    _id = gif2png(path)
    for pic_id in range(_id+1):
        content,colors,pic_width,pic_height = analy_image(pic_id)
        text2png(content,colors,pic_width,pic_height,pic_id)
        sleep(5 / 130)
        os.system('cls')
    png2gif(_id)

if __name__ == '__main__':
	main()
- 来看这样一张
GIF图片

- 他会变成这样

以上就是Python使用PIL将图片或GIF转为字符画的方法详解的详细内容,更多关于Python PIL图片或GIF转字符画的资料请关注编程客栈(www.devze.com)其它相关文章!


 加载中,请稍侯......
精彩评论