springboot整合 xxl-job的项目实践
目录
- 一、xxl-job是什么
- 二、使用步骤
- 1. 下载并运行管理端代码
- 2. 访问管理页面,确认是否启动成功
- 3. 配置执行器【在自己的springboot项目中配置】
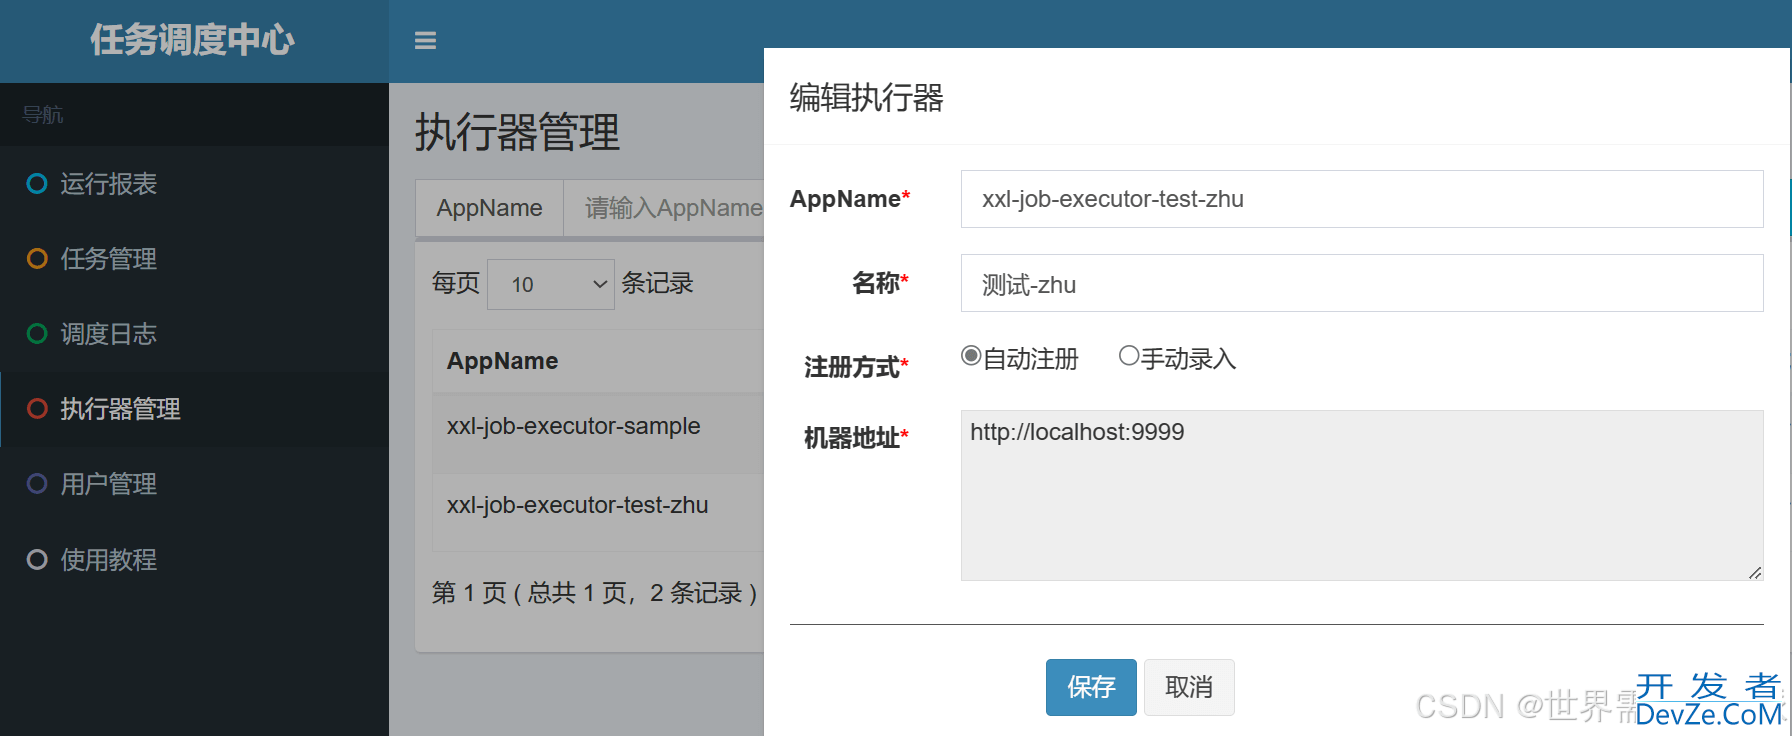
- 4. 在页面上创建执行器和任务,与项目中绑定
- 总结
- 参考
一、xxl-job是什么
XXL-JOB 是一个分布式任务调度平台,主要用于解决在分布式系统中任务调度和任务管理的问题。
- XXL-JOB 的架构通常包括以下几个组件:调度中心(Scheduler):负责任务的调度、管理和监控,是整个调度系统的核心。
- 执行器(Executor):负责具体任务的执行,可以部署在不同的节点上。
- Web 管理控制台:提供友好的 Web 界面,方便用户进行任务的管理和监控。
二、使用步骤
1. 下载并运行管理端代码
项目地址:
1️⃣:【gitee】https://gitee.com/xuxueli0323/xxl-job2️⃣:【github】https://github.com/xuxueli/xxl-job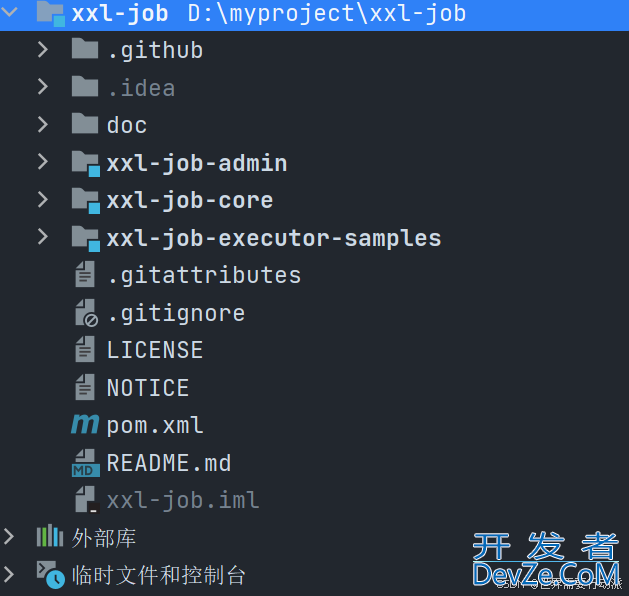
管理端需要注意的地方
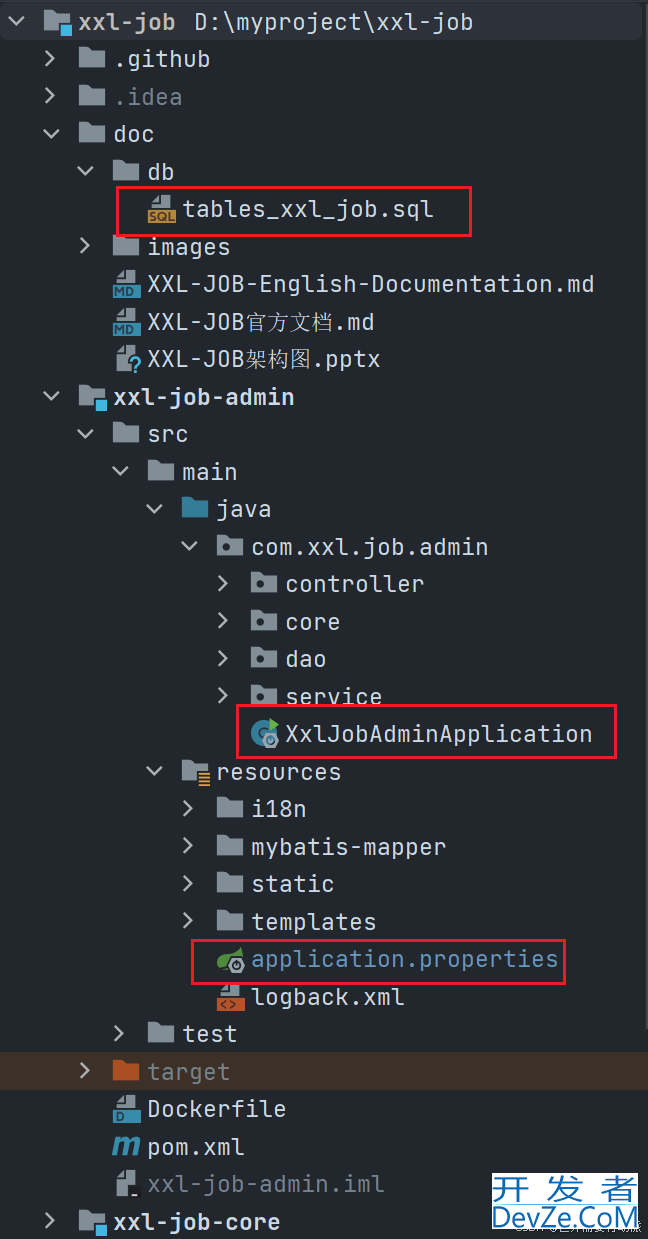
执行sql脚本,tables_xxl_job.sql
修改application.properties配置文件,主要修改两处
### xxl-job, datasource
spring.datasource.url=jdbc:mysql://127.0.0.1:3306/xxl_job?useUnicode=true&characterEncoding=UTF-8&autoReconnect=true&serverTimezone=Asia/Shanghai
spring.datasource.username=root
spring.datasource.password=123456
spring.datasource.driver-class-name=com.mysql.cj.jdbc.Driver
### xxl-job, Access token
xxl.job.accessToken=default_token
数据库地址对应的是第一步执行脚本创建的库的位置
- accessToken的值需要和执行器中配置的值(后面会写)一致
- 通过Application运行程序,也可以打包后通过jar命令启动
2. 访问管理页面,确认是否启动成功
地址:http://127.0.0.1:8080/xxl-job-admin 【和配置文件一致】
默认账密:admin/123456【忘记密码可以去数据库修改,使用md5加密后填充】3. 配置执行器【在自己的springboot项目中配置】
引入依赖
        <dependency>
            <groupId&jsgt;com.xuxueli</groupId>
            <artifactId>xxl-job-core</artifactId>
            <version>2.4.0</version>
        </dependency>
添加配置文件
- accessToken与前面配置一致,address对应管理端访问地址
- executor(执行器)的配置与后面在页面上创建执行器时保持一致
### xxl-job admin address list, such as "http://address" or "http://address01,http://address02"
xxl:
  job:
    accessToken: default_token
    admin:
      addresses: http://127.0.0.1:8080/xxl-job-admin
    executor:
      appname: xxl-job-executor-test-zhu
      address: http://localhost:9999  # 填充地址,假设执行器运行在本地
      ip: 127.0.0.1  # 填充本地IP,确保它与address配置一致
      port: 9999
      logpath: /data/applogs/xxl-job/jobhandler
      logretentiondays: -1
执行器组件配置
package com.zhui.yudada.config;

import com.xxl.job.core.executor.impl.XxlJobSpringExecutor;
import lombok.extern.slf4j.Slf4j;
import org.springframework.beans.factory.annotation.Value;
import org.springframework.context.annotation.Bean;
import org.springframework.context.annotation.Configuration;

@Slf4j
@Configuration
public class XxlJobConfig {
    @Value("${xxl.job.admin.addresses}")
    private String adminAddresses;
    @Value("${xxl.job.accessToken}")
    private String accessToken;
    @Value("${xxl.job.executor.appname}")
    private String appname;
    @Value("${xxl.job.executor.address}")
    private String address;
    @Value("${xxl.job.executor.ip}")
    private String ip;
    @Value("${xxl.job.executor.port}")
    private int port;
    @Value("${xxl.job.executor.logpath}")
    private String logPath;
    @Value("${xxl.job.executor.logretentiondays}")
    private int logRetentionDays;
    @Bean
    public XxlJobSpringExecutor xxlJobExecutorandroid() {
        log.info(">>php>>>>>>>>> start xxl-job config init");
        XxlJobSpringExecutor xxlJobSpringExecutor = new XxlJobSpringExecutor();
        xxlJobSpringExecutor.setAdminAddresses(adminAddresses);
        xxlJobSpringExecutor.setAppname(appname);
        xxlJobSpringExecutor.setAddress(address);
        xxlJobSpringExecutor.setIp(ip);
        xxlJobSpringExecutor.setPort(port);
        xxlJobSpringExecutor.setAccessToken(accessToken);
        xxlJobSpringExecutor.setLogPath(logPath);
        xxlJobSpringExecutor.setLogRetentionDays(logRetentionDays);
        return xxlJobSpringExecutor;
    }
}
jobhander配置
package com.zhui.yudada.job;


import com.xxl.job.core.biz.model.ReturnT;
import com.xxl.job.core.handler.a编程客栈nnotation.XxlJob;
import org.springframework.beans.factory.annotation.Value;
import org.springframework.stereotype.Component;


@Component
public class HelloJob {

    @Value("${server.port}")
    private String port;

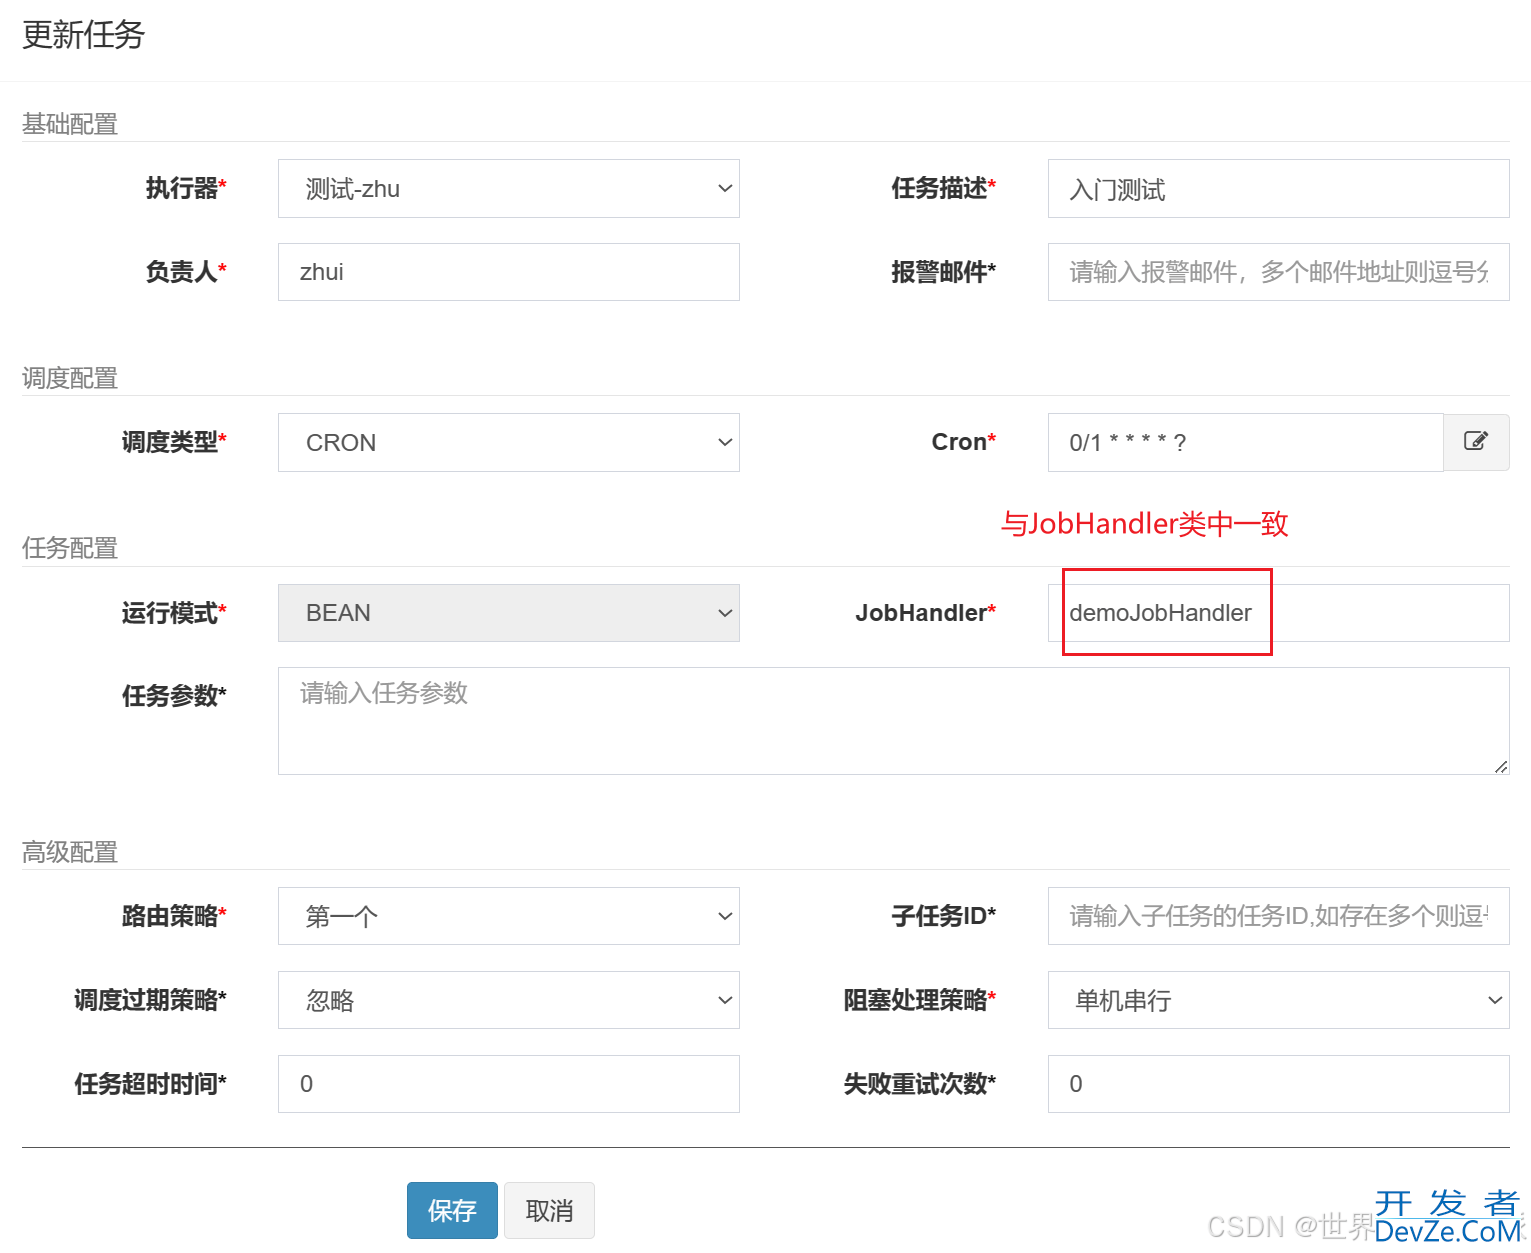
    @XxlJob("demoJobHandler")
    public ReturnT helljavascriptoJob() {
        System.out.println("简单任务执行了。。。" + port);
        return  ReturnT.SUCCESS;
    }
}
启动项目,出现下面的提示说明启动成功

4. 在页面上创建执行器和任务,与项目中绑定
创建执行器【取值与springboot项目中配置文件一一对应】
创建任务

启动,验证是否执行成功
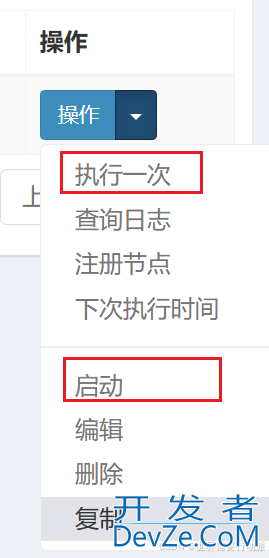
启动后查看调度日志,或者观察程序控制台数据


总结
如果启动失败,检查配置文件的值是否一致,如accessToken的值
参考
- https://developer.aliyun.com/article/1436105
- https://blog.csdn.net/m0_52985087/article/details/135646151
到此这篇关于springboot整合 xxl-job的项目实践的文章就介绍到这了,更多相关springboot整合 xxl-job内容请搜索编程客栈(www.devze.com)以前的文章或继续浏览下面的相关文章希望大家以后多多支持编程客栈(www.devze.com)!


 加载中,请稍侯......
精彩评论