C#桌面应用开发实现番茄定时器
目录
- 1、环境搭建和工程创建:
- 2、制作窗体部件
- 3、界面布局设计
- 4、具体功能函数
1、环境搭建和工程创建:
步骤一:安装visual studio2022
步骤二:新建工程
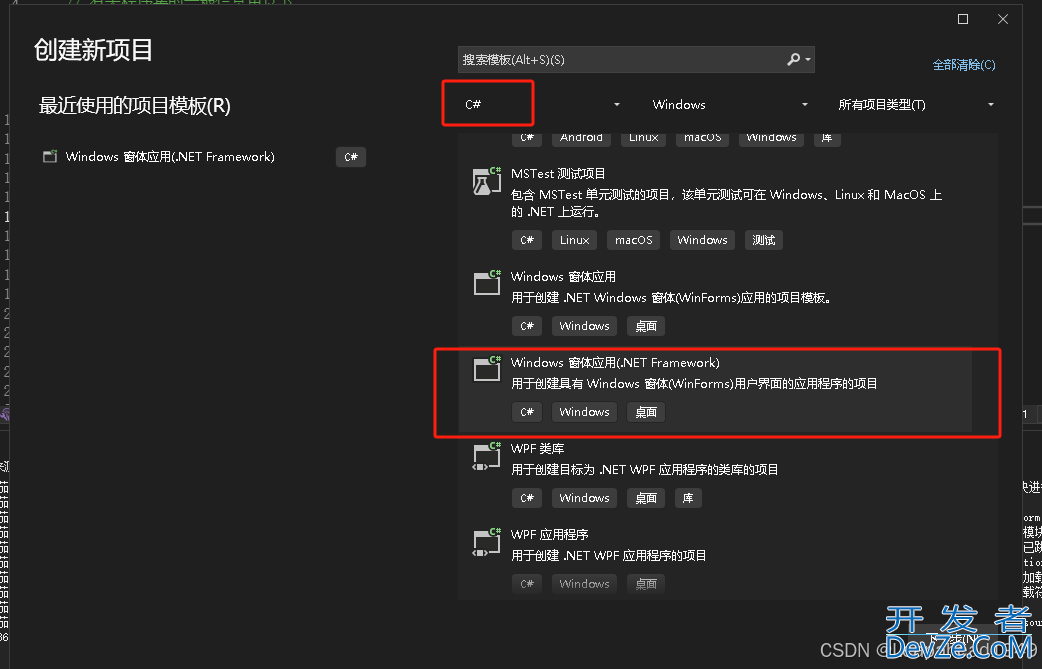
2、制作窗体部件
*踩过的坑:
(1)找不到工具箱控件,现象如下:
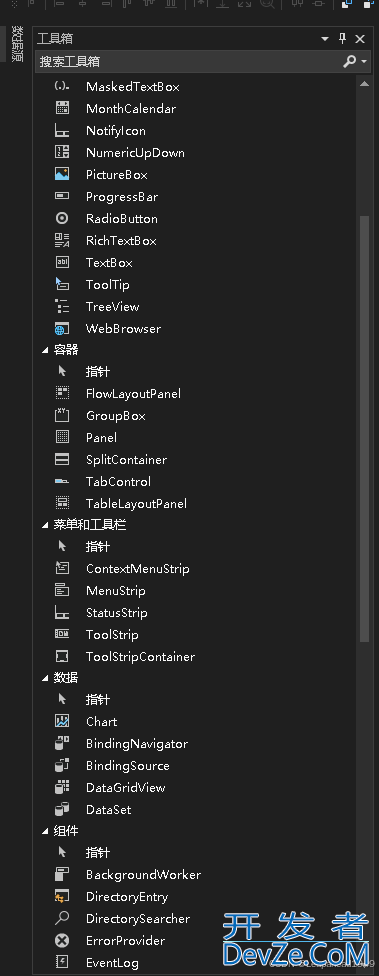
解决办法:
依次点击:工具栏->获取工具和功能->单个组件:安装3.5版本开发工具
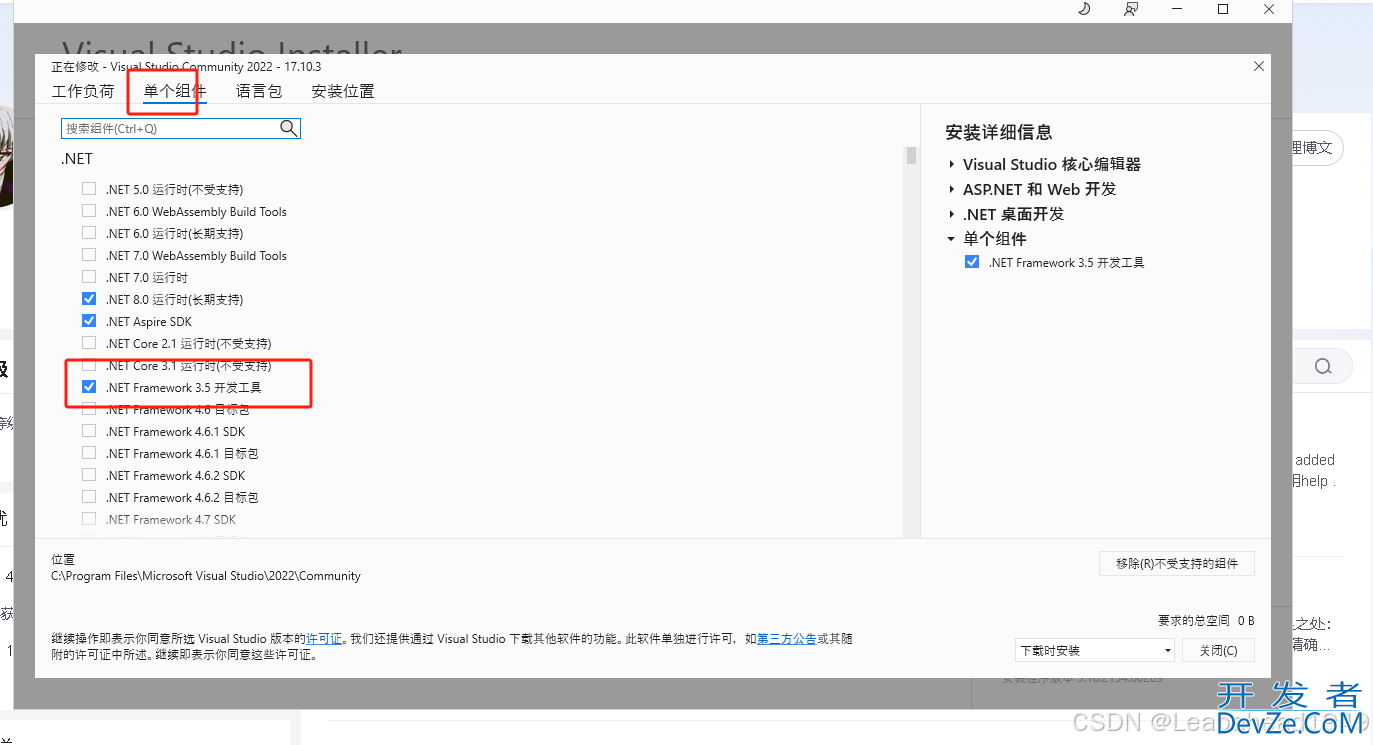
若上述
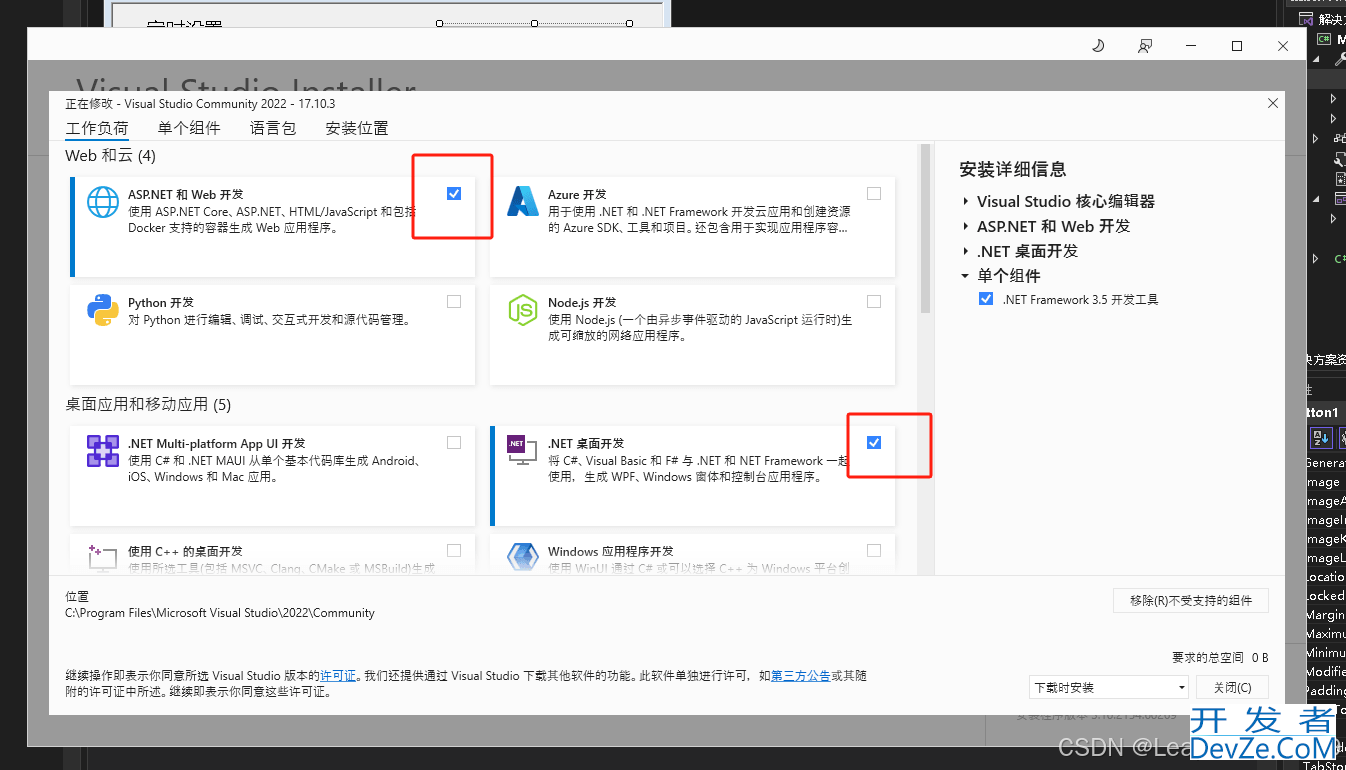
办法不生效,继续检查.NET桌面开发和ASP.NET开发是否勾选
最后点击顶部栏的:视图->工具箱就能显示出工具栏
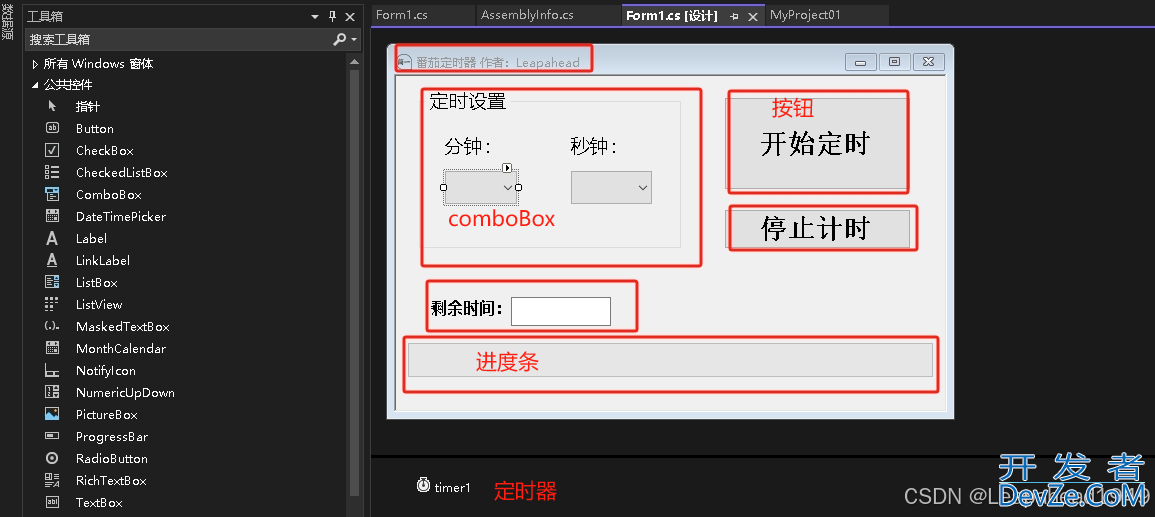
3、界面布局设计
(1)界面设计如下:
4、具体功能函数hSzImGe
using System;
using System.Windows.Forms;
using static System.Windows.Forms.VisualStyles.VisualStyleElement;

namespace MyProject01
{
    public partial class Form1 : Form
    {
        UInt16 Timer_Value = 0; //定时值
        UInt16 Timer_Count = 0; //定时器计数值
        byte Timer_Status = 0;  //定时器状态 0--停止  1 -- 定时状态  2 --暂停状态


        public Form1()
        {
            InitializeComponent();
        }

        private void textBox1_TextChanged(object sender, EventArgs e)
        {

        }

  www.devze.com      private void button1_Click(object sender, EventArgs e)
        {

        }

        private void label1_Click(object sender, EventArgs e)
        {

        }

        private void button2_Click(object sender, EventArgs e)
        {

        }

        private void flowLayoutPanel1_Paint(object sender, PaintEventArgs e)
        {

        }

        private void label1_Click_1(object sender, EventArgs e)
        {

        }

        private void label2_Click(object sender, EventArgs e)
        {

        }

        private void label4_Click(object sender, EventArgs e)
        {

        }

        private void Form1_Load(object sender, EventArgs e)
        {
            byte i;

            for (i = 0; i < 60; i++)
            {
                //分钟和秒钟的组合框初始化
                comboBox1.Items.Add(i.ToString());
                comboBox2.Items.Add(i.ToString());

                comboBox1.Text = "45";  //初始化为45分钟
                comboBox2.Text = "0";


            }
        }

        private void comboBox1_SelectedIndexChanged(object sender, EventArgs e)
        {

        }

        private void textBox1_TextChanged_1(object sender, EventArgs e)
        {
            textBox1.ReadOnly = true;
        }

        private void button1_Click_1(object sender, EventArgs e)
        {
            //定时器状态机函数
            switch (Timer_Status)
            {
                case 0:
                    {
                        //获取定时时间,分钟*60+秒钟
                        Timer_Value = Convert.ToUInt16(comboBox1.Text, 10);
                        Timer_Value *= 60;
                        Timer_Value += Convert.ToUInt16(comboBox2.Text, 10);

                        if (Timer_Value > 0)
                        {

                            //开始定时任务
                            textBox1.Text = Timer_Value.ToString() + " 秒";
                            button1.Text = "暂停计时";
                            button2.Enabled = true;

                            comboBox1.Enabled = false;  //关闭时间选择
                            comboBox2 .Enabled = false;

                            timer1.Start();

                            Timer_Status = 1;

                        }
                        else
                        {

                            MessageBox.Show("定时时间不能为0,请重新输入", "警告");
                            //
                        }

                        //进度条初始化
                        progressBar1.Value = 0;
                        progressBar1.Maximum = Timer_Value;

                        break;
                    }
                case 1:
                    {
                        timer1.Stop();
                        Timer_Status = 2;
                        button1.Text = "继续计时";
                        break;
                    }
                case 2:
                    {
                        timer1.Start();
                        Timer_Status = 1;
                        button1.Text = "暂停计时";
                        break;
                    }
          android      default:
                    www.devze.com{

                        break;
                    }


            }
        }

        //定时按钮单击事件
        private void timer1_Tick(object sender, EventArgs e)
        {


            Timer_Count++;
            textBox1.Text = Timer_Value-Timer_Count + " 秒";

            //更新进度条
            progressBar1.Value = Timer_Count;


            if (Timer_Count == Timer_Value)
            {
                timer1.Stop();
                Timer_Count = 0;
                System.Media.SystemSounds.Asterisk.Play();

                button1.Text = "计时结束";

                MessageBox.Show ("定时时间到","提示");
                button1.Text = "开始定时";

                comboBox1.Enabled = true;  //关闭时间选择
                comboBox2.Enabled = true;


                comboBox1.Text = "45";  //初始化为45分钟
                comboBox2.Text = "0";

                button2.Enabled = false;

                Timer_Status = 0;
                progressBar1.Value = 0;


            }

       hSzImGe }

        private void comboBox2_SelectedIndexChanged(object sender, EventArgs e)
        {

        }

        private void button2_Click_1(object sender, EventArgs e)
        {

            if(Timer_Status > 0)
            {
                Timer_Value = 0; //定时值
                Timer_Count = 0;
                Timer_Status = 0;
                progressBar1.Value = 0;
                textBox1.Text= "0";
            }


            timer1.Stop();
            Timer_Count = 0;

            button1.Text = "开始定时";

            comboBox1.Enabled = true;  //关闭时间选择
            comboBox2.Enabled = true;


            comboBox1.Text = "45";  //初始化为45分钟
            comboBox2.Text = "0";

            button2.Enabled = false;

            Timer_Status = 0;
            Timer_Value = 0;
        }
    }
}
到此这篇关于C#桌面应用开发实现番茄定时器的文章就介绍到这了,更多相关C# 番茄定时器内容请搜索编程客栈(www.devze.com)以前的文章或继续浏览下面的相关文章希望大家以后多多支持编程客栈(www.devze.com)!


 加载中,请稍侯......
精彩评论