Spring中的自定义NamespaceHandler详解
目录
- 前言
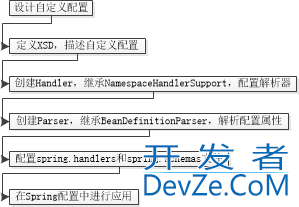
- 自定义NamespaceHandler流程
- 1) 设计自定义配置
- 2) 定义XSD,描述自定义配置
- 3) 创建Handler
- 4) 创建Parser
- 5) 配置spring.handlers和spring.schemas文件
- 6) 在Spring配置中进行应用
- 总结
前言
通常情况下,Spring生态圈提供的功能已足够使用,但不排除特殊情况下,需要匹配特殊及复杂的业务情况。Spring提供了可扩展Schema支持,可以自定义命名空间进行配置及解析。
自定义NamespaceHandler流程

自定义NamespaceHandler项目结构

1) 设计自定义配置
设计配置包含id、name、sex、word、blob五个属性,同步创建JavaBean,用于属性载体。
package com.arhorchin.securitit.hello.bean;
/**
 * @author Securitit.
 * @note Introduce相关BEAN.
 */
public class HelloIntroduceBean {
    /**
     * id.
     */
    private String id;
    /**
     * 姓名.
     */
    private String name;
    /**
     * 性别.
     */
    private String sex;
    /**
     * 语言.
     */
    private String word;
    /**
     * 博客.
     */
    private String blob;
    public String getId() {
        return id;
    }
    public void setId(String id) {
        this.id = id;
    }
    public String getName() {
        return name;
    }
    public void setName(String name) {
        this.name = name;
    }
    public String getSex() {
        return sex;
    }
    public void setSex(String sex) {
        this.sex = sex;
    }
javascript    public String getWord() {
        return word;
    }
    public void setWord(String word) {
        this.word = word;
    }
    public String getBlob() {
        return blob;
    }
    public void setBlob(String blob) {
        this.blob = blob;
    }
}
2) 定义XSD,描述自定义配置
XSD文件是对JavaBean的描述,需要注意xsd:schema节点的XMLns和targetNamespace属性,需为要定义的命名空间。
<?xml version="1.0" encoding="UTF-8" standalone="no"?>
<xsd:schema xmlns="http://code.alibaBATech.com/schema/hello"
	xmlns:xsd="http://www.w3.org/2001/XMLSchema" 		    python
    xmlns:beans="http://www.springframework.org/schema/beans"
	xmlns:tool="http://www.springframework.org/schema/tool"
	targetNamespace="http://code.alibabatech.com/schema/hello">

	<xsd:import namespace="http://www.w3.org/XML/1998/namespace" />
	<xsd:import namespace="http://www.springframework.org/schema/beans" />
	<xsd:import namespace="http://www.springframework.org/schema/tool" />

	<xsd:complexType name="baseHelloType">
	</xsd:complwww.devze.comexType>

	<xsd:complexType name="baseReferenceType">
	</xsd:complexType>

	<!-- 简介节点定义. -->
	<xsd:element name="introduce">
		<xsd:complexType>
			<xsd:complexContent>
				<xsd:extension base="baseHelloType">
					<xsd:attribute name="id" type="xsd:string">
						<xsd:annotation>
							<xsd:documentation>
								id.
							</xsd:documentation>
						</xsd:annotation>
					</xsd:attribute>
					<xsd:attribute name="name" type="xsd:string">
						<xsd:annotation>
							<xsd:documentation>
								名称.
							</xsd:documentation>
						</xsd:annotation>
					</xsd:attribute>
					<xsd:attribute name="sex" type="xsd:string">
						<xsd:annotation>
							<xsd:documentation>
								性别.
							</xsd:documentation>
						</xsd:annotation>
					</xsd:attribute>
					<xsd:attribute name="word" type="xsd:string">
						<xsd:annotation>
							<xsd:documentation>
								语言.
							</xsd:documentation>
						</xsd:annotation>
					</xsd:attribute>
					<xsd:attribute name="blob" type="xsd:string">
						<xsd:annotation>
							<xsd:documentation>
								博客.
							</xsd:documentation>
						</xsd:annotation>
					</xsd:attribute>
				</xsd:extension>
			</xsd:complexContent>
		</xsd:complexType>
	</xsd:element>

	<!-- 代理对象设置. -->
	<xsd:element name="reference">
		<xsd:complexType>
			<xsd:complexContent>
				<xsd:extension base="baseReferenceType">
					<xsd:attribute name="id" type="xsd:string">
						<xsd:annotation>
							<xsd:documentation>
								see document
							</xsd:documentation>
						</xsd:annotation>
					</xsd:attribute>
					<xsd:attribute name="interface" type="xsd:string">
						<xsd:annotation>
							<xsd:documentation>
								see document
							</xsd:documentation>
						</xsd:annotation>
					</xsd:attribute>
				</xsd:extension>
			</xsd:complexContent>
		</xsd:complexType>
	</xsd:element>
</xsd:schema>
3) 创建Handler
创建Handler,继承NamespaceHandlerSupport,配置解析器
Handler的实现比较简单,主要目的是将自定义配置与解析器Parser进行绑定,同时指定配置属性载体JavaBean。
package com.arhorchin.securitit.hello.handler;

import org.springframework.beans.factory.xml.NamespaceHandlerSupport;

import com.arhorchin.securitit.hello.bean.HelloIntroduceBean;
import com.arhorchin.securitit.hello.parser.IntroduceReqBeanDefinitionParser;

/**
 * @author Securitit.
 * @note Spring namespace定义.
 */
public class HelloNamespaceHandler extends NamespaceHandlerSupport {

    @Override
    public void init() {
        registerBeanDefinitionParser("introduce", new IntroduceReqBeanDefinitionParser(HelloIntroduceBean.class, true));
    }

}
4) 创建Parser
创建Parser,继承BeanDefinitionParser,解析配置属性。
Parser负责接收配置属性值,对属性值进行校验处理,并初始化RootBeanDefinition,设置Bean相关属性。
package com.arhorchin.securitit.hello.parser;

import org.apache.commons.lang3.StringUtils;
import org.springframework.beans.factory.config.BeanDefinition;
import org.springframework.beans.factory.support.RootBeanDefinition;
import org.springframework.beans.factory.xml.BeanDefinitionParser;
import org.springframework.beans.factory.xml.ParserContext;
import org.w3c.dom.Element;

/**
 * @author Securitit.
 * @note 解析Spring的XMLhttp://www.devze.com文件, 设置Bean信息.
 */
public class IntroduceReqBeanDefinitionParser implements BeanDefinitionParser {

    /**
     * BEAN类型.
     */
    private final Class<?> beanClass;

    /**
     * 是否必需.
     */
    private final boolean required;

    /**
     * constructor.
     * @param beanClass .
     * @param required .
     */
    public IntroduceReqBeanDefinitionParser(Class<?> beanClass, boolean required) {
        this.beanClass = beanClass;
        this.required = required;
    }

    protected Class<?> getBeanClass(Element element) {
        return beanClass;
    }

    @Override
    public BeanDefinition parse(Element element, ParserContext parserContext) {
        return parse(element, parserContext, beanClass, required);
    }

    /**
     * Bean解析.
     * @param element 当前正在解析元素.
     * @param parserContext 解析器上下文.
     * @param beanClass 正在解析的Bean类.
     * @param required 是否必需.
     * @return 返回解析Bean定义.
     */
    private static BeanDefinition parse(Element element, ParserContext parserContext, Class<?> beanClass,
            boolean required) {
        String id = null;
        String name = null;
        String sex = null;
        String word = null;
        String blob = null;
        RootBeanDefinition beanDefinition = null;

        // 取introduce元素属性值.
        id = element.getAttribute("id");
        name = element.getAttribute("name");
        sex = element.getAttribute("sex");
        word = element.getAttribute("word");
        blob = element.getAttribute("blob");

        // 检查id值域.
        if (StringUtils.isEmpty(id)) {
            throw new IllegalStateException("hello:introduce元素属性id值必需.");
        }
        // 检查name值域.
        if (StringUtils.isEmpty(name)) {
            throw new IllegalStateException("hello:introduce元素属性name值必需.");
        }
        // 检查sex值域.
        if (StringUtils.isNotEmpty(sex) && !"male".equals(sex) && !"female".equals(sex)) {
            throw new IllegalStateException("hello:introduce元素属性sex值若存在,需为male或female.");
        }

        // 设置Bean定义.
        beanDefinition = new RootBeanDefpythoninition();
        beanDefinition.setBeanClass(beanClass);
        beanDefinition.setLazyInit(false);
        parserContext.getRegistry().registerBeanDefinition(id, beanDefinition);
        beanDefinition.getPropertyValues().addPropertyValue("id", id);
        beanDefinition.getPropertyValues().addPropertyValue("name", name);
        beanDefinition.getPropertyValues().addPropertyValue("sex", sex);
        beanDefinition.getPropertyValues().addPropertyValue("word", word);
        beanDefinition.getPropertyValues().addPropertyValue("blob", blob);
        return beanDefinition;
    }

}
5) 配置spring.handlers和spring.schemas文件
spring.handlers文件内容:
http\://code.alibabatech.com/schema/hello=com.arhorchin.securitit.hello.handler.HelloNamespaceHandler
spring.schemas文件内容:
http\://code.alibabatech.com/schema/hello/hello.xsd=META-INF/hello.xsd
6) 在Spring配置中进行应用
在应用中增加配置,引入对应的命名空间,并配置元素内容。
<?xml version="1.0" encoding="UTF-8"?>
<beans xmlns="http://www.springframework.org/schema/beans"
	xmlns:xsi="http://www.w3.org/2001/XMLSchema-instance"
	xmlns:hello="http://code.alibabatech.com/schema/hello"
	xsi:schemaLocation="http://www.springframework.org/schema/beans
    http://www.springframework.org/schema/beans/spring-beans.xsd
    http://code.alibabatech.com/schema/hello
    http://code.alibabatech.com/schema/hello/hello.xsd">

    <hello:introduce id="securitit" name="Securitit" sex="male" word="Java" blob="https://blog.csdn.net/securitit?spm=1001.2100.3001.5343"/>

</beans>
通过JUnit进行测试加载配置文件,进行测试。
package com.arhorchin.securitit.component;

import org.junit.Test;
import org.junit.runner.RunWith;
import org.slf4j.Logger;
import org.slf4j.LoggerFactory;
import org.springframework.beans.factory.annotation.Autowired;
import org.springframework.test.context.ContextConfiguration;
import org.springframework.test.context.junit4.SpringJUnit4ClassRunner;

import com.arhorchin.securitit.hello.bean.HelloIntroduceBean;

@RunWith(SpringJUnit4ClassRunner.class)
@ContextConfiguration(
        locations = { "classpath:spring/applicationContext.xml" })
public class NamespaceHandlerTest {

    /**
     * logger.
     */
    private Logger logger = LoggerFactory.getLogger(NamespaceHandlerTest.class);

    @Autowired
    private HelloIntroduceBean helloIntroduceBean;

    @Test
    public void test() {
        logger.info("Spring NamespaceHandler 自定义测试.");

        logger.info("hello:introduce元素属性:[id=" + helloIntroduceBean.getId() + "], [name=" + helloIntroduceBean.getName()
                + "], [sex=" + helloIntroduceBean.getSex() + "], [word=" + helloIntroduceBean.getWord() + "], [blob="
                + helloIntroduceBean.getBlob() + "]");
    }

}
可以看到,控制台输出了Spring配置文件中定义的内容。
2021-01-28 16:38:58 INFO [com.arhorchin.securitit.component.NamespaceHandlerTest] Spring NamespaceHandler 自定义测试.
2021-01-28 16:38:58 INFO [com.arhorchin.securitit.component.NamespaceHandlerTest] hello:introduce元素属性:[id=securitit], [name=Securitit], [sex=male], [word=Java], [blob=https://blog.csdn.net/securitit?spm=1001.2100.3001.5343]
总结
自定义NamespaceHandler的需求是会有很大几率碰见的,当然,在不知道的情况下,可能会选择其他方案,这就需要多了解,以便在需要的时候做出正确的选择。
源码解析基于spring-framework-5.0.5.RELEASE版本源码。
若文中存在错误和不足,欢迎指正!
到此这篇关于Spring中的自定义NamespaceHandler详解的文章就介绍到这了,更多相关自定义NamespaceHandler内容请搜索编程客栈(www.devze.com)以前的文章或继续浏览下面的相关文章希望大家以后多多支持编程客栈(www.devze.com)!


 加载中,请稍侯......
精彩评论