SpringBoot整合邮件发送的四种方法
目录
- 前言
- 一、创建Spring boot工程后,在pom.XML中添加依赖
- 1.1、方式一,新建工程时,在IO选项勾选邮件依赖
- 1.2、方式二,手动在pom.xml中添加依赖
- 二、在工程resource目录下创建application.properties文件,并添加相关配置
- 三、关于授权码
- 3.1、什么是 QQ 邮箱授权码
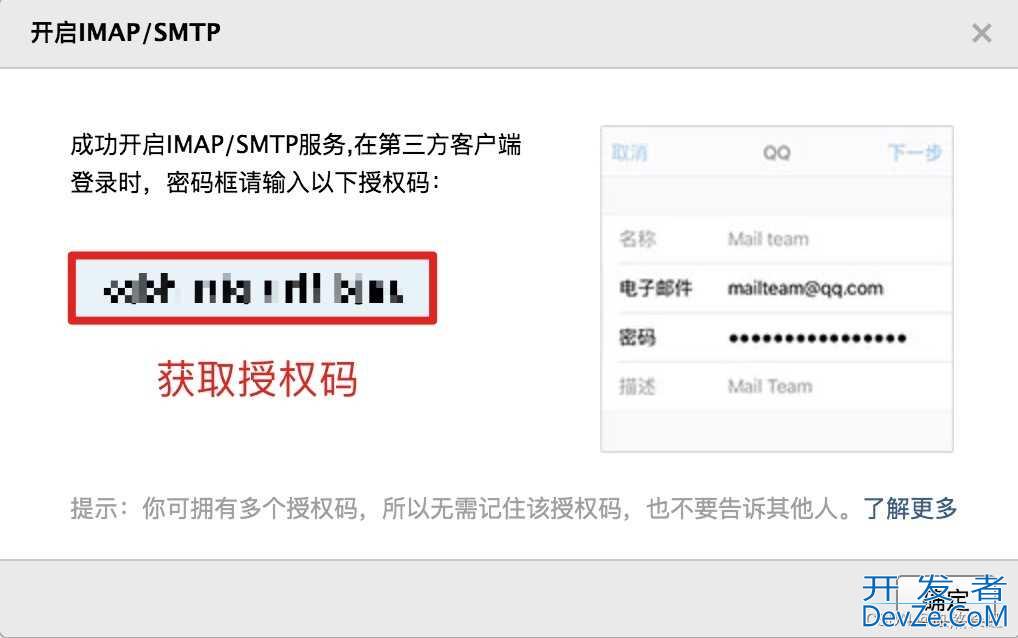
- 3.2、如何获取QQ授权码
- 3.2.1、登录 QQ 邮箱
- 3.2.2、点击设置,再点击页签中的“账户”
- 3.2.3、跳转页面后,点击账户,将页面往下拖动,您会看到,授权码的开启菜单
- 3.2.4、点击“开启”,验证成功过后,即可获取授权码
- 3.3、163邮箱的授权码
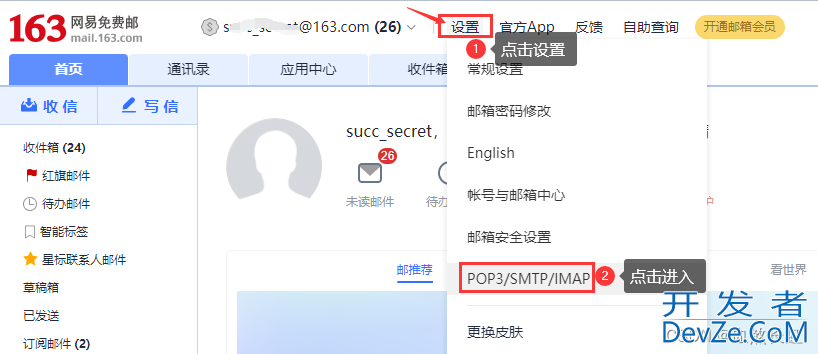
- 3.3.1、点击顶部页签的”"设置"按钮,进入POP3设置界面
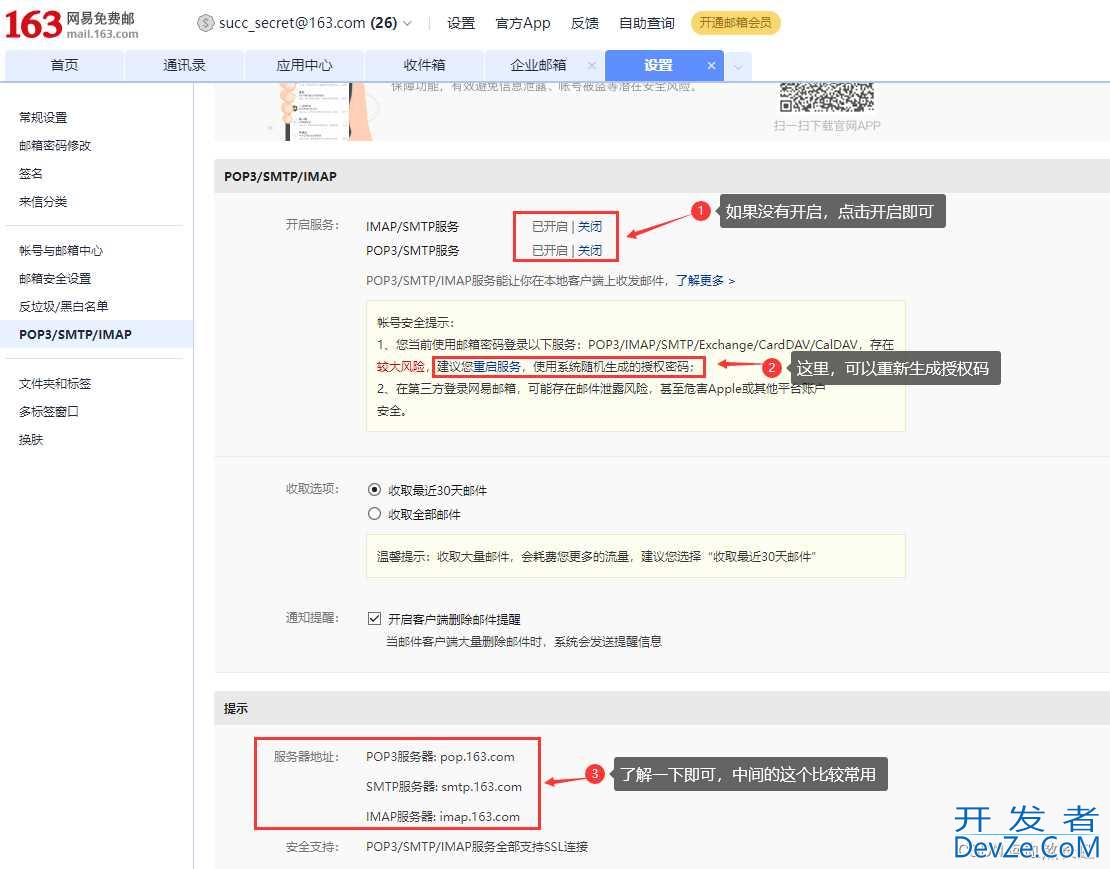
- 3.3.2、开启服务,也可以重新生成授权码
- 3.4、 发送邮件所需要遵从的POP3/SMTP/IMAP三个协议的简述
- 四、业务代码
- 4.1、新增MailService接口,并声明4个发送不同类型邮件的方法
- 4.2、新增MailService接口的实现类MailServiceImpl
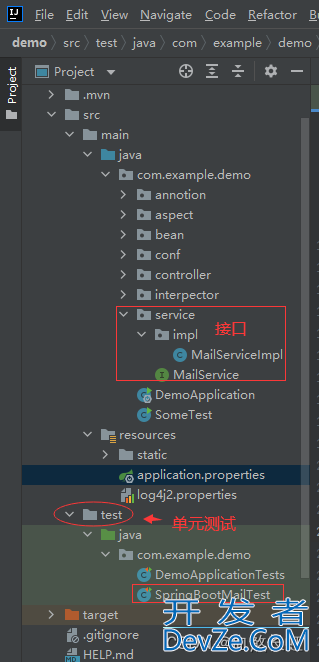
- 4.3、工程目录结构查看
- 五、单元测试,查看成果
- 5.1、发送纯文本邮件的测试
- 5.1.1、测试代码编写
- 5.1.2、运行查看,报错小插曲
- 5.1.3、给MailServiceImpl添加@Component注解后,再试
- 5.2、发送纯html文本测试
- 5.2.1、测试代码编写
- 5.2.2、运行并查看结果
- 5.3、发送带图片的HTML测试
- 5.3.1、测试代码编写
- 5.3.2、运行并查看结果
- 5.4、发送带附件的测试
- 5.4.1、测试代码编写
- 5.5.2、运行并查看结果
前言
邮件发送,听着很神秘,然而对于Spring Boot来说,这个功能已被集成好,只需引入spring-boot-starter-mail依赖后,少量代码即可实现大部分邮件发送需求。
因发送邮件的方法只是在调用上,略有改动(比如,设置参数是否包含有ture),故在代码编排上,写在一个类中了,后面单元测试时分开测试即可。
¥¥¥¥¥具体操作步骤如下¥¥¥¥¥
一、创建Spring boot工程后,在pom.xml中添加依赖
1.1、方式一,新建工程时,在IO选项勾选邮件依赖
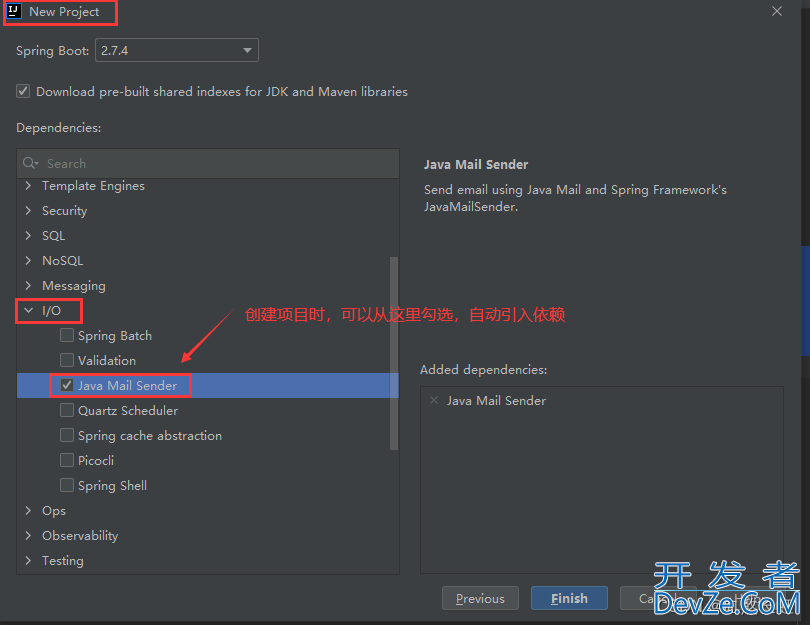
勾选后,spring-boot-starter-mail 依赖会被自动引入到pom.xml中
1.2、方式二,手动在pom.xml中添加依赖
引入:mail核心依赖
<dependencies>
    <dependency>
        <groupId>org.springframework.boot</groupId>
        <artifactId>spring-boot-starter-mail</artifactId>
    </dependency>
</dependencies>
其他相关依赖,可以酌情引入,需要注意的是,如果在项目中,无法自动导入依赖包,则很可能是下面的某个依赖,你没有引入,引入后鼠标右键pom.xml-->Maven-->Reload Project,就可以了。
		<dependency>
			<groupId>org.springframework.boot</groupId>
			<artifactId>spring-boot-starter</artifactId>
			<exclusions>
				<!--不使用默认的 logback日志,使用下面的log4j2-->
				<exclusjsion>
					<groupId>org.springframework.boot</groupId>
					<artifactId>spring-boot-starter-logging</artifactId>
				</exclusion>
			</exclusions>
		</dependency>
		<dependency>
			<groupId>org.springframework.boot</groupId>
			<artifactId>spring-boot-starter-log4j2</artifactId>
		</dependency>

		<dependency>
			<groupId>org.springframework.boot</groupId>
			<artifactId>spring-boot-starter-web</artifactId>
			<!-- 移除掉默认支持的 Tomcat -->
			<exclusions>
				<exclusion>
					<groupId>org.springframework.boot</groupId>
					<artifactId>spring-boot-starter-tomcat</artifactId>
				</exclusion>
			</exclusions>
		</dependency>
		<!-- 添加 Undertow 容器 -->
		<dependency>
			<groupId>org.springframework.boot</groupId>
			<artifactId>spring-boot-starter-undertow</artifactId>
		</dependency>
<dependency>
			<groupId>org.springframework.boot</groupId>
			<artifactId>spring-boot-starter-test</artifactId>
			<scope>test</scope>
		</dependency>
		<!-- aop 依赖 -->
		<dependency>
			<groupId>org.springframework.boot</groupId>
			<artifactId>spring-boot-starter-aop</artifactId>
		</dependency>

		<!-- 用于日志切面中,以 gson 格式打印出入参 -->
		<dependency>
			<groupId>com.google.code.gson</groupId>
			<artifactId>gson</artifactId>
		</dependency>
		<dependency>
			<groupId>org.projectlombok</groupId>
			<artifactId>lombok</artifactId>
			<version>1.18.24</version>
		</dependency>
		<!-- 引入DevTools热部署 -->
		<dependency>
			<groupId>org.springframework.boot</groupId>
			<artifactId>spring-boot-devtools</artifactId>
			<scope>runtime</scope>
			<optional>true</optional>
		</dependency>
二、在工程resource目录下创建application.properties文件,并添加相关配置
注意:下面的邮箱地址,是你自己的邮箱(作为邮件的发送者);密码是对应邮箱的登录密码或授权码,授权码在下方会有详细介绍,本文以163邮箱为例!
# 发送邮件的服务器,
# QQ 邮件:smtp.qq.com
# 如果是163邮箱,变更为“smtp.163.com”即可
spring.mail.host=smtp.163.com
#你的邮箱地址
spring.mail.username=123456789@163.com
#授权码,或邮箱登录密码
spring.mail.password=123456
#是否开启验证 true为开启,false不开启
spring.mail.properties.mail.smtp.auth=true
#通讯是否加密,true开启,false不开启
spring.mail.properties.mail.smtp.starttls.enable=true
#是否必须通过使用加密通讯进行通讯,true开启,false不开启
spring.mail.properties.mail.smtp.starttls.required=true
提示:如果你想使用application.yml配置文件,则格式如下
spring:
  mail:
    host: smtp.qq.com #发送邮件的服务器
    username: 你的邮箱地址
    password: 授权码,或邮箱密码
    properties.mail.smtp.auth: true
    properties.mail.smtp.starttls.enable: true
    default-encoding: utf-8
三、关于授权码
如果使用的是 163 邮箱,或者 Gmail 邮箱,直接使用密码就可以了,如果使用的是 QQ 邮箱,则需要先获取授权码。
3.1、什么是 QQ 邮箱授权码
官方解释如下图所示

3.2、如何获取QQ授权码
3.2.1、登录 QQ 邮箱
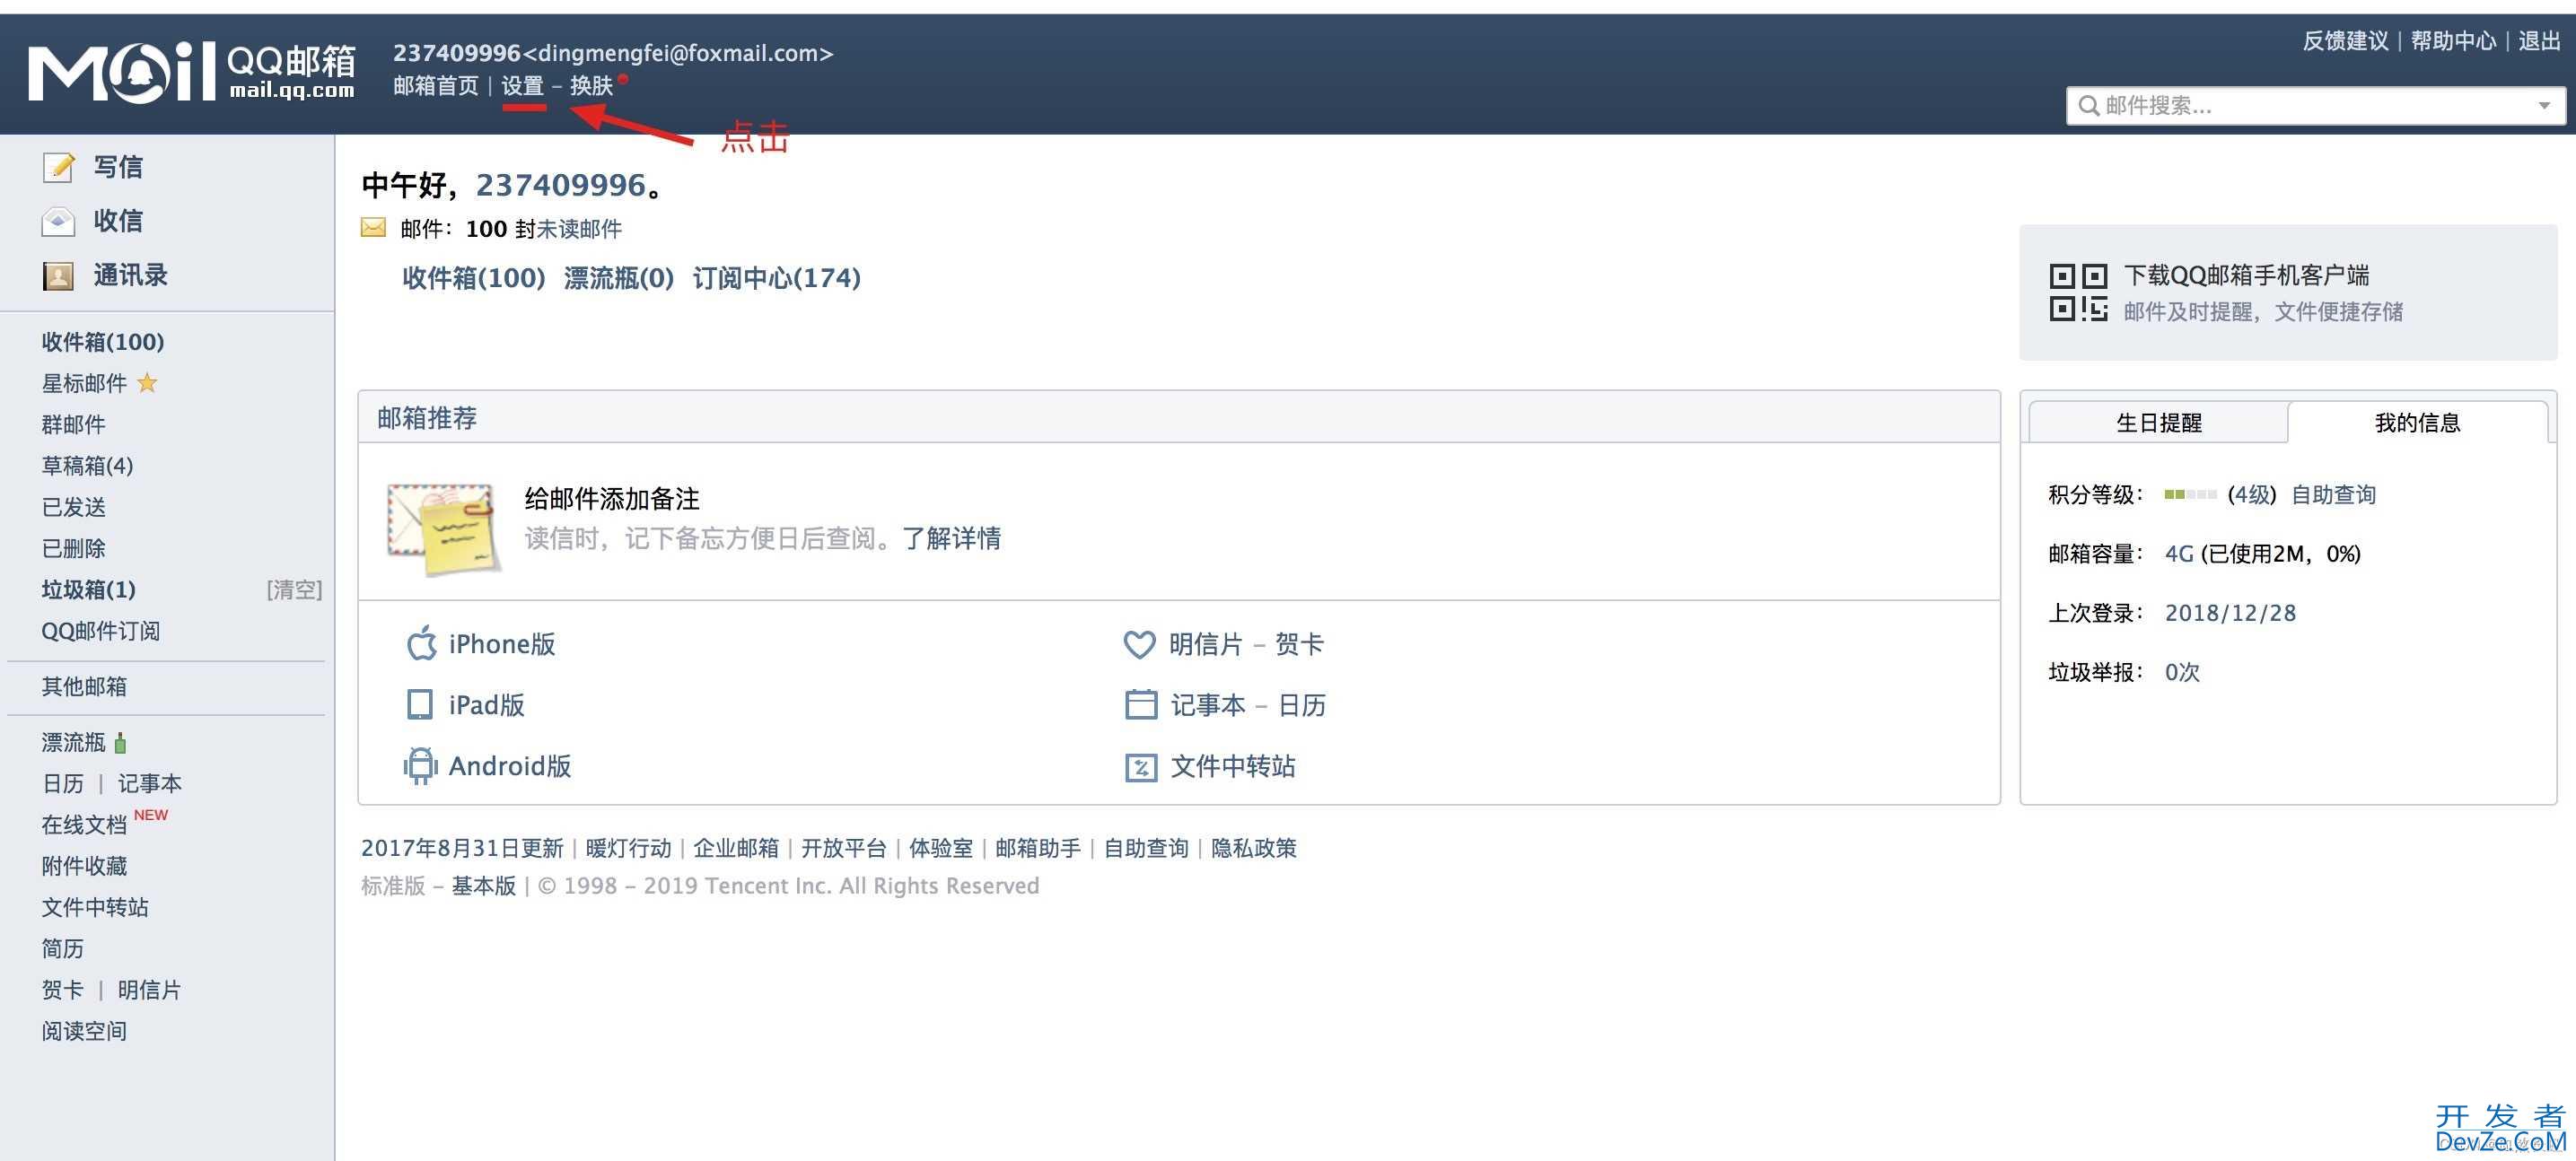
3.2.2、点击设置,再点击页签中的“账户”
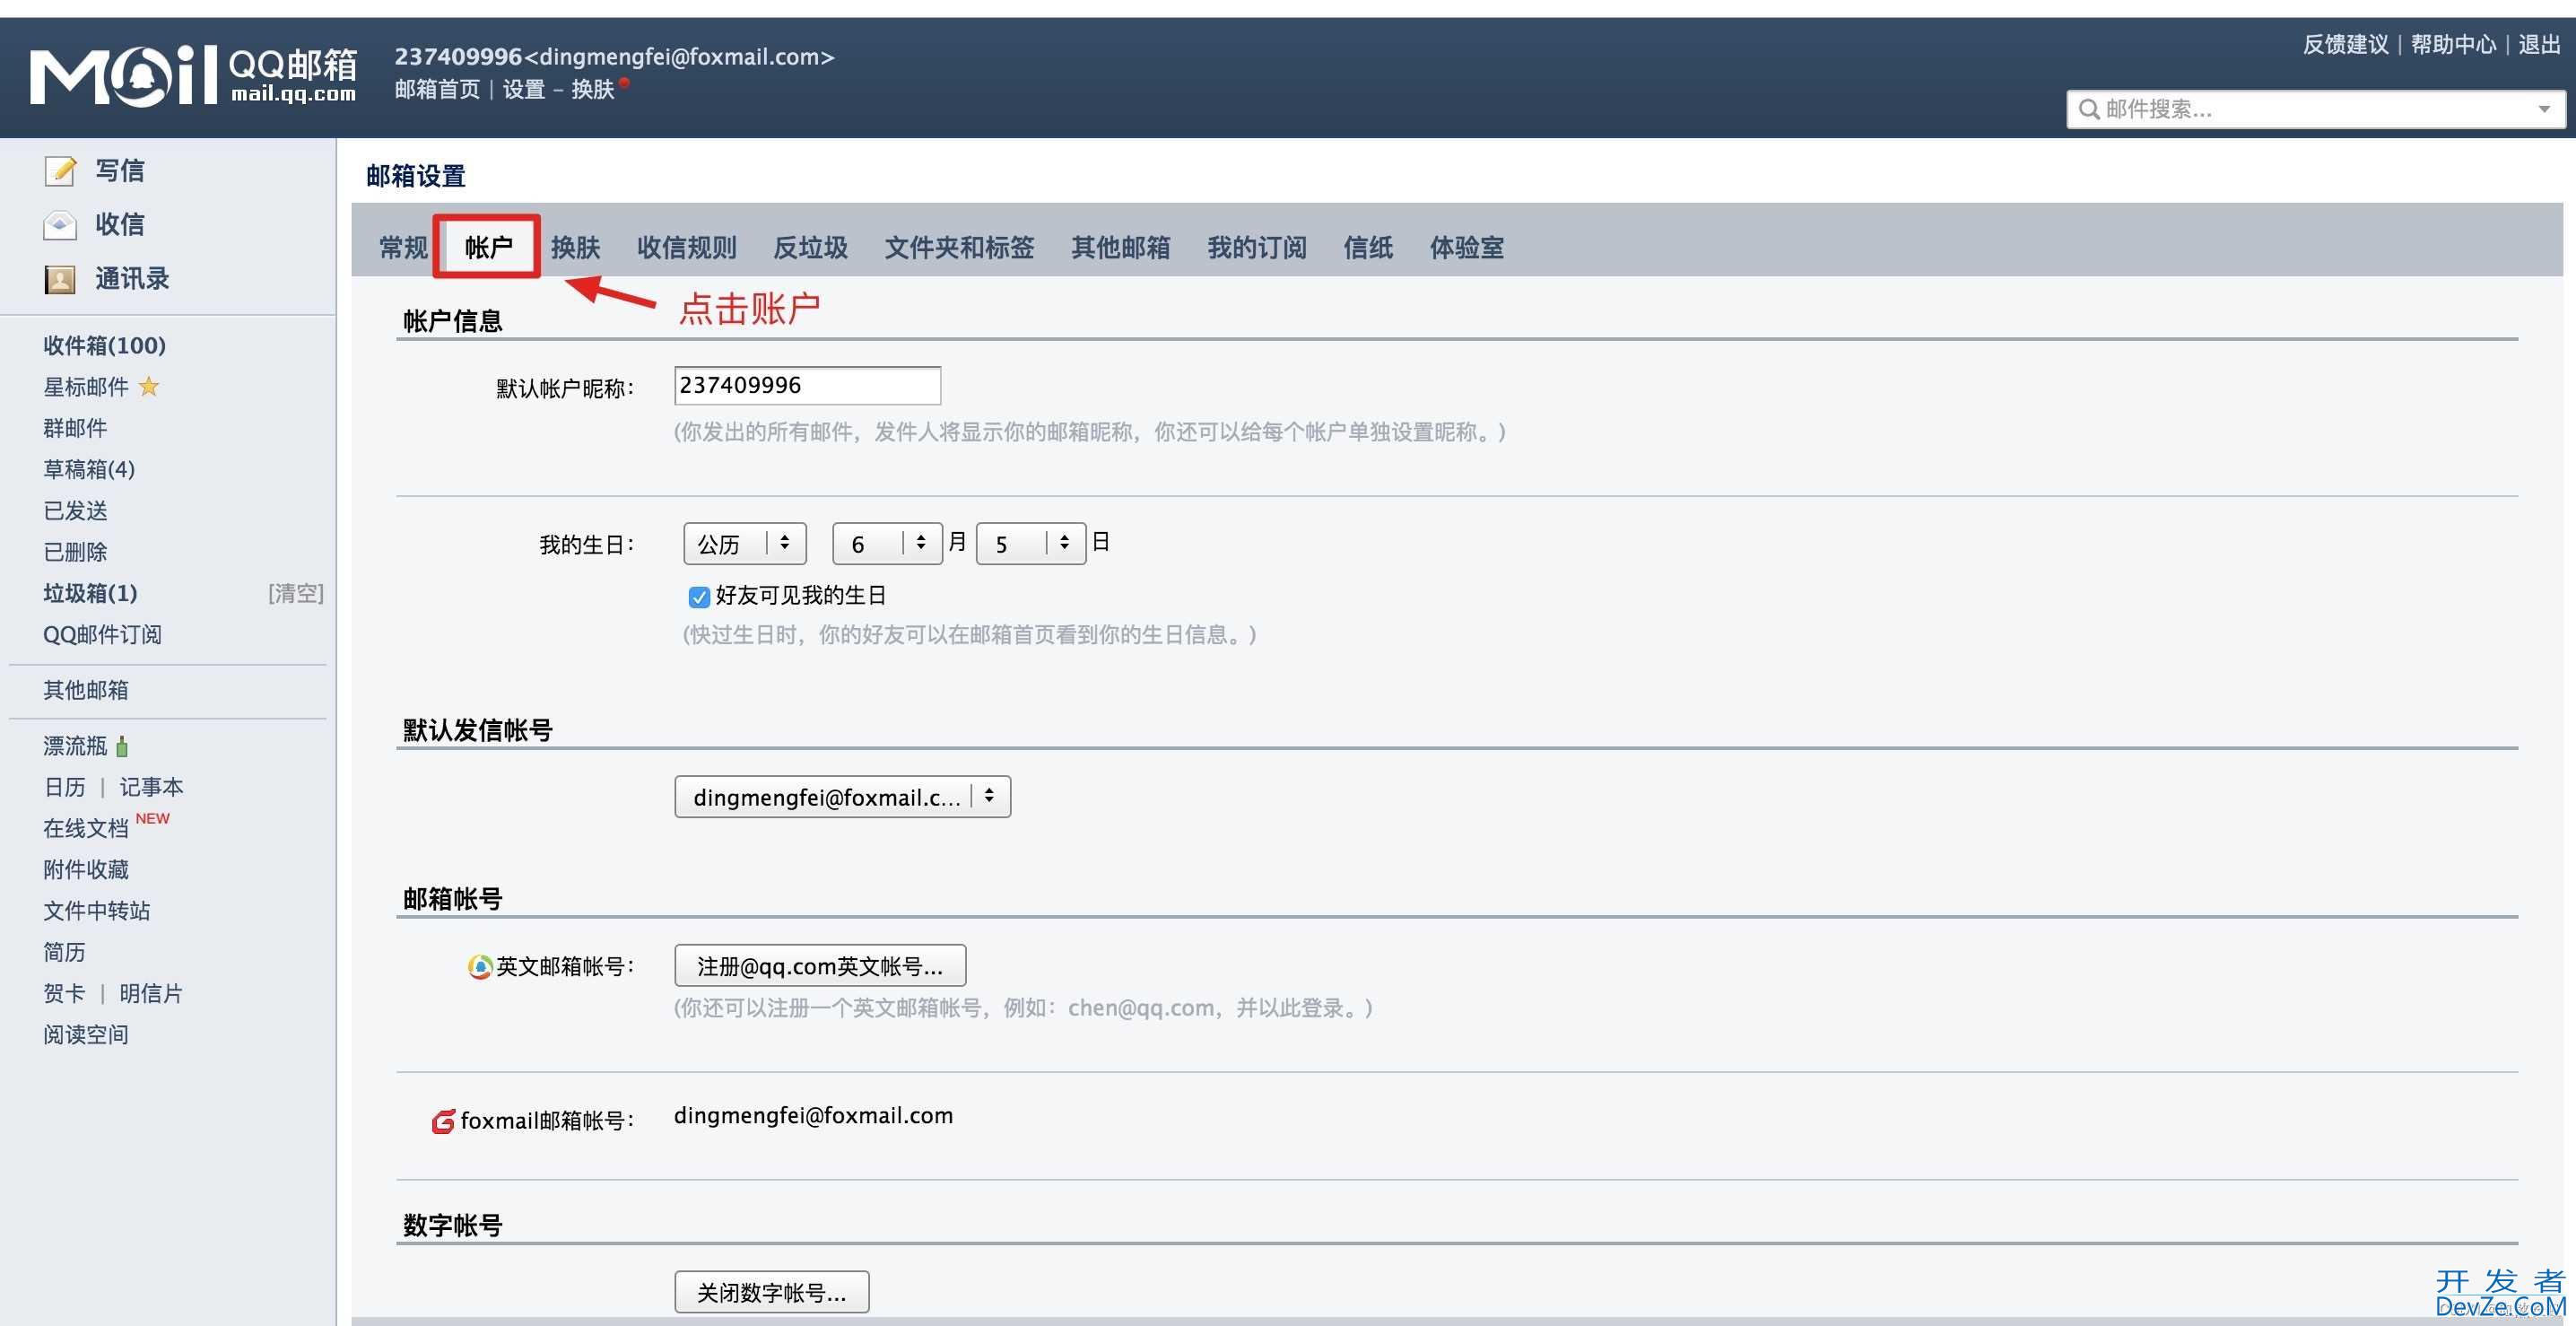
3.2.3、跳转页面后,点击账户,将页面往下拖动,您会看到,授权码的开启菜单

3.2.4、点击“开启”,验证成功过后,即可获取授权码
3.3、163邮箱的授权码
我的账号默认是开启的,如果你的没有开启,如下步骤操作
3.3.1、点击顶部页签的”"设置"按钮,进入POP3设置界面
3.3.2、开启服务,也可以重新生成授权码
3.4、 发送邮件所需要遵从的POP3/SMTP/IMAP三个协议的简述
SMTP(Simple Mail Transfer Protocol):简单邮件传输协议,用于发送电子邮件的传输协议。
POP3(Post Office Protocol - Version 3):用于接收电子邮件的标准协议。
IMAP(Internet Mail Access Protocol):互联网消息协议,是POP3的替代协议。
简而言之,SMTP是发邮件必须遵从的标准,POP3是接收邮件要遵从的标准,而IMAP是对POP3协议的升级,日常工作中,我们主要使用的是发邮件操作。
四、业务代码
4.1、新增MailService接口,并声明4个发送不同类型邮件的方法
注:入参多于3个的情况下,通常也会把入参封装为一个实体Bean,方便起见,这里就不封装了。
package com.example.demo.service;

/**
 * @author xyp
 * @create 2022-10-07 12:57
 * @describe 邮件发送接口,定义发送不同类型邮件的方法
 */
public interface MailService {
    /**
     * 发送简单文本的邮件
     * @param to
     * @param subject
     * @param content
     * @return
     */
    boolean sendSimpleText(String to, String subject, String content);

    /**
     * 发送 html 的邮件
     * @param to
     * @param subject
     * @param html
     * @return
     */
    boolean sendwithHtml(String to, String subject, String html);

    /**
     * 发送带有图片的 html 的邮件
     * @param to
     * @param subject
     * @param html
     * @param cids
     * @param filePaths
     * @return
     */
    boolean sendWithImageHtml(String to, String subject, String html, String[] cids, String[] filePaths);


    /**
     * 发送带有附件的邮件
     * @param to
     * @param subject
     * @param content
     * @param filePaths
     * @return
     */
    boolean sendWithWithEnclosure(String to, String subject, String content, String[] filePaths);
}
4.2、新增MailService接口的实现类MailServiceImpl
package com.example.demo.service.impl;

import com.example.demo.service.MailService;
import org.slf4j.Logger;
import org.slf4j.LoggerFactory;
import org.springframework.beans.factory.annotation.Autowired;
import org.springframework.boot.autoconfigure.mail.MailProperties;
import org.springframework.core.io.FileSystemResource;
import org.springframework.mail.SimpleMailMessage;
import org.springframework.mail.Javamail.JavaMailSender;
import org.springframework.mail.javamail.MimeMessageHelper;

import javax.mail.internet.MimeMessage;

/**
 * @author xyp
 * @create 2022-10-07 13:01
 * @describe
 */
@Component //没有这个注解,发送邮件时可能会引发空指针异常
public class MailServiceImpl implements MailService {

    private final static Logger logger = LoggerFactory.getLogger(MailServiceImpl.class);

    @Autowired
    private MailProperties mailProperties;
    @Autowired
    private JavaMailSender javaMailSender;

    @Override
    public boolean sendSimpleText(String to, String subject, String content) {
        logger.info("## Ready to send mail ...");

        SimpleMailMessage simpleMailMessage = new SimpleMailMessage();
        // 邮件发送来源
        simpleMailMessage.setFrom(mailProperties.getUsername());
        // 邮件发送目标
        simpleMailMessage.setTo(to);
        // 设置标题
        simpleMailMessage.setSubject(subject);
        // 设置内容
        simpleMailMessage.setText(content);

        try {
            // 发送
            javaMailSender.send(simpleMailMessage);
            logger.info("## Send the mail success ...");
        } catch (Exception e) {
            logger.error("Send mail error: ", e);
            return false;
        }

        return true;
    }

    @Override
    public boolean sendWithHtml(String to, String subject, String html) {
        logger.info("## Ready to send mail ...");
        MimeMessage mimeMessage = javaMailSender.createMimeMessage();

        MimeMessageHelper mimeMessageHelper = null;
        try {
            mimeMessageHelper = new MimeMessageHelper(mimeMessage, true);
            // 邮件发送来源
            mimeMessageHelper.setFrom(mailProperties.getUsername());
            // 邮件发送目标
            mimeMessageHelper.setTo(to);
            // 设置标题
            mimeMessageHelper.setSubject(subject);
            // 设置内容,并设置内容 html 格式为 true
            mimeMessageHelper.setText(html, true);

            javaMailSender.send(mimeMessage);
            logger.info("## Send the mail with html success ...");
        } catch (Exception e) {
            e.printStackTrace();
            logger.error("Send html mailjs error: ", e);
            return false;
        }

        return true;
    }

    @Override
    public boolean sendWithImageHtml(String to, String subject, String html, String[] cids, String[] filePaths) {
        logger.info("## Ready to send mail ...");
        MimeMessage mimeMessage = javaMailSender.createMimeMessage();

        MimeMessageHelper mimeMessageHelper = null;
        try {
            mimeMessageHelper = new MimeMessageHelper(mimeMessage, true);
            // 邮件发送来源
            mimeMessageHelper.setFrom(mailProperties.getUsername());
            // 邮件发送目标
            mimeMessageHelper.setTo(to);
            // 设置标题
            mimeMessageHelper.setSubject(subject);
            // 设置内容,并设置内容 html 格式为 true
            mimeMessageHelper.setText(html, true);

            // 设置 html 中内联的图片
            for (int i = 0; i < cids.length; i++) {
                FileSystemResource file = new FileSystemResource(filePaths[i]);
                // addInline() 方法 cid 需要 html 中的 cid (Content ID) 对应,才能设置图片成功,
                // 具体可以参见,下面 4.3.3 单元测试的参数设置
                mimeMessageHelper.addInline(cids[i], file编程客栈);
            }

            javaMailSender.send(mimeMessage);
            logger.info("## Send the mail with image success ...");
        } catch (Exception e) {
            e.printStackTrace();
            logger.error("Send html mail error: ", e);
            return false;
        }

        return true;
    }

    @Override
    public boolean sendWithWithEnclosure(String to, String subject, String content, String[] filePaths) {
        logger.info("## Ready to send mail ...");
        MimeMessage mimeMessage = javaMailSender.createMimeMessage();

        MimeMessageHelper mimeMessageHelper = null;
        try {
            // 设置为true,代表要支持附件
            mimeMessageHelper = new MimeMessageHelper(mimeMessage, true);
            // 邮件发送来源
            mimeMessageHelper.setFrom(mailProperties.getUsername());
            // 邮件发送目标
            mimeMessageHelper.setTo(to);
            // 设置标题
            mimeMessageHelper.setSubject(subject);
            // 设置内容
            mimeMessageHelper.setText(content);

             // 添加附件
            for (int i = 0; i < filePaths.length; i++) {
                FileSystemResource file = new FileSystemResource(filePaths[i]);
                String attachementFileName = "附件" + (i + 1)+"_"+ file.getFilename();
                mimeMessageHelper.addAttachment(attachementFileName, file);
            }

            javaMailSender.send(mimeMessage);
            logger.info("## Send the mail with enclosure success ...");
        } catch (Exception e) {
            logger.error("Send html mail error: ", e);
            return false;
        }
        return true;
    }
}
4.3、工程目录结构查看
如下图所示,核心的几个类,都被红色的框,框选着的,其他一些package与本项目无关。
五、单元测试,查看成果
准备工作
1、在pom中引入单元测试的依赖
<dependency>
	<groupId>junit</groupId>
	<artifactId>junit</artifactId>
	<version>4.9</version>
	<scope>test</scope>
</dependency>
需要注意的是,在单元测试类中,所有与单元测试类相关的类,都来自于junit,不要使用默认的。
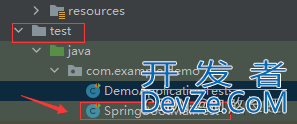
2、在test单元测试目录,新建SpringBootMailTest.java类
5.1、发送纯文本邮件的测试
5.1.1、测试代码编写
package com.example.demo;

import com.example.demo.service.MailService;
import org.junit.Assert;//注意这个包是junit的,不是自带的
import org.junit.jupiter.api.Test;
import org.springframework.beans.factory.annotation.Autowired;
import org.springframework.boot.test.context.SpringBootTest;

/**
 * @author xyp
 * @create 2022-10-07 15:07
 * @describe
 */
@SpringBootTest
public class SpringBootMailTest {

    @Autowired(required = false)
    private MailService mailService;

    @Test
    public void sendSimpleText(){
        String to="871038951@qq.com";
        String title="标题:简单的文本发送测试";
        String content="简单的文本";
        Assert.assertTrue(mailService.sendSimpleText(to,title,content));
    }
}
5.1.2、运行查看,报错小插曲

初次运行,可能会报如下错误
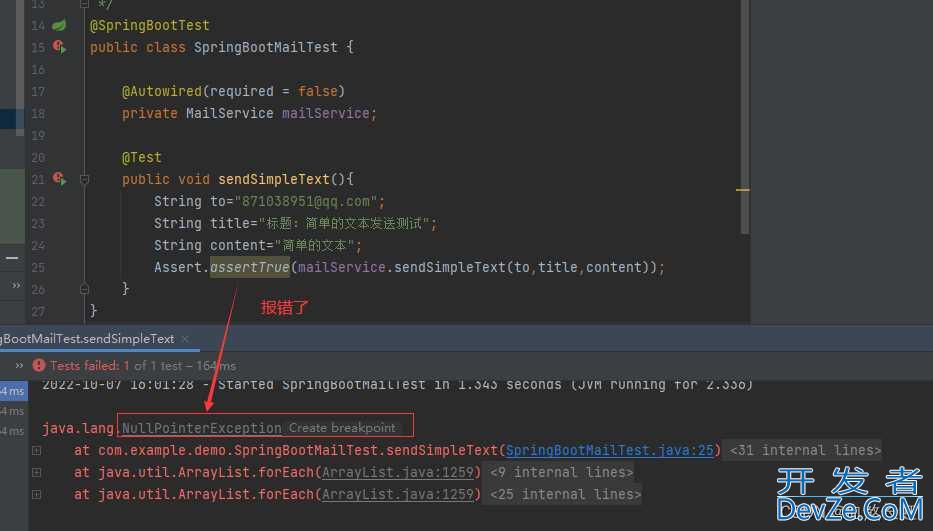
经百般百度后,得知需要给MailServicel的实现类MailServiceImpl添加@Component注解

5.1.3、给MailServiceImpl添加@Component注解后,再试
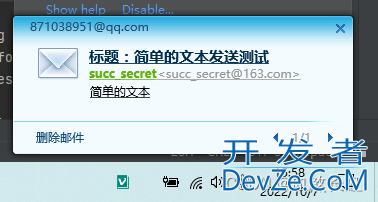


至此,第一个纯文本邮件发送,测试成功!
5.2、发送纯HTML文本测试
5.2.1、测试代码编写
    @Test
    public void sendHtml(){
        String to="871038951@qq.com";
        String title="标题:Html文本发送测试";
        String htmlContent="<html><body><h1>欢迎来到 Spring boot 的世界</h1></body></html>";
        Assert.assertTruewww.devze.com(mailService.sendWithHtml(to,title,htmlContent));
    }
5.2.2、运行并查看结果

运行后,收到邮件提示

进入邮箱,并打开
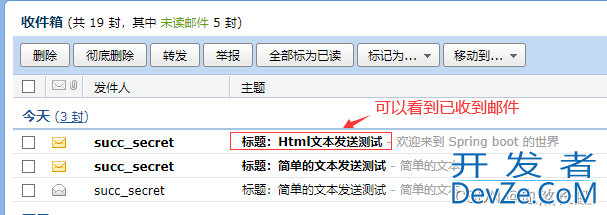
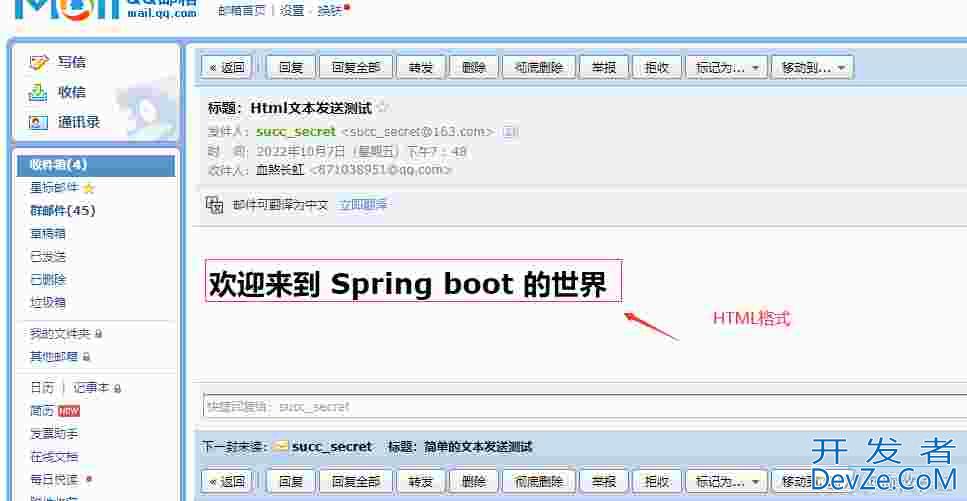
至此,第二个发送Html的测试,测试成功!
5.3、发送带图片的HTML测试
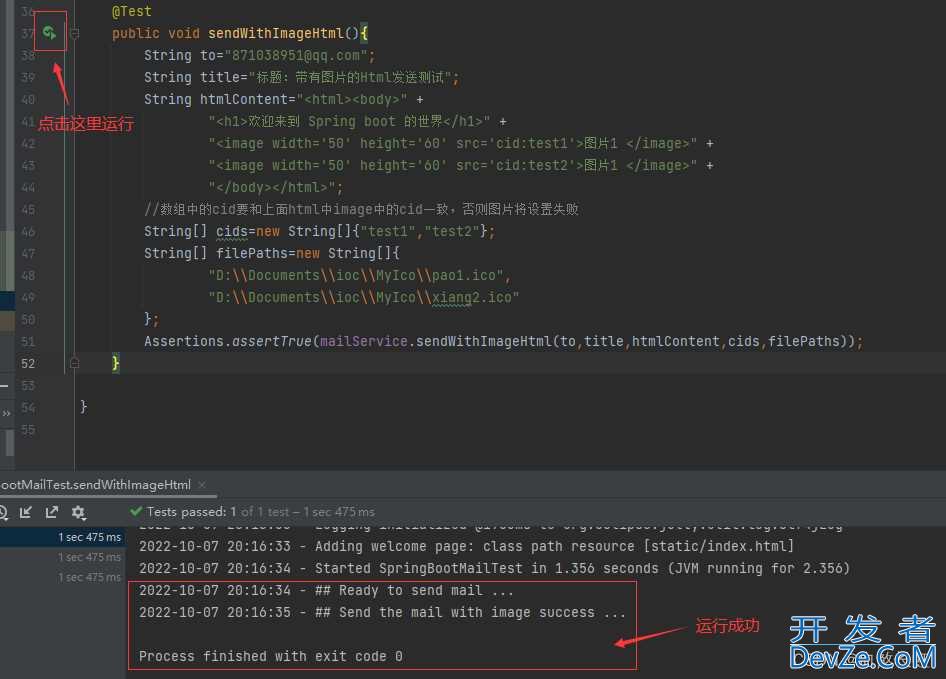
5.3.1、测试代码编写
    @Test
    public void sendWithImageHtml(){
        String to="871038951@qq.com";
        String title="标题:带有图片的Html发送测试";
        String htmlContent="<html><body>" +
                "<h1>欢迎来到 Spring boot 的世界</h1>" +
                "<image width='50' height='60' src='cid:test1'>图片1 </image>" +//cid:是约定好的固定格式,只需要修改后面的变量
                "<image width='50' height='60' src='cid:test2'>图片php1 </image>" +
                "</body></html>";
        //数组中的cid要和上面html中image中的cid一致,否则图片将设置失败
        String[] cids=new String[]{"test1","test2"};
        String[] filePaths=new String[]{
                "D:\\Documents\\ioc\\MyIco\\pao1.ico",
                "D:\\Documents\\ioc\\MyIco\\xiang2.ico"
        };
        Assertions.assertTrue(mailService.sendWithImageHtml(to,title,htmlContent,cids,filePaths));
    }
5.3.2、运行并查看结果
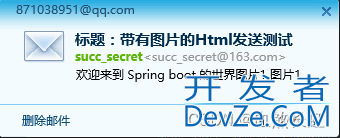
电脑右下角有邮件提醒
进入邮箱,查看邮件
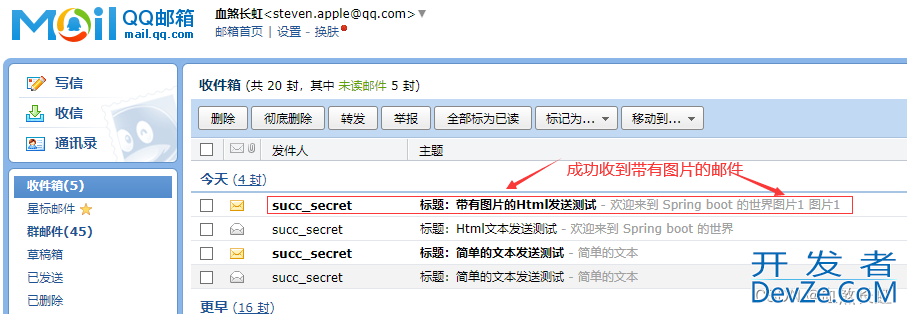
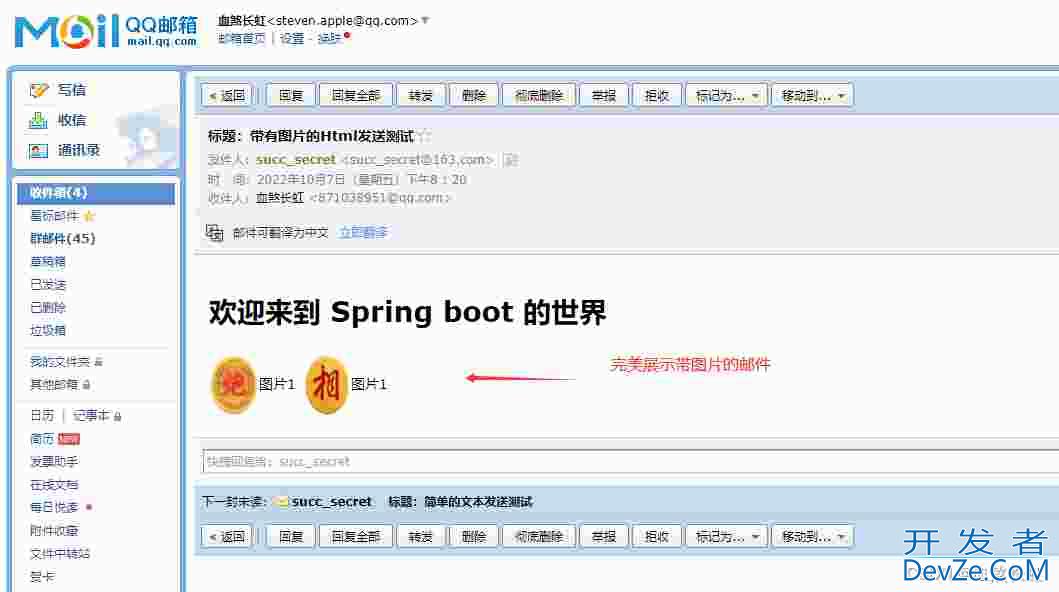
至此,第三个发送带图片的Html邮件,测试成功!
5.4、发送带附件的测试
5.4.1、测试代码编写
 @Test
    public void sendWithWithEnclosure(){
        String to="871038951@qq.com";
        String title="标题:带有附件的邮件发送测试";
        String content="欢迎来到 Spring boot 的世界";
        String[] filePaths=new String[]{
                "D:\\Documents\\ioc\\MyIco\\pao1.ico",
                "D:\\Documents\\ioc\\MyIco\\expect5.45.tar.gz"
        };
        Assert.assertTrue(mailService.sendWithWithEnclosure(to,title,content,filePaths));
    }
5.5.2、运行并查看结果

注:刚开始附件,测试的是图片,为了测试压缩包是否能被当做附件发送,又新增了压缩包的测试。
电脑右下角弹出新邮件提示:

进入收件箱查看邮件
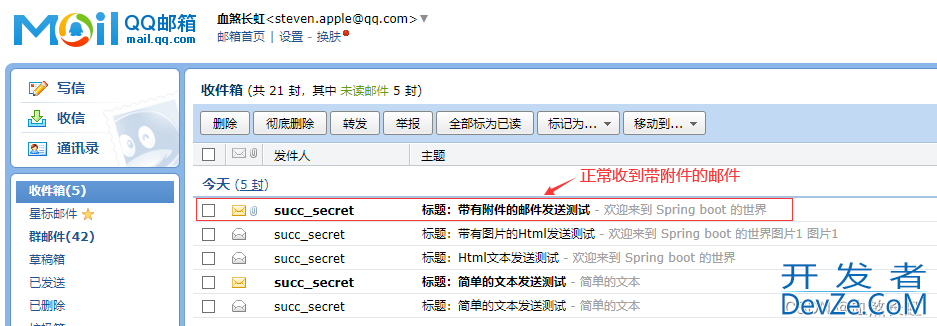
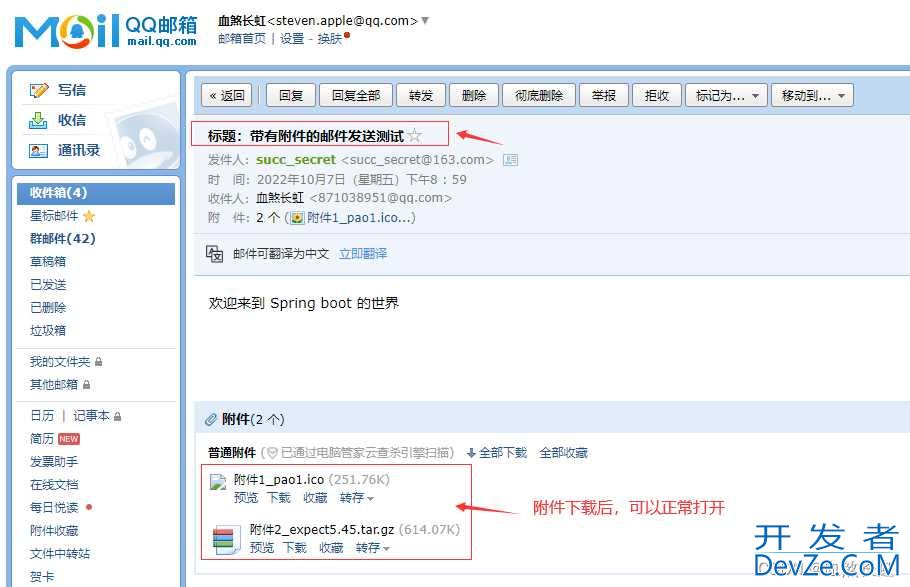
经测试,下载后,附件可以正常打开。
至此,各个案例都演示完毕!
案例虽然简单,总的来说,这个几个方法还是有一定的局限性,不过它为我们今后整合一个功能更齐全的邮件发送功能,带来的指引和启发,已经够用了。
注意下面几行点参数中true的含义:
//纯文本邮件,不用带任何参数
SimpleMailMessage simpleMailMessage = new SimpleMailMessage();
simpleMailMessage .setText(contentText);
// 邮件内容如果是html和图片,则下面两处都需要设置为true
mimeMessageHelper = new M开发者_Python开发imeMessageHelper(mimeMessage, true);//如果是仅支持附件,这一处设置为true即可
mimeMessageHelper.setText(html, true);
注意:连续发内容相同的邮件,会被判定为垃圾邮件,可能会被拦截。
到此这篇关于SpringBoot整合邮件发送的四种方法的文章就介绍到这了,更多相关SpringBoot邮件发送内容请搜索我们以前的文章或继续浏览下面的相关文章希望大家以后多多支持我们!


 加载中,请稍侯......
精彩评论