手把手教你如何搭建SpringBoot+Vue前后端分离
目录
- 1 什么是前后端分离
- 2 Spring Boot后端搭建
- 2.1 Mapper层
- 2.2 Service层
- 2.3 Controller层
- 2.4 配置类
- 3 vue前端搭建
- 3.1 新建Vue_cli2.x项目
- 3.2 引入路由
- 3.3 新建文件
- 3.4 配置和测试路由
- 3.5 引入Element UI
- 3.6 使用Element UI美化页面
- 3.7 整合axIOS与Spring Boot后端交互
- 4 总结
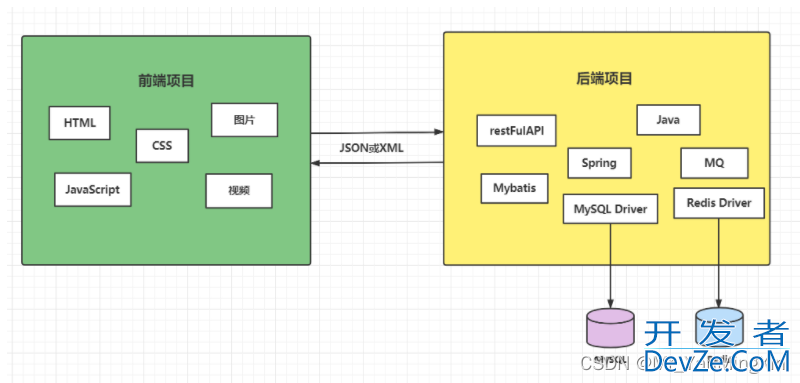
1 什么是前后端分离
前后端分离是目前互联网开发中比较广泛使用的开发模式,主要是将前端和后端的项目业务进行分离,可以做到更好的解耦合,前后端之间的交互通过XML或json的方式,前端主要做用户界面的渲染,后端主要负责业务逻辑和数据的处理。
2 Spring Boot后端搭建
2.1 Mapper层
请参阅这篇文章https://blog.csdn.net/Mr_YanMingXin/article/details/118342143
此次项目的后端搭建就是在这个项目的基础上
2.2 Service层
接口:
/**
 * @author 17122
 */
public interface StudentService {
    /**
     * 添加一个学生
     *
     * @param student
     * @return
     */
    public int saveStudent(Student student);

    /**
     * 根据ID查看一名学生
     *
     * @param id
     * @return
     */
    public Student findStudentById(Integer id);

    /**
     * 查询全部学生
     *
     * @return
     */
    public List<Student> findAllStudent();

    /**
     * 根据ID删除一个
     *
     * @param id
     * @return
     */
    public int removeStudentById(Integer id);

    /**
     * 根据ID修改
     *
     * @param student
     * @return
     */
    public int updateStudentById(Student student);


}
实现类:
/**
 * @author 17122
 */
@Service
public class StudentServiceImpl implements StudentService {

    @Autowired
    private XmlStudentMapper xmlStudentMapper;

    @Override
    public int saveStudent(Student student) {
        return xmlStudentMapper.saveStudent(student);
    }

    @Override
    public Student findStudentById(Integer id) {
        return xmlStudentMapper.findStudentById(id);
    }

    @Override
    public List<Student> findAllStudent() {
        return xmlStudentMapper.findAllStudent();
    }

    @Override
    public int removeStudentById(Integer id) {
        return xmlStudentMapper.removeStudentById(id);
    }

    @Override
    public int updateStudentById(Student student) {
        return xmlStudentMapper.updateStudentById(student);
    }
}
2.3 Controller层
/**
 * @author 17122
 */
@RestController
@RequestMapping("/student")
public class StudentController {

    @Autowired
    private StudentService studentService;

    /**
     * 添加学生
     *
     * @param student
     * @return
     */
    @PostMapping("/save")
    public int saveStudent(@RequestBody Student student) {
        int result;
        try {
            result = studentService.saveStudent(student);
        } catch (Exception exception) {
            return -1;
        }
        return result;
    }

    /**
     * 查看全部
     *
     * @return
     */
    @GetMapping("/findAll")
    public List<Student> findAll() {
        return studentService.findAllStudent();
    }

    /**
     * 根据ID查看
     *
     * @param id
     * @return
     */
    @GetMapping("/findById/{id}")
    public Student findById(@PathVariable("id") Integer id) {
        return studentService.findStudentById(id);
    }

    /**
     * 删除一个
     *
     * @param id
     * @return
     */
    @DeleteMapping("/remove/{id}")
    public int remove(@PathVariable("id") Integer id) {
        return studentService.removeStudentById(id);
    }

    /**
     * 修改学生信息
     *
     * @param student
     * @return
     */
    @PostMapping("/update")
    public int update(@RequestBody Student student) {
        return studentService.updateStudentById(student);
    }

}
2.4 配置类
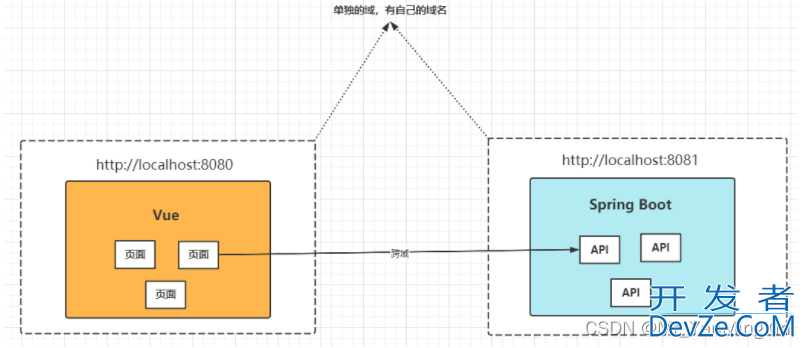
解决跨域请求
/**
 * @author 17122
 */
@Configuration
public class CorsConfig implements WebMvcConfigurer {
    @Override
    public void addCorsMappings(CorsRegistry registry) {
        registry.addMapping("/**")
                .allowedOriginPatterns("*")
                .allowedMethods("GET", "HEAD", "POST", "PUT", "DELETE", "OPTIONS")
                .allowCredentials(true)
                .maxAge(3600)
                .allowedHeaders("*");
    }
}
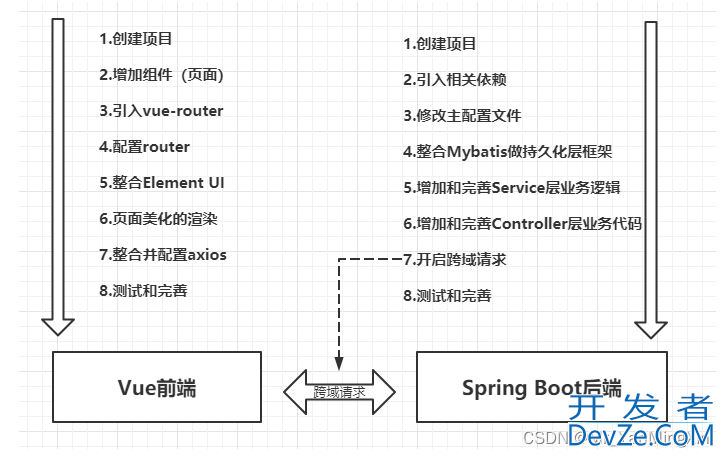
图解跨域问题:
3 Vue前端搭建
3.1 新建Vue_cli2.x项目
3.2 引入路由
npm install vue-router --save
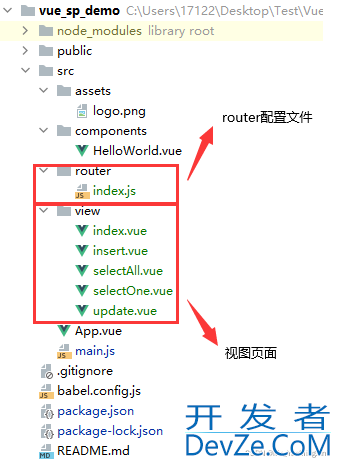
3.3 新建文件
3.4 配置和测试路由
main.js配置
import Vue from 'vue'
import App from './App.vue'
import router from './router'

Vue.config.productionTphpip = false

new Vue({
    render: h => h(App),
    router
}).$mount('#app')
index.js
//注册路由
import Vue from 'vue';
import VueRouter from 'vue-router';
//引入路由
import index from '../view/index'
import update from "../view/update";
import selectAll from "../view/selectAll";
import selectOne from "../view/selectOne";
import insert from "../view/insert";

Vue.use(VueRouter);

const router = new VueRouter({
    routes: [
        {
            name: "主页重定向",
            path: "/",
            redirect: "/index"
        }, {
            name: "主页",
            path: "/index",
            component: index,
            children: [
                {
                    name: "修改操作",
                    path: "/update",
                    component: update,
                }, {
                    name: "查看全部",
                    path: "/selectAll",
                    component: selectAll,
                }, {
                    name: "查看一个",
                    path: "/selectOne",
                    component: selectOne,
                }, {
                    name: "添加一个",
                    path: "/insert",
                    component: insert,
                }
            ]
        }
    ]
})

export default router
App.vue
<template>
    <div id="app">
        <router-view/>
    </div>
</template>

<script>

export default {
    name: 'App',
}
</script>
index.vue
<template>
    <div>
        <router-link to="update">update</router-link>
        <br>
        <router-link to="selectAll"> selectAll</router-link>
        <br>
        <router-link to="selectOne"> selectOne</router-link>
        <br>
        <router-link to="insert"> insert</router-link>
        <br>
        <br>
        <router-view></router-view>
    </div>
</template>

<script>
export default {
    name: "index"
}
</script>

<style scoped>

</style>
insert.vue
<template>
    <div>
        insert
    </div>
</template>

<script>
export default {
    name: "insert"
}
</script>

<style scoped>

</style>
selectOne.vue
<template>
    <div>
        selectOne
    </div>
</template>

<script>
export default {
    name: "selectOne"
}
</script>

<style scoped>

</style>
selectAll.vue
<template>
    <div>
        selectAll
    </div>
</template>

<script>
export default {
    name: "selectAll"
}
</script>

<style scoped>

</style>
update.vue
<template>
    <div>
        update
    </div>
</template>

<script>
export default {
    name: "update"
}
</script>

<style scoped>

</style>
测试
启动项目
npm run serve
访问:http://localhost:8080/
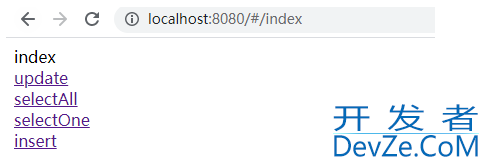
点击相关标签时会显示响应页面
3.5 引入Element UI
npm i element-ui -S
main.js
import Vue from 'vue'
import App from './App.vue'
import router from './router'
import ElementUI from 'element-ui'
import 'element-ui/lib/theme-chalk/index.css'

Vue.config.productionTip = false
Vue.use(ElementUI)
new Vue({
    render: h => h(App),
    router
}).$mount('#app')
3.6 使用Element UI美化页面
index.vue
<template>
    <div>
        <el-menu class="el-menu-demo" mode="horizontal" :router="true">
            <el-menu-item index="/selectAll">全部学生</el-menu-item>
            <el-menu-item index="/insert">添加学生</el-menu-item>
            <el-menu-item index="/selectOne">查看学生</el-menu-item>
            <el-menu-item index="/update">修改学生</el-menu-item>
        </el-menu>
        <router-view></router-view>
    </div>
</template>

<script>
export default {
    name: "index"
}
</script>

<style scoped>

</style>
insert.vue
<template>
    <div>
        <el-form :model="ruleForm" status-icon  label-width="100px" class="demo-ruleForm" style="margin-top:30px;width: 30%;">
            <el-form-item label="姓名" prop="pass">
                <el-input type="text" v-model="ruleForm.name" ></el-input>
            </el-form-item>
            <el-form-item label="年龄" prop="checkPass">
                <el-input type="text" v-model="ruleForm.age" ></el-input>
            </el-form-item>
            <el-form-item>
                <el-b开发者_开发培训utton type="primary" @click="submitForm('ruleForm')">提交</el-button>
            </el-form-item>
        </el-form>
    </div>
</template>

<script>
export default {
    name: "insert",
    data() {
        return {
            ruleForm: {
                name: '',
                age: ''
            }
        };
    },
    methods: {
        submitForm(formName) {
            this.$refs[formName].validate((valid) => {
                if (valid) {
                    alert('submit!');
                } else {
                    console.log('error submit!!');
                    return false;
                }
            });
        },
    }
}
</script>

<style scoped>

</style>
selectOne.vue
<template>
    <div>
        <el-form :model="ruleForm" status-icon label-width="100px" class="demo-ruleForm"
                 style="margin-top:30px;width: 30%;">
            <el-form-item label="ID" prop="pass">
                <el-input type="text" v-model="ruleForm.id"></el-input>
            </el-form-item>
            <el-form-item label="姓名" prop="pass">
                <el-input type="text" v-model="ruleForm.name"></el-input>
            </el-form-item>
            <el-form-item label="年龄" prop="checkPass">
                <el-input type="text" v-model="ruleForm.age"></el-input>
            </el-form-item>
            <el-form-item>
                <el-button type="primary" @click="submitForm('ruleForm')">提交</el-button>
                <el-button @click="resetForm('ruleForm')">重置</el-button>
            </el-form-item>
        </el-form>
    </div>
</template>

<script>
export default {
    name: "selectOne",
    data() {
        return {
            ruleForm: {
                id: '',
                name: '',
                age: ''
            }
        };
    },
    methods: {
        submitForm(formName) {
            this.$refs[formName].validate((valid) => {
                if (valid) {
                    alert('submit!');
                } else {
                    console.log('error submit!!');
                    return false;
                }
            });
        },
        resetForm(formName) {
            this.$refs[formName].resetFields();
        }
    }
}
</script>

<style scoped>

</style>
selectAll.vue
<template>
    <div>
        <template>
            <el-table
                  :data="tableData"
                  style="width: 60%;margin-top:30px;">
                <el-table-column
                      prop="id"
                      label="ID"
                      width="180">
                </el-table-column>
                <el-table-column
                      prop="name"
                      label="姓名"
                      width="180">
                </el-table-column>
                <el-table-column
                      prop="age"
                      label="年龄">
                </el-table-column>
                <el-table-column
                      label="操作">
                    <template>
                        <el-button type="warning" size="small">修改</el-button>
                        <el-button type="danger" size="small">删除</el-button>
                    </template>
                </el-table-column>
            </el-table>
        </template>
    </div>
</template>

<script>
export default {
    name: "selectAll",
    data() {
        return {
            tableData: []
        }
    }
}
</script>

<style scoped>

</style>
update.vue
<template>
    <div>
        <el-form :model="ruleForm" status-icon label-width="100px" class="demo-ruleForm"
                 style="margin-top:30px;width: 30%;">
            <el-form-item label="ID" prop="pass">
                <el-input type="text" v-model="ruleForm.id"></el-input>
            </el-form-item>
            <el-form-item label=javascript"姓名" prop="checkPass">
                <el-input type="text" v-model="ruleForm.name"></el-input>
            </el-form-item>
            <el-form-item label="年龄" prop="age">
                <el-input type="text" v-model="ruleForm.age"></el-input>
            </el-form-item>
            <el-form-item>
                <el-button type="warning" @click="submitForm('ruleForm')">修改</el-button>
            </el-form-item>
        </el-form>
    </div>
</template>

<script>
export default {
    name: "update",
    data() {
        return {
            ruleForm: {
                id: '',
                name: '',
                age: ''
            }
        };
    },
    methods: {
        submitForm(formName) {
            this.$refs[formName].validate((valid) => {
                if (valid) {
                    alert('submit!');
                } else {
                    console.log('error submit!!');
                    return false;
                }
            });
        },
        resetForm(formName) {
            this.$refs[formName].resetFields();
        }
    }
}
</script>

<style scoped>

</style>
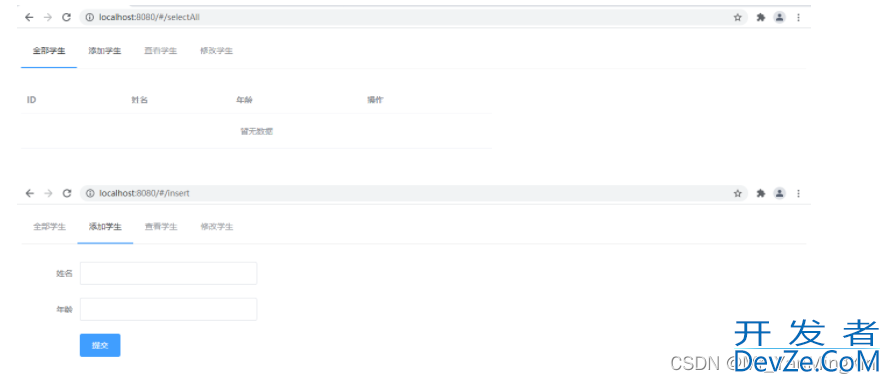
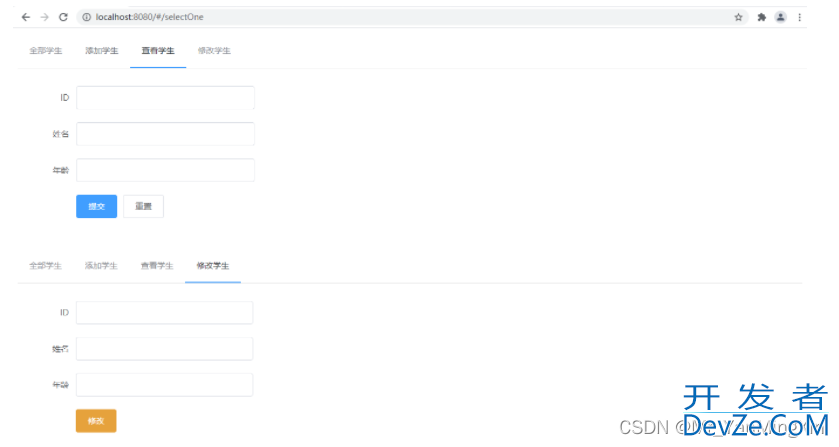
效果
3.7 整合axios与Spring Boot后端交互
npm install axios --save
insert.vue
<template>
    <div>
        <el-form :model="ruleForm" status-icon label-width="100px" class="demo-ruleForm"
                 style="margin-top:30px;width: 30%;">
            <el-form-item label="姓名" prop="pass">
                <el-input type="text" v-model="ruleForm.name"></el-input>
            </el-form-item>
            <el-form-item label="年龄" prop="checkPass">
                <el-input type="text" v-model="ruleForm.age"></el-input>
            </el-form-item>
            <el-form-item>
                <el-button type="primary" @click="submitForm()">提交</el-button>
            </el-form-item>
        </el-form>
    </div>
</template>

<script>
import axios from 编程客栈'axios'

export default {
    name: "insert",
    data() {
        return {
            ruleForm: {
                name: '',
                age: ''
            }
        };
    },
    methods: {
        submitForm() {
            axios.post("http://localhost:8081/student/save", this.ruleForm).then(function (resp) {
                console.log(resp)
            })
        },
    }
}
</script>

<style scoped>

</style>
selectOne.vue
<template>
    <div>
        <el-form :model="ruleForm" status-icon label-width="100px" class="demo-ruleForm"
                 style="margin-top:30px;width: 30%;">
            <el-form-item label="ID" prop="pass">
                <el-input type="text" v-model="ruleForm.id"></el-input>
            </el-form-item>
            <el-form-item label="姓名" prop="pass">
                <el-input type="text" v-model="ruleForm.name"></el-input>
            </el-form-item>
            <el-form-item label="年龄" prop="checkPass">
                <el-input type="text" v-model="ruleForm.age"></el-input>
            </el-form-item>
        </el-form>
    </div>
</template>

<script>
import axios from "axios";

export default {
    name: "selectOne",
    data() {
        return {
            ruleForm: {
                id: '',
                name: '',
                age: ''
            }
        };
    },
    methods: {
        getStudent() {
            const _this = this;
            axios.get("http://localhost:8081/student/findById/" + this.$route.query.id).then(function (resp) {
                _this.ruleForm = resp.data;
            })
        }
    },
    created() {
        this.getStudent();
    }
}
</script>

<style scoped>

</style>
selectAll.vue
<template>
    <div>
        <template>
            <el-table
                  :data="tableData"
                  style="width: 60%;margin-top:30px;">
                <el-table-column
                      prop="id"
                      label="ID"
                      width="180">
                </el-table-column>
                <el-table-column
                      prop="name"
                      label="姓名"
                      width="180">
                </el-table-column>
                <el-table-column
                      prop="age"
                      label="年龄">
                </el-table-column>
                <el-table-column
                      label="操作">
                    <template slot-scope="scope">
                        <el-button type="primary" size="small" @click="select(scope.row)">查看</el-button>
                        <el-button type="warning" size="small" @click="update(scope.row)">修改</el-button>
                        <el-button type="danger" size="small" @click="remove(scope.row)">删除</el-button>
                    </template>
                </el-table-column>
            </el-table>
        </template>
    </div>
</template>

<script>
import axios from "axios";

export default {
    name: "selectAll",
    data() {
        return {
            tableData: []
        }
    },
    methods: {
        getData() {
            const _this = this;
            axios.get("http://localhost:8081/student/findAll").then(function (resp) {
                _this.tableData = resp.data;
            })
        },
        remove(stu) {
            const _this = this;
            if (confirm("确定删除吗?")) {
                axios.delete("http://localhost:8081/student/remove/" + stu.id).then(function (resp) {
                    if (resp.data == 1) {
                        _this.getData();
                    }
                })
            }
        },
        select(stu) {
            this.$router.push({
                path: "/selectOne",
                query:{
                    id: stu.id
                }
            })
        },
        update(stu) {
            this.$router.push({
                path: "/www.devze.comupdate",
                query:{
                    id: stu.id
                }
            })
        }
    },
    created() {
        this.getData();
    }
}
</script>

<style scoped>

</style>
update.vue
<template>
    <div>
        <el-form :model="ruleForm" status-icon label-width="100px" class="demo-ruleForm"
                 style="margin-top:30px;width: 30%;">
            <el-form-item label="ID">
                <el-input type="text" v-model="ruleForm.id" disabled></el-input>
            </el-form-item>
            <el-form-item label="姓名">
                <el-input type="text" v-model="ruleForm.name"></el-input>
            </el-form-item>
            <el-form-item label="年龄">
                <el-input type="text" v-model="ruleForm.age"></el-input>
            </el-form-item>
            <el-form-item>
                <el-button type="warning" @click="submitForm()">修改</el-button>
            </el-form-item>
        </el-form>
    </div>
</template>

<script>
import axios from "axios";

export default {
    name: "update",
    data() {
        return {
            ruleForm: {
                id: '',
                name: '',
                age: ''
            }
        };
    },
    methods: {
        submitForm() {
            axios.post("http://localhost:8081/student/update", this.ruleForm).then(function (resp) {
                console.log(resp)
            })
        },
        getStudent() {
            const _this = this;
            axios.get("http://localhost:8081/student/findById/" + this.$route.query.id).then(function (resp) {
                _this.ruleForm = resp.data;
            })
        }
    },
    created() {
        this.getStudent();
    }
}
</script>

<style scoped>

</style>
4 总结
到此这篇关于手把手教你如何搭建SpringBoot+Vue前后端分离的文章就介绍到这了,更多相关SpringBoot+Vue前后端分离内容请搜索我们以前的文章或继续浏览下面的相关文章希望大家以后多多支持我们!


 加载中,请稍侯......
精彩评论