RocketMQ producer容错机制源码解析
目录
- 1. 前言
- 2. 失败重试
- 3. 延迟故障
- 3.1 最普通的选择策略
- 3.2 延迟故障的实现
1. 前言
本文主要是介绍一下RocketMQ消息生产者在发送消息的时候发送失败的问题处理?这里有两个点,一个是关于消息的处理,一个是关于broker的处理,比如说发送消息到broker-a的broker失败了,我们可能下次就不想发送到这个broker-a,这就涉及到一个选择broker的问题,也就是选择MessageQueue的问题。
2. 失败重试
其实失败重试我们在介绍RocketMQ消息生产者发送消息的时候介绍过了,其实同步发送与异步发送都会失败重试的,比如说我发送一个消息,然后超时了,这时候在MQProducer层就会进行控制重试,默认是重试2次的,加上你发送那次,一共是发送3次,如果重试完还是有问题的话,这个android时候就会抛出异常了。
我们来看下这一块的代码实现( DefaultMQProducerImpl 类sendDefaultImpl方法):

这块其实就是用for循环实现的,其实不光RocketMQ,分布式远程调用框架Dubbo的失败重试也是用for循环实现的。
3. 延迟故障
我们都知道,在RocketMQ中一个topic其实是有多个MessageQueue这么一个概念的,然后这些MessageQueue可能对应着不同的broker name,比如说id是0和1的MessageQueue 对应的broker name是 broker-a ,然后id是2和3的MessageQueue对应的broker name 是broker-b
我们发送消息的时候,其实涉及到发送给哪个MessageQueue这么一个问题,当然我们可以在发送消息的时候指定这个MessageQueue,如果你不指定的话,RocketMQ就会根据MQFaultStrategy 这么一个策略类给选择出来一个MessageQueue。
我们先来看下是在哪里选择的,其实就是在我们重试的循环中: org.apache.rocketmq.client.impl.producer.DefaultMQProducerImpl#sendDefaultImpl
...
// 重试发送
for (; times < timesTotal; times++) {
    String lastBrokerName = null == mq ? null : mq.getBrokerName();
    // todo 选择message queue
    MessageQueue mqSelected = this.selectOneMessageQueue(topicPublishInfo, lastBrokerName);
    ...
我们可以看到,它会把topicPublishInfo 与 lastBrokerName 作为参数传进去,topicPublishInfo 里面其实就是那一堆MessageQueue, 然后这个lastBrokerName 是上次我们选择的那个broker name , 这个接着我们来看下这个selectOneMessageQueue实现:
public MessageQueue selectOneMessageQueue(final TopicPublishInfo tpInfo, final String lastBrokerName) {
    // todo
    return this.mqFaultStrategy.selectOneMessageQueue(tpInfo, lastBrokerName);
}
可以看到它调用了MQFaultStrategy 这个类的selectOneMessageQueue 方法,我们接着进去:
public MessageQueue selectOneMessageQueue(final TopicPublishInfo tpInfo, final String lastBrokerName) {
    // 发送延迟故障启用,默认为false
    if (this.sendLatencyFaultEnable) {
        try {
            // 获取一个index
            int index = tpInfo.getSendwhichQueue().getAndIncrement();
            for (int i = 0; i < tpInfo.getMessageQueueList().size(); i++) {
                int pos = Math.abs(index++) % tpInfo.getMessageQueueList(开发者_开发学习).size();
                if (pos < 0)
                    pos = 0;
                MessageQueue mq = tpInfo.getMessageQueueList().get(pos);
                // 选取的这个broker是可用的 直接返回
                if (latencyFaultTolerance.isAvailable(mq.getBrokerName()))
                    return mq;
            }
            // 到这里 找了一圈 还是没有找到可用的broker
            // todo 选择 距离可用时间最近的
            final String notBestBroker = latencyFaultTolerance.pickOneAtLeast();
            int writeQueueNums = tpInfo.getQueueIdByBroker(notBestBroker);
            if (writeQueueNums > 0) {
                final MessageQueue mq = tpInfo.selectOneMessageQueue();
                if (notBestBroker != null) {
                    mq.setBrokerName(notBestBroker);
                    mq.setQueueId(tpInfo.getSendWhichQueue().getAndIncrement() % writeQueueNums);
                }
                return mq;
            } else {
                latencyFaultTolerance.remove(notBestBroker);
            }
        } catch (Exception e) {
            log.error("Error occurred when selecting message queue", e);
        }
        return tpInfo.selectOneMessageQueue();
    }
    // todo
    return tpInfo.selectOneMessageQueue(lastBrokerName);
}
这种延迟故障策略其实是由sendLatencyFaultEnable来控制的,它默认是关闭的。
3.1 最普通的选择策略
我们先来看下最普通的选择策略,可以看到调用了TopicPublishInfo 的selectOneMessageQueue方法:
public MessageQueue selectOneMessageQueue(final String lastBrokerName) {
    // 消息第一个发送的时候 还没有重试 也没有上一个brokerName
    if (lastBrokerName == null) {
        return selectOneMessageQueue();
    } else {
        // 这个 出现在重试的时候
        for (int i = 0; i < this.messageQueueList.size(); i++) {
            int index = this.sendWhichQueue.getAndIncrement();
            int pos = Math.abs(index) % this.messageQueueList.size();
            if (pos < 0)
                pos = 0;
            MessageQueue mq = this.messageQueueList.get(pos);
            // 避开 上次发送的brokerName
            if (!mq.getBrokerName().equals(lastBrokerName)) {
                return mq;
            }
        }
        // todo 到最后 没有避开  只能随机选一个
        return selectOneMessageQueue();
    }
}
它这里里面分成了2部分,一个是没有 这个lastBroker的,也就是这个这个消息还没有被重试过,这是第一次发送这个消息,这个时候它的lastBrokerName就是null,然后他就会直接走selectOneMessageQueue 这个无参方法。
public MessageQueue selectOneMessageQueue() {
    // 相当于 某个线程轮询
    int index = this.sendWhichQueue.getAndIncrement();
    int pos = Math.abs(index) % this.messageQueueList.size();
    if (pos < 0)
        pos = 0;
    return this.messageQueueList.get(pos);
}
先是获取这个index ,然后使用index % MessageQueue集合的大小获得一个MessageQueue集合值的一个下标(索引),这个index 其实某个线程内自增1的,这样就形成了某个线程内轮询的效果。这个样子的话,同步发送其实就是单线程的轮询,异步发送就是多个线程并发发送,然后某个线程内轮询,我们看下他这个单个线程自增1效果是怎样实现的。
public class ThreadLocalIndex {
    private final ThreadLocal<I编程nteger> threadLocalIndex = new ThreadLocal<Integer>();
    private final Random random = new Random();
    public int getAndIncrement() {
        Integer index = this.threadLocalIndex.get();
        // 如果不存在就创建  然后设置到threadLocalIndex中
        if (null == index) {
            index = Math.abs(random.nextInt());
            this.threadLocalIndex.set(index);
        }
        index = Math.abs(index + 1);
        this.threadLocalIndex.set(index);
        return index;
    }
}
可以看到这个sendWhichQueue 是用ThreadLocal实现的,然后这个样子就可以一个线程一个index,而且不会出现线程安全问题。
好了这里我们就把这个消息第一次发送时候MessageQueue看完了,然后我们再来看下它其他重试的时候是怎样选择的,也就是lastBrokerName不是null的时候:
public MessageQueue selectOneMessageQueue(final String lastBrokerName) {
    // 消息第一个发送的时候 还没有重试 也没有上一个brokerName
    if (lastBrokerName == null) {
        return selectOneMessageQueue();
    } else {
        // 这个 出现在重试的时候
        for (int i = 0; i < this.messageQueueList.size(); i++) {
            int index = this.sendWhichQueue.getAndIncrement();
            int pos = Math.abs(index) % this.messageQueueList.size();
            if (pos < 0)
                pos = 0;
            MessageQueue mq = this.messageQueueList.get(pos);
            // 避开 上次发送的brokerName
            if (!mq.getBrokerName().equals(lastBrokerName)) {
                return mq;
            }
        }
        // todo 到最后 没有避开  只能随机选一个
        return selectOneMessageQueue();
    }
}
这里其实就是选择一个不是lastBrokerName 的MessageQueue,可以看到它是循环 MessageQueue 集合大小数个,这样可能把所有的MessageQueue都看一遍,注意 这个循环只是起到选多少次的作用,具体的选择还是要走某线程轮询的那一套,到最后是在是选不出来了,也就是没有这一堆MessageQueue都是在lastBrokerName上的,只能调用selectOneMessageQueue轮询选一个了。
到这我们就把最普通的选择一个MessageQueue介绍完了。
3.2 延迟故障的实现
下面我们再来介绍下那个延迟故障的实现,这个其实就是根据你这个broker 的响应延迟时间的大小,来影响下次选择这个broker的权重,他不是绝对的,因为根据它这个规则是在找不出来的话,他就会使用那套普通选择算法来找个MessageQueue。
它是这样一个原理:
- 在每次发送之后都收集一下它这次的一个响应延迟,比如我10点1分1秒200毫秒给broker-a了一个消息,然后到了10点1分1秒900毫秒的时候才收到broker-a 的一个sendResult也就是响应,这个时候他就是700ms的延迟,它会跟你就这个300ms的延迟找到一个时间范围,他就认为你这个broker-a 这个broker 在某个时间段内,比如说30s内是不可用的。然后下次选择的时候,他在第一轮会找那些可用的broker,找不到的话,就找那些上次不是这个broker的,还是找不到的话,他就绝望了,用最普通的方式,也就是上面说的那种轮询算法找一个MessageQueue出来。
接下来我们先来看下它的收集延迟的部分,是这个样子的,还是在这个失败重试里面,然后它会在响应后或者异常后面都加一行代码来收集这些延迟:
...
// todo 进行发送
sendResult = this.sendKernelImpl(msg, mq, communicationMode, sendCallback, topicPublishInfo, timeout - costTime);
endTimestamp = System.currentTimeMillis();
// todo isolation 参数为false(看一下异常情况)
this.updateFaultItem(mq.getBrokerName(), endTimestamp - beginTimestampPrev, false);
...
这是正常响应后的,注意它的isolation 参数,也就是隔离 是false,在看下异常的
...
catch (RemotingException e) {
    endTimestamp = System.currentTimeMillis();
    this.updateFaultItem(mq.getBrokerName(), endTimestamp - beginTimestampPrev, true);
    log.warn(String.format("sendKernelImpl exception, resend at once, InvokeID: %s, RT: %sms, Broker: %s", invokeID, endTimestamp - beginTimestampPrev, mq), e);
    log.warn(msg.toString());
    exception = e;
    continue;
}
...
他这个isolation 参数就是true ,也就是需要隔离的意思。
public void updateFaultItem(final String brokerName, final long currentLatency, boolean isolation) {
    // todo
    this.mqFaultStrategy.updateFaultItem(brokerName, currentLatency, isolation);
}
可以看到是调用了mqFaultStrategy 的updateFaultItem 方法:
public void updateFaultItem(final String brokerName, final long currentLatency, boolean isolation) {
    // 是否开启延迟故障容错
    if (this.sendLatencyFaultEnable) {
        // todo 计算不可用持续时间
        long duration = computeNotAvailableDuration(isolation ? 30000 : currentLatency);
        // todo 存储
        this.latencyFaultTolerance.updateFaultItem(brokerName, currentLatency, duration);
    }
}
先是判断是否开启了这个延迟故障的这么一个配置,默认是不启动的,但是你可以自己启动set下就可以了setSendLatencyFaultEnable(true)
DefaultMQProducer producer = new DefaultMQProducer("please_rename_unique_group_name");
producer.setNamesrvAddr("127.0.0.1:9876");
producer.setSendLatencyFaultEnable(true);
首先是计算这个它认为broker不可用的这么一个时间,参数就是你那个响应延迟,熔断的话就配置30000毫秒, 否则的话就是正常的那个响应时间
/**
 * 计算不可用持续时间
 * @param currentLatency 当前延迟
 */
private long computeNotAvailableDuration(final long currentLatency) {
    // latencyMax = {50L, 100L, 550L, 1000L, 2000L, 3000L, 15000L};
    // notAvailableDuration = {0L, 0L, 30000L, 60000L, 120000L, 180000L, 600000L};
    // 倒着遍历
    for (int i = latencyMax.length - 1; i >= 0; i--) {
       编程客栈 // 如果延迟大于某个时间,就返回对应服务不可用时间,可以看出来,响应延迟100ms以下是没有问题的
        if (currentLatency >= latencyMax[i])
            return this.notAvailableDuration[i];
    }
    return 0;
}
他这个计算规则是这个样子的,他有两个数组,一个是响应延迟的,一个是不可使用的时间,两个排列都是从小到大的顺序,倒着先找响应延迟,如果你这个延迟大于某个时间,就找对应下标的不可使用的时间,比如说响应延迟700ms,这时候他就会找到30000ms不可使用时间。
计算完这个不可使用时间后接着调用了latencyFaultTolerance的updateFaultItem方法,这个方法其实就是用来存储的:
public void updateFaultItem(final String name, final long currentLatency, final long notAvailableDuration) {
    // 从缓存中获取
    FaultItem old = this.faultItemTable.get(name);
    // 缓存没有的情况
    if (null == old) {
        final FaultItem faultItem = new FaultItem(name);
        // 设置延迟
        faultItem.setCurrentLatency(currentLatency);
        // 设置启用时间
        faultItem.setStartTimestamp(System.currentTimeMillis() + notAvailableDuration);
        // 设置faultItemTable 中
        old = this.faultItemTable.putIfAbsent(name, faultItem);
        // 如果已经有了,拿到 老的进行更新
        if (old != null) {
            old.setCurrentLatency(currentLatency);
            old.setStartTimestamp(System.currentTimeMillis() + notAvailableDuration);
        }
    } else {
        // 缓存中已经有了,直接拿老的进行更新
        old.setCurrentLatency(currentLatency);
        old.setStartTimestamp(System.currentTimeMillis() + notAvail编程客栈ableDuration);
    }
}
他有个faultItemTable 这个缓存,记录着 每个broker的FaultItem的项,这个FaultItem就是保存它能够使用的一个时间(当前时间戳+不可使用时间),其实这个方法就是做更新或者插入操作。
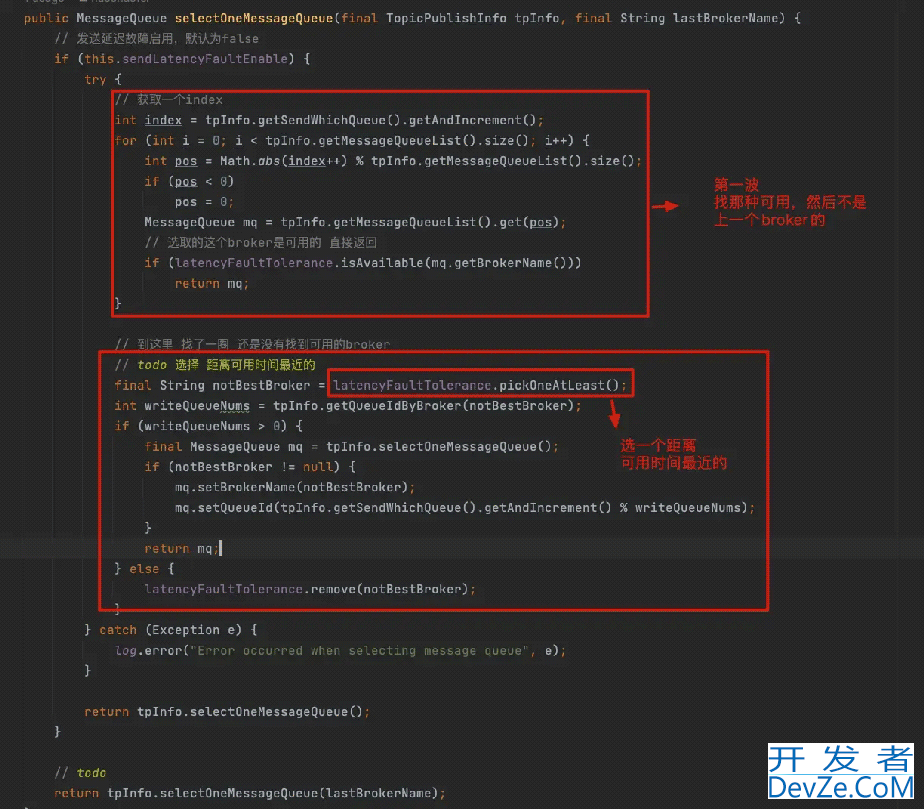
好了到这我们就把它这个收集响应延迟指标与计算可用时间这快就解析完了,再回头看下那个选择MessageQueue的方法:

可以看到它先是找那种可用的,然后不是上一个broker的那个,如果好几轮下来没有找到的话就选择一个
public String pickOneAtLeast() {
    // 将map中里面的放到tmpList 中
    final Enumeration<FaultItem> elements = this.faultItemTable.elements();
    List<FaultItem> tmpList = new LinkedList<FaultItem>();
    while (elements.hasMoreElements()) {
        final FaultItem faultItem = elements.nextElement();
        tmpList.add(faultItem);
    }
    // 如果不是null
    if (!tmpList.isEmpty()) {
        // 洗牌算法
        Collections.shuffle(tmpList);
        // 排序
        Collections.sort(tmpList);
        final int half = tmpList.size() / 2;
        // 没有 2台机器
        if (half <= 0) {
            // 选择第一个
            return tmpList.get(0).getName();
        } else {
            // 有2台机器及以上,某个线程内随机选排在前半段的broker
            final int i = this.whichItemWorst.getAndIncrement() % half;
            returpythonn tmpList.get(i).getName();
        }
    }
    return null;
}
先是排序,然后将所有的broker/2 ,如果是小于等于0的话,说明就2个broker以下,选第一个,如果是2台以上,就轮询选一个
先来看下排序规则:
/**
 * 失败条目(规避规则条目)
 */
class FaultItem implements Comparable<FaultItem> {
    // 条目唯一键,这里是brokerName
    private final String name;
    // todo currentLatency 和startTimestamp  被volatile修饰
    // 本次消息发送的延迟时间
    private volatile long currentLatency;
    // 故障规避的开始时间
    private volatile long startTimestamp;
    public FaultItem(final String name) {
        this.name = name;
    }
    @Override
    public int compareTo(final FaultItem other) {
        // 将能提供服务的放前面
        if (this.isAvailable() != other.isAvailable()) {
            if (this.isAvailable())
                return -1;
            if (other.isAvailable())
                return 1;
        }
        // 找延迟低的 放前面
        if (this.currentLatency < other.currentLatency)
            return -1;
        else if (this.currentLatency > other.currentLatency) {
            return 1;
        }
        // 找最近能提供服务的  放前面
        if (this.startTimestamp < other.startTimestamp)
            return -1;
        else if (this.startTimestamp > other.startTimestamp) {
            return 1;
        }
        return 0;
    }
它是把能提供服务的放前面,然后没有,就找那种延迟低的放前面,也没有的话就找最近能提供服务的放前头。 找到这个broker 之后然后根据这个broker name 获取写队列的个数,其实你这个写队列个数有几个,然后你这个broker对应的MessageQueue就有几个,如果write size >0的话,然后这个broker 不是null,就找一个mq,然后设置上它的broker name 与queue id
如果write<=0,直接移除这个broker对应FaultItem,最后实在是找不到就按照上面那种普通方法来找了。
好了,到这我们延迟故障也介绍完成了。
参考文章
RocketMQ4.8注释github地址
RocketMQ源码分析专栏
以上就是RocketMQ producer容错机制源码解析的详细内容,更多关于RocketMQ producer容错机制的资料请关注我们其它相关文章!


 加载中,请稍侯......
精彩评论