WPF实现可视化扫码器的示例代码
目录
- 概述
- 摄像头调度
- 二维码识别
- 源代码
概述
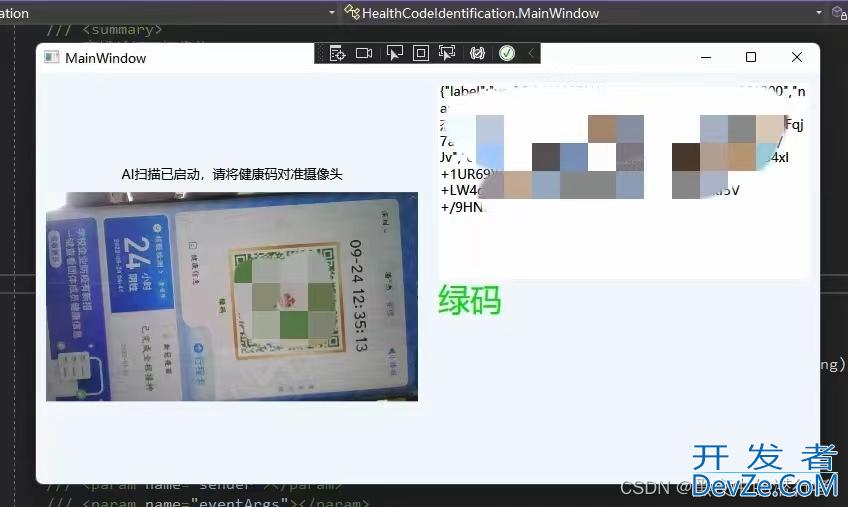
以识别粤康码识别为例。现在的深圳进出小区、商场、办公楼、乘坐公共交通工具等都需要出示并扫描健康码,也被称之为“电子哨兵”。不多说那个用的是一般的扫码枪。
摄像头调度
调度摄像头选择使用 AForge.NET
AForge.NET 是一个专门为开发者和研究者基于C#框架设计的,他包括计算机视觉与人工智能,图像处理,神经网络,遗传算法,机器学习,模糊系统,机器人控制等领域。AForge.Net 是C#的一个图像计算机视觉库,该库是一个开源项目,提供很多图像的处理,和视频处理功能。
官方地址:http://www.aforgenet.com/
需要引入三个NuGet包:
- AForge
- AForge.Video
- AForge.Video.DirectShow
如何使用这里先不介绍,后面有完整代码
二维码识别
需要的NuGet包:ZXing.Net
ZXing.Net 是由 Google ZXing 移植并优化改进而来的。
Google ZXing 是目前一个常用的基于Java实现的多种格式的1D/2D条码图像处理库。
这支持的编码方式种类相对齐全,并且支持可移植库。
如何使用这里先不介绍,后面有完整代码
源代码
<Window
    x:Class="HealthCodeIdentification.MainWindow"
    XMLns="http://schemas.microsoft.com/winfx/2006/xaml/presentation"
    xmlns:x="http://schemas.microsoft.com/winfx/2006/xaml"
    xmlns:d="http://schemas.microsoft.com/expression/blend/2008"
    xmlns:local="clr-namespace:HealthCodeIdentification"
    xmlns:mc="http://schemas.openxmlformats.org/markup-compatibility/2006"
    Title="MainWindow"
    Width="800"
    Height="450"
    WindowstartupLocation="CenterScreen"
    mc:Ignorable="d">
    <Grid Background="AliceBlue">
        <Grid.ColumnDefinitions>
            <ColumnDefinition />
            <ColumnDefinition />
        </Grid.ColumnDefinitions>

        <StackPanel
            Grid.Column="0"
            Margin="10"
            VerticalAlignment="Center">
            <Textblock
                x:Name="txtTips"
                Margin="0,10"
                HorizontalAlignment="Center" />
            <Image x:Name="imageVideo" />
        </StackPanel>

        <Grid Grid.Column="1" Margin="10">
            <Grid.RowDefinitions>
                <RowDefinition />
                <RowDefinition />
            </Grid.RowDefinitions>

            <TextBox
                x:Name="txtInfo"
                BorderThickness="0"
                TextWrapping="Wrap" />

            <TextBlock
                x:Name="txtCodeColor"
                Grid.Row="1"
                FontSize="32">
                <TextBlock.Style>
                    <Style TargetType="TextBlock">
                        <Style.Triggers>
                            <Trigger Property="Text" Value="绿码">
                                <Setter Property="Foreground" Value="#0d0" />
                            </Trigger>
                            <Trigger Property="Text" Value="黄码">
                                <Setter Property="Foreground" Value="Yellow" />
                            </Trigger>
                            <Trigger Property="Text" Value="红码">
                                <Setter Property="Foreground" Value="Red" />
                            </Trigger>
                        </Style.Triggers>
                    </Style>
                </TextBlock.Style>
            </TextBlock>

        </Grid>
    </Grid>
</Window>
using AForge.Video.DirectShow;
using Newtonsoft.json;
using System;
using System.Drawing;
using System.Drawing.Imaging;
using System.IO;
using System.Threading;
using System.Threading.Tasks;
using System.Windows;
using System.Windows.Media.Imaging;
using ZXing;

namespace HealthCodeIdentification
{
    /// <summary>
    /// MainWindow.xaml 的交互逻辑
    /// </summary>
    public partial class MainWindow : Window
    {
        private FilterInfoCollection _videoDevices;
        private VideoCaptureDevice _videoSource;

        public MainWindow()
        {
            InitializeComponent();
            Loaded += MainWindow_Loaded;
            Closed += MainWindow_Closed;
        }

        private void MainWindow_Loaded(object sender, RoutedEventArgs e)
        {
            OpenVidejavascriptoCaptureDevice();
        }

        private void MainWindow_Closed(object sender, EventArgs e)
        {
            if (_videoSource is null) return;
            _videoSource.SignalToStop();
        }

        /// <summary>
        /// 查找并打开摄像头
        /// </summary>
        private void OpenVideoCaptureDevice()
        {
            _videoDevices = new FilterInfoCollection(FilterCategory.VideoInputDevice);

            if (_videoDevices.Count > 0)
            {
                _videoSource = new VideoCaptureDevice(_videoDevices[0].MonikerString);
                _videoSource.NewFrame += _camera_NewFrame;
                _videoSource.Start();
                txtTips.Text = "AI扫描已启动,请将健康码对准摄像头";
                return;
            }

            MessageBox.Show("请连接摄像头!", "提示", MessageBoxButton.OK, MessageBoxImage.Warning);
        }

        /// <summary>
        /// 加载视频
        /// </summary>
        /// <param name="sender"></param>
        /// <param name="eventArgs"></param>
        private async void _camera_jsNewFrame(object sender, AForge.Video.NewFrameEventArgs eventArgs)
        {
            var image = eventArgs.Frame.Clone();
            Image videoImage = (Bitmap)image;
            Bitmap bitmapImage = (Bitmap)image;

            //image.RotateFlip(RotateFlipType.RotateNoneFlipX); // 设开发者_JS培训置图像旋转

            Graphics g = Graphics.FromImage(videoImage);

            //SolidBrush brush = new SolidBrush(Color.Red);
            //g.DrawString($"时间:{DateTime.Now:yyyy年MM月dd日 HH时mm分ss秒}", new Font("Arial", 18), brush, new PointF(5, 5));
            //brush.Dispose();
            //g.Dispose();

            MemoryStream ms = new MemoryStream();www.devze.com
            videoImage.Save(ms, ImageFormat.Bmp);
            ms.Seek(0, SeekOrigin.Begin);

            BitmapImage bi = new BitmapImage();
            bi.BeginInit();
            bi.StreamSource = ms;
            bi.EndInit();
            bi.Freeze();

            await Dispatcher.BeginInvoke(new ThreadStart(async delegate
             {
                 imageVideo.Source = bi;
                 await QRCodeReader(bitmapImage);
             }));
        }

        private async Task<Task> QRCodeReader(Bitmap bitmap)
        {
            await Dispatcher.BeginInvoke(new ThreadStart(delegate
            {
                BarcodeReader barcodeReader = new BarcodeReader();
                var result = barcodeReader.Decode(bitmap);
                if (result != null)
                {
                    txtInfo.Text = result.ToString();
                    if (result.ToString().StartsWith(http://www.devze.com"{"))
                    {
                        var data = JsonConvert.DeserializeObject<CodeData>(result.ToString());
                        switch (data.c.ToUpper())
                        {
                            case "G":
                                txtCodeColor.Text = "绿码";
                                break;
                            case "Y":
                                txtCodeColor.Text = "黄码";
                                break;
                            case "R":
                                txtCodeColor.Text = "红码";
                                break;
                        }
                    }
                }
            }));
            return Task.CompletedTask;
        }
    }

    public class CodeData
    {
        public string label { get; set; }
        public string cid { get; set; }
        public string cidtype { get; set; }
        public string name { get; http://www.devze.comset; }
        public string phone { get; set; }
        public string encode { get; set; }
        /// <summary>
        /// 颜色,绿码G,黄码Y,红码R
        /// </summary>
        public string c { get; set; }
        public string t { get; set; }
        public string v { get; set; }
        public string s { get; set; }
    }
}

以上就是wpF实现可视化扫码器的示例代码的详细内容,更多关于WPF可视化扫码器的资料请关注我们其它相关文章!


 加载中,请稍侯......
精彩评论