Centos8安装mysql8的详细过程(免安装版/或者二进制包方式安装)
目录
- 二进制包方式安装
- 一、首先检查服务器上是否安装有mysql:
- 二、开始安装配置mysql
- 在Navicat上测试连接
二进制包方式安装
一、首先检查服务器上是否安装有mysql:
第一步:查看mysql安装版本
rpm -qa|grep -i mysql第二步:卸载Mysql
rpm -ev --nodeps 【上一步查询到的mysql版本名称】最后删除关于mysql相关的文件夹:查找根目录下所有者是mysql和有mysql名称的文件
find / -user mysqlfind / -name mysql把查找出的目录文件删除:rm -rf 路径二、开始安装配置mysql
mysql-8.0.30-linux-glibc2.12-x86_64.tar.xz
网址:MySQL :: Download MySQL Community Server (Archived Versions)
")
上传到服务器上,解压,然后改名,copy到想要的安装目录(/usr/local/)
目录计划:
安装目录:/usr/local/mysql
data 目录:/data/mysql/data/
日志位置:/data/mysql/mysql_error.err
xz -d  tar xvf mysql-8.0.30-linux-glibc2.12-x86_64.tar.xz
tar xvf mysql-8.0.30-linux-glibc2.12-x86_64.tar
mv mysql-8.0.30-linux-glibc2.12-x86_64 mysql
mv mysql /usr/local/
创建mysql用户和android用户组
groupadd mysql
useradd -r -g mysql -s /bin/false mysql
将安装目录所有者及所属组改为mysql ,并创建相关文件夹
cd /usr/local/
chown -R mysql:mysql /usr/local/mysql/
ll
mkdir -p /data/mysql/{data,backup,scripts,binlog}
ll /data/mysql/
chown -R mysql:mysql /data/mysql/
添加环境变量,并修改my.cnf配置文件
echo "export PATH=$PATH:/usr/local/mysql/bin"  >>  /etc/profile
source /etc/profile
vi /etc/my.cnf
[mysqld]
user=mysql
port=3306
#basedir=/data/mysql
datadir = /data/mysql/data/
defa开发者_PostgreSQLult_authentication_plugin=mysql_native_password
log_error=/data/mysql/mysql_error.err
max_connections=10000
max_connect_errors=10
character-set-server=utf8mb4
default-storage-engine=INNODB
default_authentication_plugin=mandroidysql_native_password
[mysql]
default-character-set=utf8mb4
初始化mysql数据库
mysqld --initialize --user=mysql
/data/mysql/mysql_error.err里记录了 mysql初始密码
")
将mysql加入到服务,并设置开机自启,启动mysql
cp /usr/local/mysql/support-files/mysql.server /etc/init.d/mysqld
chkconfig mysqld on
systemctl start mysqld
连接mysql
遇到报错
[root@localhost mysql]# mysql -uroot -p
mysql: error while loading shared libraries: libtinfo.so.5: cannot open shared object file: No such file or directory
解决方案:
[rooandroidt@localhost mysql]# sudo ln -s /usr/lib64/libtinfo.so.6.1 /usr/lib64/libtinfo.so.5
再次连接SQL
[root@localhost mysql]# mysql -uroot -p
Enter password:
Welcome to the MySQL monitor.  Commands end with ; or \g.
Your MySQL connection id is 8
Server version: 8.0.30

Copyright (c) 2000, 2022, Oraclpythone and/or its affiliates.

oracle is a registered trademark of Oracle Corporation and/or its
affiliates. Other names may be trademarks of their respective
owners.

Type 'help;' or '\h' for help. Type '\c' to clear the current input statement.
# 修改初始密码
mysql> alter user root@localhost identified by '111111';
Query OK, 0 rows affected (0.00 sec)
mysql> use mysql
Reading table information for completion of table and column names
You can turn off this feature to get a quicker startup with -A

Database changed#设置远程连接
mysql> update user set host='%' where user='root';
Query OK, 1 row affected (0.00 sec)
Rows matched: 1  Changed: 1  Warnings: 0
# 刷新权限
mysql> FLUSH PRIVILEGES;
Query OK, 0 rows affected (0.00 sec)
# 赋权限
mysql> grant all privileges on *.* to 'root'@'%' with grant option;
Query OK, 0 rows affected (0.00 sec)#刷新权限
mysql> FLUSH PRIVILEGES;
Query OK, 0 rjsows affected (0.00 sec)
mysql> quit
#刷新权限
systemctl restart mysql
or
service mysql restart
重启服务且测试
systemctl restart mysqlorservice mysql restart
查看防火墙开放端口
firewall-cmd --list-all
在防火墙中将3306端口开放
firewall-cmd --zone=public --add-port=3306/tcp --permanent
firewall-cmd --reload
//--permanent为永久生效,没有此参数 服务器重启后配置失效
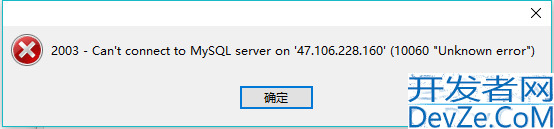
在Navicat上测试连接
重启linux后测试自启动(可选)
reboot测试mysql服务是否自启动
systemctl status mysql
参考文献:
(1条消息) Linux下免安装版本的mysql5.7
到此这篇关于Centos8安装mysql8的详细过程(免安装版/或者二进制包方式安装)的文章就介绍到这了,更多相关Centos8上安装mysql8内容请搜索我们以前的文章或继续浏览下面的相关文章希望大家以后多多支持我们!


 加载中,请稍侯......
精彩评论